I’ll begin with a disclaimer, I’m not a bleeding edge competitive player. I do like to play lists that I consider to be strong and have an advantage in most situations, but I always add a twist to make the army more enjoyable for myself to play. Today, I’d like to present a primer or guide to playing a slightly off-meta variant in the present gamestate.
With that in mind, over the past four or five months, I’ve almost exclusively become a Krennic/Bossk (or Krossk) player. When Bossk released originally, he took the meta by storm, as we were in the peak of the basic DLT and Z6 gunline spam. However, the state of Legion has shifted dramatically, with large ranged and melee dice pools ruling the day, and Bossk has taken a back seat.
In my quest to bring Bossk back to the forefront, I’ve developed two versions of Krossk for the modern meta. I’m going to first quickly discuss the two lists and then dive into how I play them.

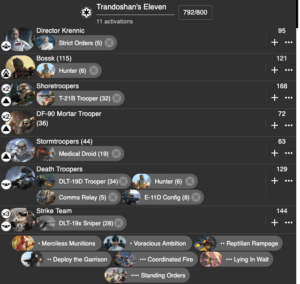
The first list, at 11 activations, was what I took to the Las Vegas Open (LVO). I managed to run the table day one and make day two, but unfortunately fell in the first round of the finals to finish the tournament at 4-1. This version focuses on Bossk as a playmaker. By equaling or out-activating opposing lists and utilizing Krennic’s cunning, it focuses on “last-firsting” with Bossk and keeping him safe via this manner.
However, I ran into two main problems with this list: it doesn’t have enough firepower, and it is vulnerable to having weak activations picked off; which ruins the last-first setup. Three sniper teams and two mortars present opportunities for an opponent to easily whack an activation turn one, which is a huge setback. In terms of firepower, I found that if I lost one shore squad early I didn’t have enough dice left to win a protracted game or to deal with armor; and I needed more than the naked medic storm.
The change I made was actually to drop to 10 activations, combine the 3rd sniper and naked medic storm into a full T21 shoretrooper with a medic, and add Aggressive Tactics to Krennic, as well as tweaking the command hand. It functions as a classic Krennic shoreline list, but with Bossk in the place of the second deathtrooper squad.
I run a small bid in this list, between 6-8 points. I do not want to play Limited Visibility or Recover the Supplies, and I don’t feel comfortable dropping the upgrades I have to bid higher than the tauntaun lists. Realistically, I expect tauntaun players to be bidding 12 or more, so I plan to outbid the normal lists and just deal the the tauntauns as they come.
Let’s talk tactics shall we?
- Last-First
- Ranges
- Jedi
- Tauns
- Command Cards
Last-First
The most important aspect of Krossk is being able to last-first with a desired unit, generally Bossk. What this means is going last with a given unit on a turn, and then immediately dropping a “quick” command card to go first on the next turn with the same unit. The classic example is using Bossk’s Lying in Wait card to build aims, go last, pop and out throw five crits into a unit, and then follow up with Reptilian Rampage or Voracious Ambition so that Bossk can finish off the unit and then duck behind line of sight blocking terrain.
One of the great things about having three shores, Bossk, and a DT squad is that you have a number of high powered targets for a last-first. Especially with using Voracious and the DT’s Comms Relay, you have the ability to have near perfect control over your “first” unit for the turn, and can capitalize on an exposed enemy unit.
This tactic is not unique to this list style, as it is one of the main aspects of Legion, but it is essential to running a gunline effectively.
Ranges
Especially with the newest update to the Rules Reference Guide (Feb. 28, 2020), measuring ranges has become even more important, and even simpler to accomplish. You are now able to measure movement as well as range at any time, so the amount of information available to you is nearly limitless.
Of the units available in this list, every unit except for Krennic has the ability to reach at least range four, and the shoretroopers and deathtroopers are devastating at range three. Unfortunately, there is not a solid melee threat in Krossk, so maintaining that range advantage is crucial. The basic concept here is to attempt to maintain exact ranges so that the opponent is not able to easily close the gap to your lines.
You’re about to see why that is.
Jedi
I’m about to drop some hard hitting analysis here, Luke Skywalker is incredibly strong. He’s also very common (contrary to LVO 2020) so you will be seeing a lot of him. I’m going to focus on Luke in this section, but the same principles apply to opposing Dooku, Vader, Grievous, and Kenobi.
I discussed this in an earlier article, but the Charge distance for Luke is 11.9 inches, which is just short of range two. When force push is added to the equation, the charge range remains at 11.9, but Luke’s ability to start an engagement increases to 15.8 inches, or approximately range two and a half.
Going back to the range section above, it is incredibly simple for you to measure this attempt to zone out a Jedi’s charge range for as long as possible. Now, this is much easier said than done, and a weakness of this list is melee units, so this idea should be used to keep the Jedi out until you have positioned the rest of your army to respond.
Let’s use a practical example of opposing an Operative Vader list. Generally clocking in at 10 activations, it also has some weak activations in the form of snipers or mortars that you can leverage your ranged firepower advantage to eliminate. Your first turn or two should be spent attempting to whittle down the opponent’s activation count, so that by the time Vader hits your lines in round three or four, you are up on units and can last first him. To be clear, Vader will get to you (provided a balanced terrain setup) and he will kill a unit of yours, so the trick is to manage how and where he enters the melee, which can be accomplished by knowing his movement and melee ranges.
One tactic I like to do, when possible, is to gain a 2 activation advantage on the jedi’s gunline, and then bait Vader or Luke with a unit that is just on the edge of their range. By sacrificing a unit of yours while you are ahead in numbers, you can force the jedi out of position, and simply wait to withdraw at the end of the turn once your opponent is out of activations. This definitely does not occur every time, and many high level opponents will not fall for the trick, but it can present a wrinkle that forces an opponent’s mistake.
Tauntauns (and Dewbacks?)
To a certain extent, everything I wrote above applies to tauntauns as well, you just increase the ranges they can move and account for the range two pistol shot.
The differences come in how to approach them. You have access to at least four suppressive weapons in Krossk; and they all come with range four. If you have the opportunity to put 4 suppression onto a tauntaun unit before it activates, it can be useful, as even with Strict Orders they would be down to one action (barring an extremely lucky rally roll). However, this is not something you can rely on, as a good player will only expose their tauntauns if they have an order token faceup, or are in no danger of needing the second action/panicking.
The best advice I have for dealing with tauns is simple: just shoot them. It is not always possible, and you may have a table in which they are hidden, but the Krossk list has a huge critical potential, and any sightlines to the tauns should be exploited whenever possible.
Command Cards
To finish up today, I’ll briefly go over the main tactic or strategy I like to use for each command card in the hand. Every player has a different style, but this is how I like to utilize my cards. A common theme you will see here is that both Krennic’s and Bossk’s cards are flexible.
Voracious Ambition: I like to use VA as a jack of all trades card, whether that’s ensuring that I can go before an opponent’s 1 pip activation, or giving myself total order control on a late game turn when I need to push the pedal down. My most frequent use is after Bossk uses Reptilian Rampage to get three consecutive attacks on an opponent via a last-first.
Merciless Munitions: It works 60% of the time, everytime. But honestly, 60% of the time this card is just ambush for Bossk. The rest of the time, its split between area denial on objectives such as Key Positions or Intercept the Transmission and getting through a guaranteed wound via poison on a high-save hero. I did have a neat corner case play this past weekend, where I was able to poison an opposing Luke for his sixth wound and then shoot and wipe a tauntaun unit as well.
Deploy the Garrison: DTG is my favorite command card in the game. It’s versatile, “fast,” and has a great effect. Coming as a surprise to none, the best tactic (in my opinion) with DTG is to help zone out tauntauns and jedi from making the first action of the turn safely by dropping standbys right in their path. Even if they have to use a sniper to pick off the standby, the positive order control gives you flexibility to respond to their next move.
Reptilian Rampage: To me, this is Bossk’s best card. Flexible, deadly, and unique; it allows Bossk to adapt to any situation. Playing breakthrough and you need to get to the zone? Tripe move. Need to kill an opponent’s mini? Double attack and trigger hunter. In a dangerous spot? Shoot then double move. The free move action is fantastic, and allows you to adapt to what your opponent is doing. I find myself using it most often for a double shot and then move into line of sight blocking cover.
Assault/Coordinated Fire: I’m going to include these together, as I find I use them in the same manner, especially with the three shores version of the list. In both situations, I play the card when I want to go second in the turn, or if I know I’m already in position and want to leverage the aims and surges the shoreline provides. Ya know, the basics.
Lying in Wait: In my opinion, LIW is a mistake punisher, and if your opponent doesn’t make one turn one or two, it frequently goes to waste. I find it most useful if you can hit a full shore squad, armor, or a non pierce immune hero. I recently dropped this card from my hand to play assault and coordinated fire.
Krossk is by far my favorite list, and while it’s not a fully meta list, I think it has legs. My 10 activation version throws a metric ton of dice, has flexible command cards, and has the bounty wild card. Try it out for yourself and see how you like it. Just make sure you keep Bossk out of sight of enemy armor, as he will likely die almost instantaneously. If you have any questions or comments, feel free to tag me on Discord or Facebook, and I’d be more than happy to discuss with you. Enjoy the crits!