This week we take a gander at the newest Empire gunline hotness for Star Wars Legion: Shoretroopers.
Update: The new RRG has made it such that mortars can no longer take comms relay. Some portions of this article are undergoing edits. Don’t worry, Shores are still great.
This article will focus on both Shoretroopers and their accompanying emplacement, the DF-90 Mortar Trooper.
Generally speaking we are talking about the Shores when equipped with their excellent T-21B heavy upgrade. You pretty much always want that.
Let’s start, as usual, with some strengths and weaknesses.
Strengths:
- Hit like a truck
- Hit like a bigger truck with a face up order (Target)
- Hit like a ridiculously large truck with a face up order plus a surge (Aggressive Tactics)
- Free aims
- Benefit from surge tokens in both directions (offense and defense)
- Easy to chain orders with Coordinate and Relay and get face up orders
- Solid range 4 chip damage through dodge/cover/guardian with T-21B
- Shore/Mortar combination is cheaper than 2 DLT Storms
Weaknesses
- Expensive (individually) for a corps unit
- Vulnerable to pierce (like all red save units)
- Unreliable Impact damage compared to DLT Storms
Well, one of those lists is a fair bit shorter than the other.
Let’s hit their unit card and the mortar’s unit card, and then we will talk about some list ideas and the Shoretroopers’ two most important abilities: Coordinate and Target.
Shoretroopers
52 points, four models. A little pricey, but you get a lot for buying the elite corps of the Empire (apparently there are a lot of beachheads that need protecting?).
Defense: Red dice, 1 health per mini. Same as Stormtroopers… which isn’t great, given their cost. You are getting a lot of bang for your buck elsewhere, though.
Offense: E-22, 1 black dice. This is one of the main reasons these guys are more expensive than Stormtroopers. When you add in a sexy heavy upgrade like the T-21B, and free aim tokens and surge tokens, those black dice form a really spicy base for your attack pool.
Courage: 1, standard corps fare. However… Shores are really easy to get mass face-ups on every turn (yup, even your one pip turns), so this is much easier to mitigate with Strict Orders than on other corps (more on that later). I would also strongly recommend running them with Krennic; since they get free aims anyway, Compel essentially allows you to move, aim, and shoot every turn whether they are suppressed or not.
Slots: One heavy, one personnel, one training, one gear, one grenade. You are definitely going to be filling the first of these most of the time, though they have some great gear upgrades as well. That training slot is going to be pretty solid once Offensive Push hits the table.
Coordinate: Emplacement Trooper; This is amazing. You can basically make this read, Coordinate: Anything. More on that in a minute.
Target 1: Free aims with face up orders are solid. Free aims on units that hit like a truck are amazing. Free aims on units that get to hand out free face up orders to other units with Target are even better.
DF-90 Mortar Trooper
36 points, awesome. It is hard to complain about anything for that price.
Defense: 3 wounds, red saves. For its cost, this is excellent.
Offense: DF-90 Mortar, 3 white, Critical 1, more keyword soup. This thing is great for its cost (whether you are fire supporting or not). We’ll dedicate a whole section to it later when we hit weapon stats.
Detachment: Shoretroopers. Can’t take this thing without taking a unit of Shoretroopers first. That is probably a good thing, given how awesome it is.
Fire Support: Neat with some specific combos, but hardly necessary. There are some pretty significant costs to fire supporting, but luckily this thing is solid firing just on its own.
Full Pivot, Reposition: Standard fare for emplacements. Don’t forget that pivot doesn’t count against Cumbersome (so you can pivot and still fire the mortar).
Sentinel: Range 3 standby if you have nothing better to do.
And you get an order, and you get an order…
(and an aim token, and a surge token…)
Before we get to upgrades, list ideas, and tactics, I am going to lead with Coordinate, because it is essentially their unit defining ability when combined with Target.
Shoretroopers want face up orders. This is very different from most other corps units, who don’t receive any particular benefit from orders, unless you are running Strict Orders. They get a free aim with Target, and they get strong benefits as well from Strict Orders and the new Aggressive Tactics upgrade.
Another related concept here is equally important: Mortars don’t need face up orders. I know it feels like you are “wasting” fire support. You aren’t. These bad boys don’t need fire support at all.
Fire support has several costs associated with it. Let’s go over them real quickly.
- You lose an action (because you are essentially just attacking; usually this is an aim token)
- You go down an activation for the turn
- You lose a suppression (since you are combining two ranged attacks into one)
- You lose a face-up order (the free one from Coordinate)
Okay, so those are pretty steep costs. What do you gain?
- A larger dice pool
- Counting cover once instead of twice
The latter bullet often doesn’t come into play anyway, since two of the three die facings on the mortar’s pool are critical hits. As we will see in the stats section, fire supporting doesn’t actually do more damage, even into heavy cover.
There are a couple situations where you want to fire support; when you have gobs of aim tokens on the supported unit (Lying in Wait comes to mind), or when you can combine pools to straight up eliminate an activation at the start of a turn, especially a high threat one like a tauntaun. Otherwise, you generally just want to be aiming and shooting with your mortars.
Why is this important?
Coordinate
Shoretroopers have Coordinate: Emplacement trooper. Given we’ve established that Shoretroopers really want face up order tokens and mortars don’t need them, wouldn’t it be great if your Shoretroopers could just use this to generate free orders to give to their other Shoretrooper brethren, who could then generate more free orders?
Well… you can! There is this handy little upgrade called Comms Relay.
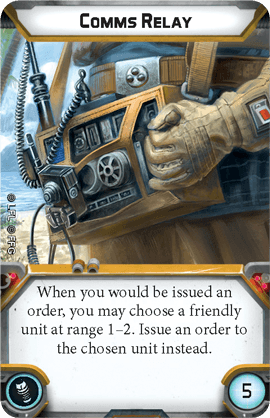
Put this bad boy on your possibly-already-under-costed mortar, and for just 5 points you’ve turned Coordinate: Emplacement trooper into Coordinate: Anything.
Before we go any further, I want to say this is definitely not the only way to play Shoretroopers. But it is definitely my favorite way.
So how does this work?
Suppose you have three Shoretroopers, and three Mortars. Shoretrooper 1 gets an order. Shore #1 uses Coordinate to get a free order and give it to Mortar #1, which uses Comms Relay to bounce that order to Shore #2. Shore #2 then gets another free order from Coordinate, gives it to Mortar #2, which uses Comms Relay to bounce it to Shore #3. Rinse, repeat.

This starts to get pretty amazing when you combine it with Strict Orders and Aggressive Tactics. Each Shoretrooper gets a free aim token from Target, a free surge token from Aggressive Tactics, and can pick up a suppression with Strict Orders. If you set your list up correctly, you can do this every turn. You do have to be mindful of positioning, since Coordinate is Range 1 and Relay is Range 2. You usually want to do some honey-combing, which basically means you want to have your dudes in a couple of overlapping lines across your front (think like a hex grid).
List Ideas
Let’s his some quick list ideas. There are basically four ways to kick off your Shoretrooper chain: Uplink, Entourage, Battle Meditation, or just a good old fashioned order from a command card. That last one is boring though and hardly necessary.
Krennic Shore Gunline
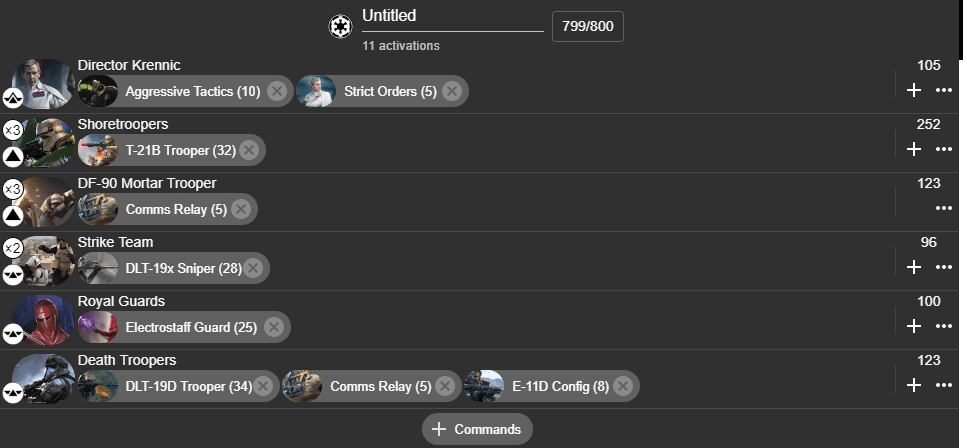
This is a pretty straightforward 3/3 gunline (three shores, three mortars). A lot of Empire players are running a variation of this recently, particularly in Invader League. You have Aggressive Tactics and Strict Orders for maximum face-up order benefit, and the Royal Guard to keep your Shores and Deathtroopers healthy while doubling as a counter-melee linebacker for those pesky tauntauns.
Here is how you would want to do your orders on a given turn:
Voracious Ambition: Relay Entourage order to Shore chain, Royal Guard or Sniper at end of chain; you will almost certainly draw a spec ops on your card, but if you don’t then you will have three specs ops in your bag, so you’ll have control of your Deathtroopers still.
Ambush: Give Entourage order to Deathtroopers, Ambush order to Shore chain, bounce to Royal Guard at end of chain.
Deploy the Garrison: Same as Ambush above, except you have one extra faceup, which you could give to a sniper, or one of the mortars if you want to do a fire support.
Coordinated Fire and Annihilation Looms: Plenty of orders to work with here. You should pretty much have face-ups on whatever you want.
Krennic/Operative (Bossk)

This is a riff on one of my favorite previous archetypes, Krennic/Bossk. You are a little light on “frontline” corps units with just 3, but this list dishes out a ton of suppression and firepower at range 4. Bossk and the Deathtroopers both have Hunter for bringing down tauntauns.
Aggressive tactics is somewhat less valuable in a list like this: I would cut Lying in Wait in favor of Coordinated Fire, so you are still getting surges on 4/6 turns. You can always bounce the order chain to Bossk to make sure you can wait to dump him some aims.
On your operative or one pip turns, you want to relay the Entourage order to the Shoretrooper chain. Otherwise it is basically the same concept as list #1 above.
You could swap in another Operative (Operative Vader or Boba Fett) instead of Bossk in this list structure and it works basically the same way, though Vader will require cutting an activation.
Veers, AT-ST, Shore Uplink
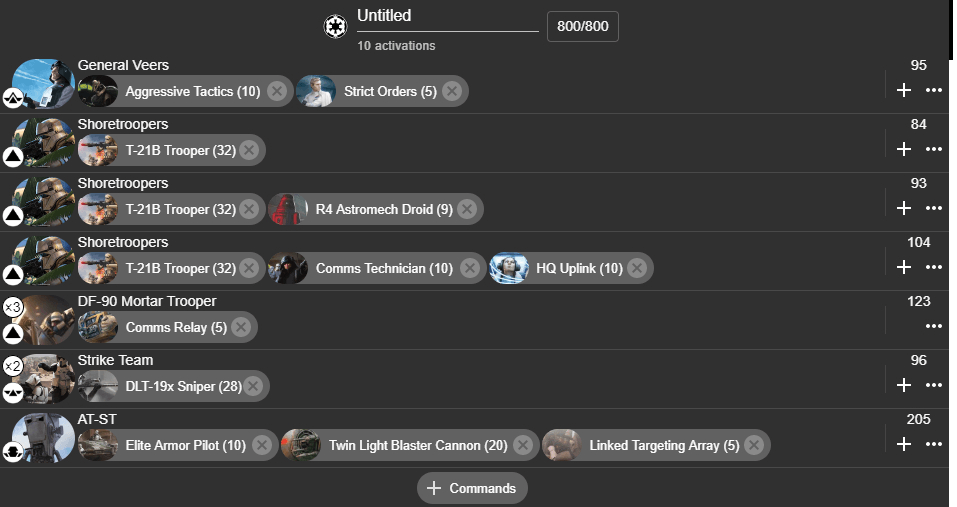
You can also do a 9 activation version of this with Krennic and Deathtroopers instead of Veers, which is probably even nastier. Of course you can also swap in the tank instead of the AT-ST if you prefer.
Make sure the AT-ST gets an order every turn for Linked Targeting Array (an excellent forthcoming upgrade released with Clone Wars). Note: It’s not in the core set, so you’ll need the card pack, Droidekas, or BARC expansions. With this upgrade, Spotter, and aim actions, your AT-ST is looking at a 9 dice pool with surge and 1-3 aims every turn, or 4+ on your Coordinated Fire turn. Oof.
Here’s how your chain shakes out:
Maximum Firepower: Order to Veers, activate uplink to chain shores, bounce to AT-ST at end of chain
Ambush: Same as above, or give order directly to Shores to start the bounce if your uplink is exhausted
Push: Order Shore to start chain and AT-ST
Pinned down: This one is a little tricky, since you can’t give one of the orders to your Shore chain. You’ll need the uplink here. This is one of the downsides to running Veers instead of Krennic.
Assault, Discipline: Same as Push above, plus some more unnecessary orders. Refresh uplink on Shores. You might even want to Fire Support on these turns, if you are into that sort of thing.
You can also run this with Krennic instead.
Palpatine Battle Meditation
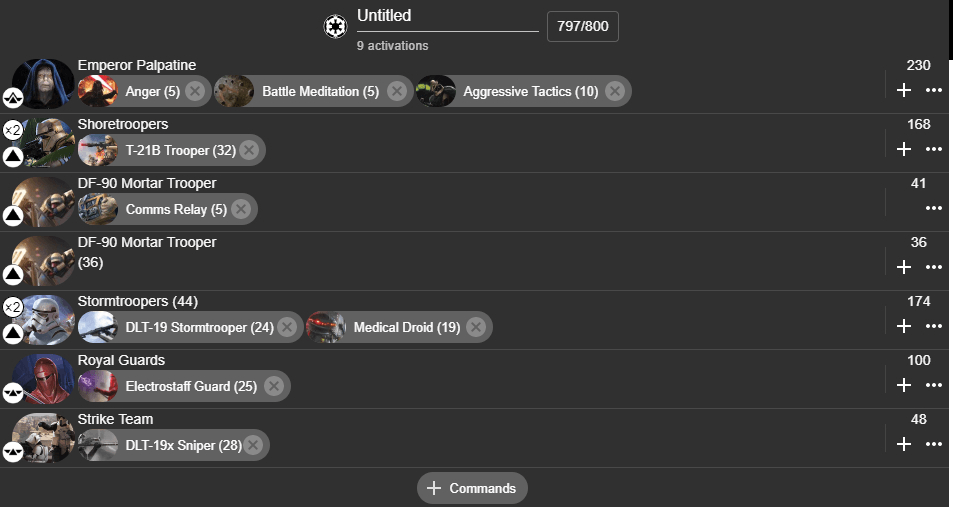
Let me talk about why this is good, and then we’ll hit how Battle Meditation plays into this.This might be my favorite one. I love me some Palpatine.
Aggressive Tactics gives your Shores, IRG, and possibly a sniper (depending on your command card) a surge token every turn, which of course the IRG can use for Guardian. You have two medics to keep Palpatine and the Guard alive. Don’t be afraid to use them on Shores either, but you might be living dangerously with no Esteemed Leader on Palpatine.
Pull the Strings is amazing on Shoretroopers, because they hit like a truck.
This list is designed to hard counter tauntauns and do reasonably well against gunlines. It is definitely outmatched it a straight fire fight against a Krennic gunline or Rotary club (three Rotary RTs). You’ll need to use And Now you Will Die to even the score at some point in those matchups.
So, why is Battle Meditation in here?
Palpatine needs orders, because he’s Palpatine. Your Shoretroopers also need orders, but Palpatine has at least two cards (And Now you Will Die and Give in to Your Anger) where only Palpatine can get an order. Royal Guard don’t have a comms slot like Deathtroopers, so you can’t bounce the Entourage order either.
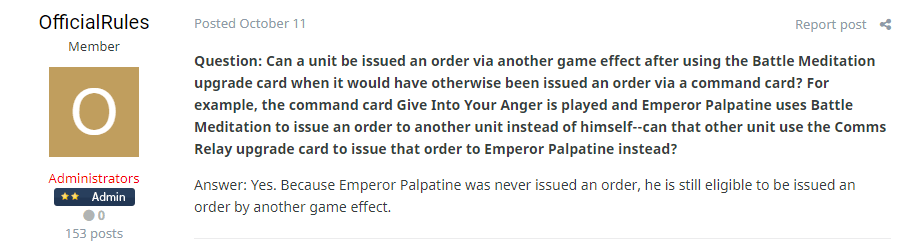
Luckily, you don’t have to. Battle meditation allows you to issue an order to any unit on the battlefield, including ignoring unit restrictions on the command card. This means on your Give in to Your Anger and Jazz Hands* turns, you can issue your one order straight to a Shoretrooper unit, who gets a free one from Coordinate, who gives it to a mortar, who bounces it to Palpatine. This strat is so janky it got its own forum ruling from FFG:
This list only has one relay because upgrades are so tight, but there are ways to run this list with a second one and some other upgrades if you are comfortable cutting one of the DLTs down to a second sniper instead.
So those are all solid list ideas, if you want to build a Shoretrooper chain.
Let’s move on to some tactics and then we will hit the weapon stats.
Tactics
Range 4
Take a look at those lists above. Each of them has at least six range 4+ weapons (the AT-ST one has 9!). Range gives you the power to dictate the terms of engagement, if you are patient enough.
If you are facing a Rebel list, for example, there is a good chance their only range 4+ weapons are snipers. If that is the case, don’t be afraid to utilize the mortars and T-21b to keep them at max range (exactly Range 4 if possible) and make them come to you while getting suppressed. Measuring to exactly range 4 is very important; a speed 2 move for a trooper is just under range 1, so if you shoot something that has a range 3 weapon (like a Z-6 squad) at exactly range 4, they won’t be able to move up and return fire if they clear their suppression. If they don’t clear their suppression, it will take them a full extra turn until they can get up into their effective engagement range. If you keep suppressing them continuously… well you get the idea.
It is tempting to want to move up and shoot in the Shoretroopers devastating Range 3 band. That is certainly advisable if you can delete something by doing so; but the T-21b in a pool by itself is still fairly strong, and if your opponent isn’t throwing any dice at all until Range 3, make them work for it to get there.
Obviously this is an objective based game, and you do need to actually take some board position at some point. Everything is a balance; keeping your opponent at arms length and bleeding their units needs to be weighed against how and when you can approach the objectives. Don’t forget it is a six turn game, though, and most objectives (except Recover) involve counting unit leaders at the end of the game.
Defensive Advantage
Creating a defensive advantage involves more than just range 4. It starts in list building and goes through to Turn 0. Generally in a Shoretrooper list you will want to be cutting Recover Supplies and Limited Visibility, almost without exception. You probably want to also cut Disarray, both because Tauntauns love Disarray and also because you are likely only running one commander.
For vetoes, you should be targeting all of the above (if you are red player), and Sabotage (as red player). Breakthrough can actually be okay for you depending on the match up, and both Key Positions and Intercept are solid as long as you aren’t up against Vader or Palpatine. Beyond that, you want to make sure you look very carefully at the terrain and think about your approaches to the important parts of the table. Generally you want to be creating long firing lanes for your opponent to approach the objectives whenever possible.
Be patient and let your opponent make mistakes. Shoretroopers are excellent at punishing positioning mistakes because of how hard they hit. If you can catch a vulnerable unit out of cover, you have a high chance of just straight deleting it.
Positioning and cohesion
Positioning is very important with Shoretroopers, particularly if you are running relays. Coordinate is only range 1, and comms relay is range 1-2, so you want to make sure you think very carefully about how you are going to bounce your orders around. If possible you want to create some overlap, in case one of your mortar relays gets taken out.
Cohesion plays a huge role in this. Range for coordinate is measured from any mini to any mini, which means you can spread out your effective Coordinate range by using cohesion. The speed 1 move tool gives you about 4″ of extra play in any given direction from your unit leader.
It is also worth mentioning mortar deployment here. It is tempting to try and drop them forward from your Shores to get some turn 1 shots, since they don’t have to be placed in your deployment zone per the detachment rules (just at speed 1 of your Shore unit leader). However, you generally want to keep your mortars behind your Shoretroopers whenever possible. If Shoretroopers are bricks, the mortars are the mortar that keeps your brick wall together (see what I did there?). A savvy opponent will try and eliminate them as quickly as possible to disrupt your relay chain. Don’t let them.
Handling Aggression
Nothing messes up a well oiled gunline like a lightsaber in its face or a creature trooper with a comms jammer. You want to keep these aggressive units at arms length and gun them down from range. All of the lists above have some kind of tool for that; overwhelming firepower and blocking (AT-ST), priority winning and movement restricting command cards (Krennic), or things that are even more dangerous at close range (Vader and Palpatine). Make sure you have a plan for dealing with units like Tauntauns, and focus them down as early and often as possible. If you are running Krennic, use Deploy the Garrison before the units in question engage you to hedge them out, or even just to win priority and create some extra deterrent around your line.
If you are dealing with multiple aggressive units like a triple tauntaun list, and they have already made it into or near your lines, prioritize the ones that have not yet activated before those that have. You will end up with some units tied up in engagement and others that aren’t. Use the free units to try and put some hurt on any unengaged, unactivated units before attempting to withdraw with the engaged ones to target those that have activated already. Lists with Vader or Palpatine give you some more tools to handle melee units that have already engaged, particularly Force Push (in Vader’s case) and Royal Guard with Pull the Strings (in Palpatine’s case).
Also, beware of the Emplacement withdrawal rules. Units cannot use free actions or any abilities while withdrawing, which means that emplacements cannot use reposition to pivot. In practice, this means if a creature troopper engages one of your mortars in its front arc, it will be completely unable to withdraw (since it cannot move forward through the creature trooper). Don’t let this happen, or be ready to clear them out with IRG or another melee unit when it does.
Weapon stats
Lets lead things off with a ginormous table. Blue/green is good/high, red is low. “c2” is cover 2. The fire support pools are highlighted in green.
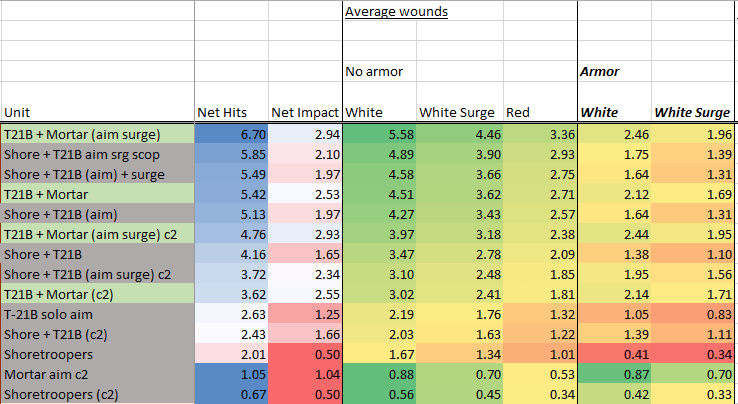
That’s a lot of info; let’s look at a few important points here.
T-21B
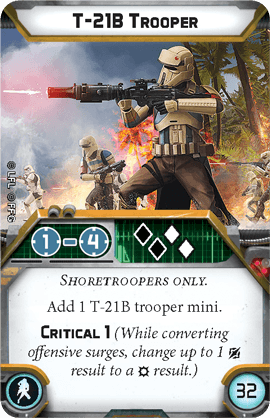
Well that’s a gun. Not only does the thing have Critical 1 and amazing dice, it’s range 4.
Shores by themselves average about 2 hits, which is mostly going to be bouncing off cover. Shoretroopers with a T-21B average 4.16 hits, before you start accounting for free aim tokens and such. While this gun only costs a little over half the amount of the base unit, it more than doubles their damage output. By contrast, the previous gold standard for Range 3 efficiency, the Z-6, also costs about half as much as the unit you are putting it on but only increases their output by 75%. And Rebel troopers don’t get free aim tokens.
When fired by itself at Range 4, if you have an aim from Target, you have an 82% chance to get at least one crit (not on this table). Think about it this way; a Rotary AT-RT, notorious for its crit generation capability, throws 5 dice at range 3. The T-21B throws 6 (4 base, 2 on aim reroll) at range 4. You also net an average of about 2 hits. Rebel Troopers hate this thing, with good reason. You want to be running your Shores with the T-21B.
Aims
It should go without saying that free aims are good. When Shoretroopers have one, with the main pool and T-21B combined, they average just over five hits. Ouch.
Of course, if you have more aims, say from like… the aim action, this gets even better.
Surge Tokens
Aggressive Tactics gives you surge tokens on your face-up orders, which as we discussed previously you want to be generating to proc Target. A surge token increases your average hits by about half a hit. Of course, you can also spend them on defense.
Targeting Scopes
These things are 4 points now. They are also great on units that get free aims; for a small investment you can increase the efficiency of each of your aim tokens by 50%. With Scopes, a Surge token, and one aim token (a very achievable setup in the lists above), Shoretroopers average just shy of six hits at Range 3. For reference, Deathtroopers with a DLT-19D average 4.625. Chew on that one for a minute.
Dat Mortar Tho
When aiming and shooting with this bad boy, it averages almost exactly one hit through heavy cover. You have a 75% chance to get at least one crit if you fire with an aim token. For reference, that is exactly the same chance to get at least one crit as an entire Z-6 Rebel Trooper unit. Not bad for 36 points! These things bleed opposing wounds and dish out lots of suppression if they get a nice lane to set up in.
Fire Support
That fire support pool is pretty strong; but is it better than just firing separately?
If you assume you have an aim and a surge token, the fire support pool does just an average of 4.76 hits into heavy cover. That’s quite good! However, if you add up the average hits separately done by a Shore unit with T-21B (with aim and surge) and a mortar with aim, both into heavy cover, you get…. 4.77. Even though you are counting cover twice, the mortar doesn’t really care about cover, you get an extra aim in the bargain (from the mortar’s aim action) and the final output is almost the same. The only benefit here to fire support is front loading your damage output to one activation instead of two. You give up an activation and a suppression token to do it. Choose carefully.
Summary
Well, that about wraps it up. Key points:
- Shores really want face-ups. Set this up efficiently with comms relay on your mortars and good list building.
- Shores hit like a truck, but they aren’t much more durable than Storms. Beware pierce weapons
- Aggressive units can ruin your gunline’s day. Plan accordingly and bring some counters.
- Fire support can be a trap. Think very carefully before you use it.
Go forth and defend all those beachheads.
*And Now You Will Die, for the uninitiated.
All mini images provided by Jagged Brush Studios
I am trying to build your Krennick Bosk list and it comes out to 876. Am I doing something wrong. Is there supposed to be only 1 scout trooper?