This week we take a look at the massive AAT Trade Federation Battle Tank for the Separatist Alliance.
This beast sits on a base that is nearly 6″ diameter which it barely fits on. Though it may be last among heavies in carrying case convenience, it is first in my heart.
We’ll break down the unit, look at some upgrades, and then hit a couple sample lists.
Check out more CIS unit guides below:
Strengths
- Durable
- Long ranged
- Native high velocity
- Strong damage
Weaknesses
- Vulnerable to pierce and save variance
- No access to repair
- Difficult to maneuver on tight boards
- Expensive
Overview
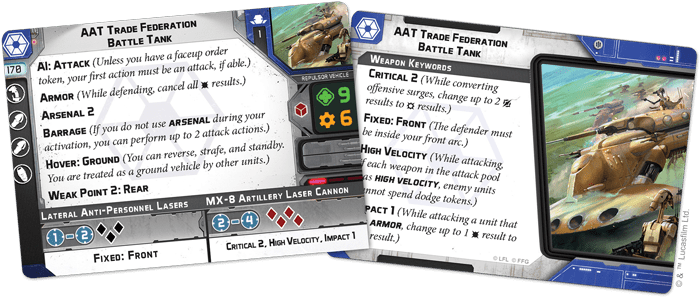
170 points. This is a lot, but it is downright affordable in the worlds of heavies. The challenge with CIS is their lack of a cheap support commander, so the expense hurts a little more than it would for some other factions.
Defense. Armor, red defense dice, 9 health, 6 resilience. Very solid. The health can disappear pretty quickly though with a couple of bad rolls or against weapons with both Pierce and Impact/Critical, so don’t be reckless. ARC snipers in particular shred this thing with their combination of Lethal and Critical, so be wary.
Offense: MX-8 Artillery Laser Cannon. Range 2-4, four red, critical 2, high velocity, Impact 1. Four dice isn’t a lot for a heavy, but they are red dice and therefore super reliable, and you can double tap with Barrage if you need to. High velocity on a main gun is great. Note this thing is not Fixed: Front, unlike nearly every other heavy main weapon.
Offense: Lateral Anti-Personnel Lasers. Three black, range 1-2. You won’t be using this much with the short range, but it can come in handy when your shells are exhausted and you need to move/shoot something close.
AI: Attack. You could certainly do worse with AI. Attacking is normally what the AAT wants to be doing anyway… though you should have a face up most of the time.
Barrage. You can perform two attacks. Straightforward and amazing.
Hover: Ground, Repulsor Vehicle. The combination of these keywords is sort of confusing; basically you treat it like a ground vehicle when it interacts with other units, and like a repulsor vehicle when it interacts with terrain. As a result the AAT displaces like a ground vehicle, but can move over terrain less than its height (as opposed to half its height like ground vehicles). It can also strafe via the side notches on the base.
Weak Point: Rear 2. Ouch. Don’t get shot in the ass. At least it doesn’t have Weak Point Sides like the Saber and Occupier.
Upgrades
Ordinance
High-Energy Shells
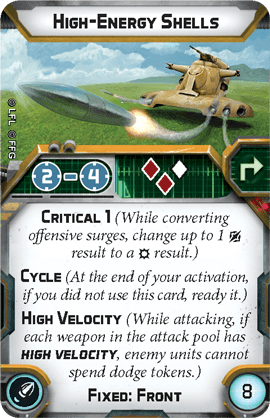
This is my favorite Ordinance upgrade for the AAT. It has everything you want; good dice, range 4, and the High Velocity combos with the main gun to give you the most potent dodge token ignoring attack pool in the game. Oh hey there Kenobi, I see you have six pointless dodge tokens.
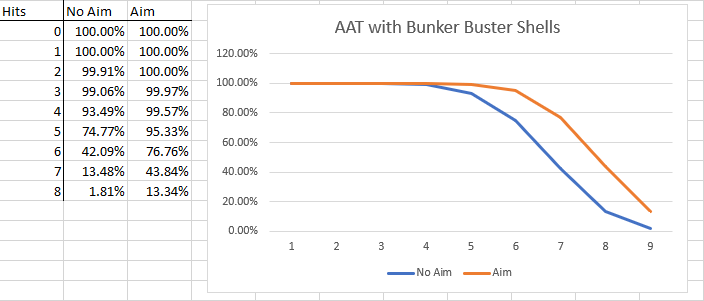
Below is what the attack pool looks like when you combo it with the main gun. All percentages in this article will be cumulative. For example, in the below chart, an AAT with main gun and HE shells has a 88.62% chance to get at least five hits.
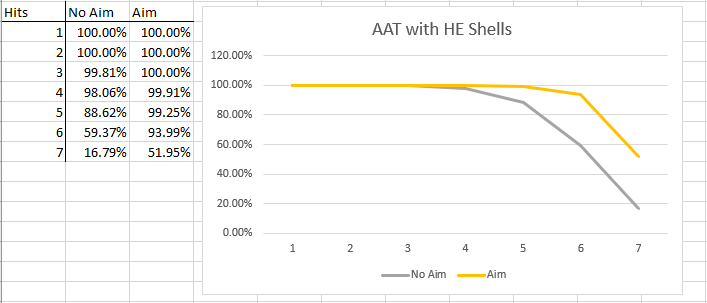
Note how much the aim token brings up the floor on this attack pool. Red dice are great, but you still want to be getting aim tokens whenever possible, from the aim action or Linked Targeting Array.
This is an extremely reliable pool. You have a more than 90% chance to get 6 hits with just one aim, and a more than 50/50 shot to max out at 7.
Bunker Buster Shells
The bunker buster shells combined with the main gun hit roughly as hard as the HE shells, though they ignore cover due to blast, so they usually hit quite a bit harder. The range 1-2 is very restrictive however, and it also makes it somewhat more difficult to combo these with the main gun, since they only overlap at Range 2.
Overall I think these are my least favorite shells on the AAT for these reasons. If you have 12 points lying around and already bought the HE shells, I could see it… but I never seem to have 12 points lying around.
Armor Piercing Shells
Impact 3 on a shell upgrade; yikes. Combined with Critical 2 from the main gun, you can make a pretty silly anti-armor attack pool. It isn’t quite as good as the AT-ST with it’s blaster cannon upgrade, but it is close.
Let’s look at the impact hits below; the non-impact hits are comparable to the other shells, and you aren’t taking AP shells to shoot at troopers anyway.
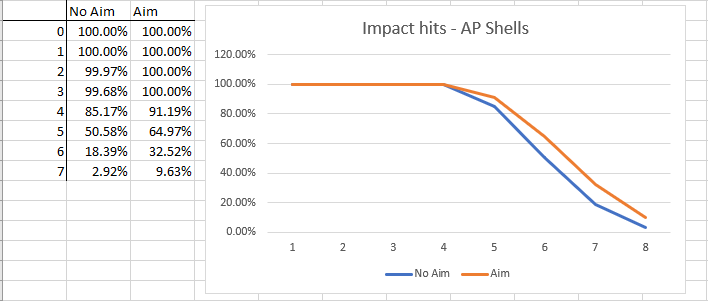
Without an aim you have a 50/50 chance to get at least 5 impact hits, and a 65% chance with an aim. The Range 3 isn’t great, but if you have 10 points lying around after buying your HE shells these make a great hedge against armor.
Pilots
Lok Durd
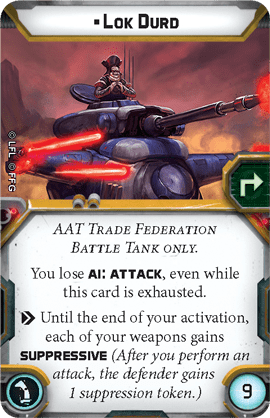
Lok Durd, complete with evil villain grin and steepled villain fingers. This comes from a clone wars episode where Lok Durd basically creates some kind of napalm shell.
Suppressive is a great effect, and losing AI: Attack is nice, too. If you recover with Lok Durd you will also refresh whatever shells you have.
T-Series Tactical Droid Pilot
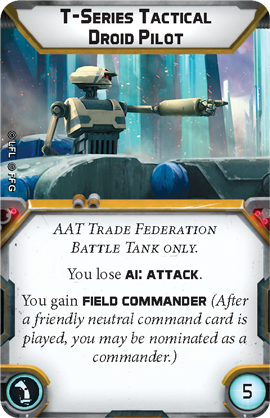
Field commander feels really niche; if you want to issue orders with neutral command cards you can do it from the tank instead of your commander. That is situationally useful, but not worth paying 5 points for. Losing AI: Attack is nice, but Lok Durd gives you that also, with a much more useful secondary ability.
OOM-Series Droid Pilot
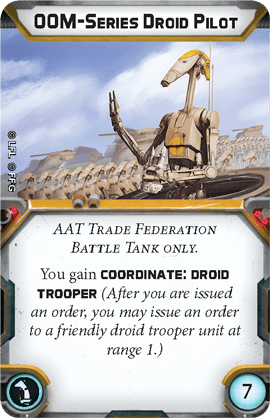
Now this is great. You can give your first order to the AAT and then bounce it to your B1 chain. If you are buying a pilot, I think the OOM-Series is the clear first choice.
Comms
Linked Targeting Array

Free aim on faceup order. Since you want to be giving the AAT orders anyway, this is a very solid comms upgrade. Aims may feel wasted on big pools of red dice, but they actually are not; as seen on the charts above for the shells, they bring your floor up quite a bit. Red dice do miss, especially when you roll a lot of them, but they have a very high chance to convert on a re-roll, so big pools with a lot of good dice are great candidates for aim tokens.
HQ Uplink
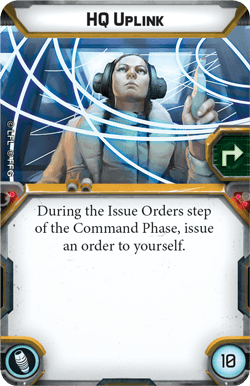
Always a great comms upgrade, HQ Uplink is also very solid on the AAT. I like pairing this with the OOM pilot if you take it, so you can bounce your free order to your B1 chain. Personally I prefer Linked Targeting Array, but I could definitely see Uplink in certain builds.
Sample Lists
Note these lists use BX droids as they are in Tabletop Simulator and Legion HQ.
Grievous Tank
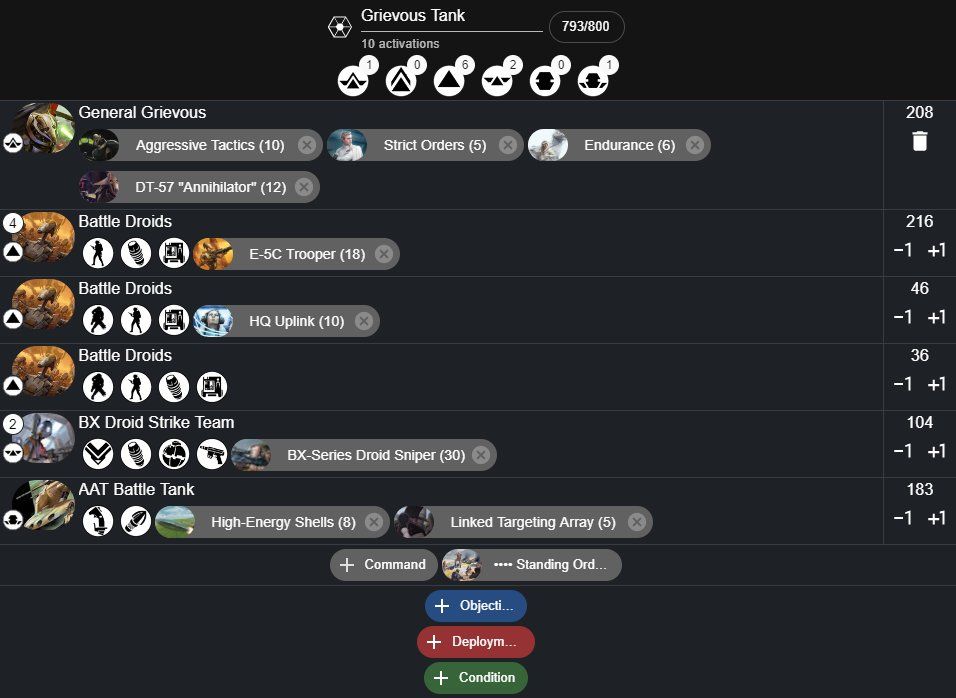
Grievous, some B1s with heavy upgrades, two sniper strikes, and a tank. Solid. The orders can occasionally get a little awkward, particularly on your Supreme Commander turn where there is no way to get the tank an order.
Dooku Tank
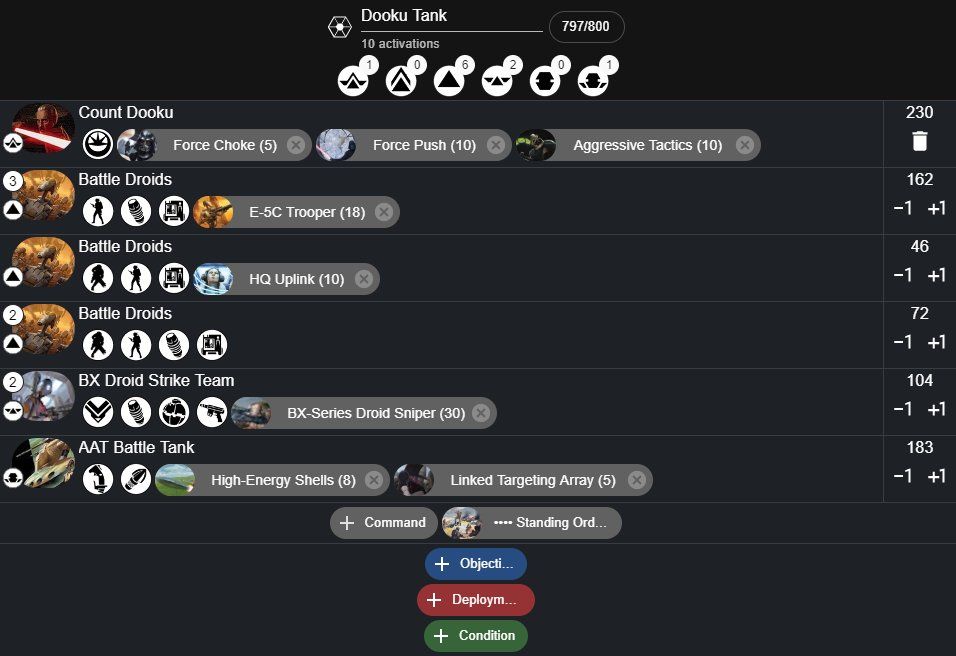
Slightly modified from the Grievous list above to fit Dooku. Three B1 heavy upgrades is rather light; I’ve also seen versions of this list that cut one of the sniper strikes to go down to 9 activations but fit in more B1 heavy upgrades. I think either way is perfectly decent.
Double Tank
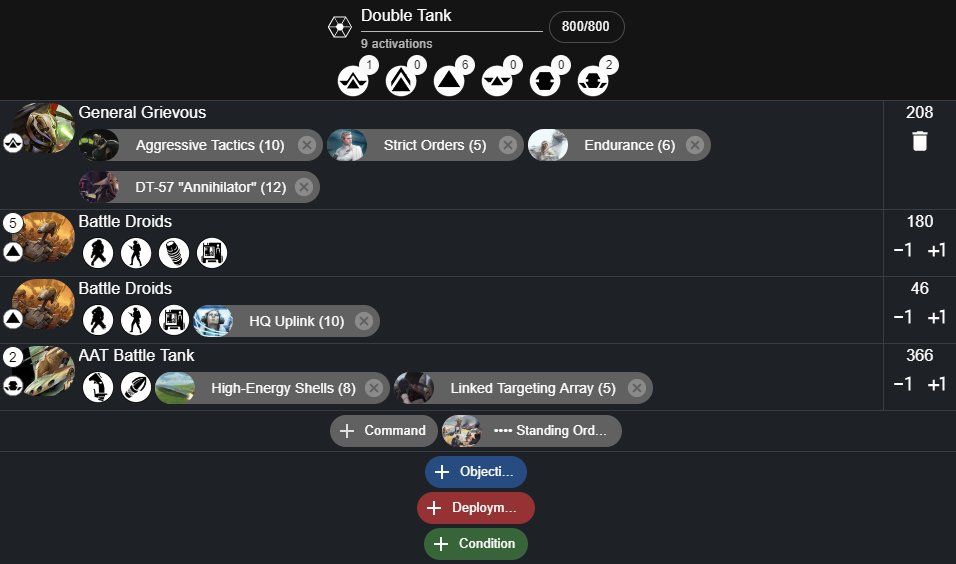
I heard you like some tanks with your tanks. Naked B1s aren’t great, but they aren’t terrible either; you can do a lot worse for 36 points a pop. Your opponent is going to be so focused on the tanks it should basically be a waste of time for them to shoot your B1s, which means they can quietly be useful capping objectives, crit fishing, and generally being a nuisance.
Summary
The AAT is a solid heavy that brings good Range 4 firepower with High Velocity on a durable chassis. Grab some high energy shells and stay away from Pierce and Impact weapons.
I like these unit guides.
It would have been good to also see in this a AAT versus other Heavy comparison to understand the maths, ranges and strategies to use when taking on Sabres, ATs, etc.
Also to see a breakdown of the major anti-armour troops and emplacements to be aware of – highlighting the most threatening ones (high impact/critical).
And advice on what to do with Tanks versus light sabre using Heroes noting a hero in contact with an AAT – do you pivot and shoot, do you run, do you shoot something else and just wait to be destroyed?
Great guide, i like these posts!
What do you think about keeping the second BX and dropping a B1? So you’ll have 2BX and 5B1.