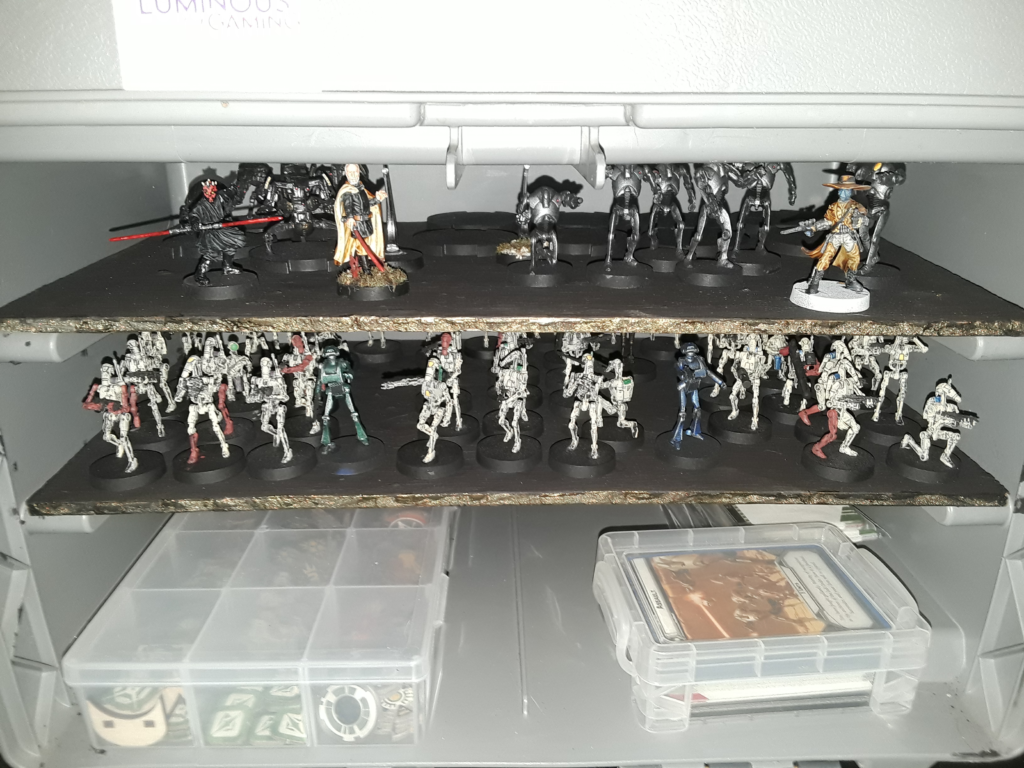
In this article we will walk through how to build a magnetic minis case from scratch.
The Premise
In recent months I began a foray into collecting and building a Separatist army. I’ve got most of my characters assembled and painted and the B1s are assembled and mostly painted. I still have a ways to go before I consider them to be a playable force, as per personal rule I don’t allow myself to use unpainted units, and as such had just assumed that I was going to continue my foam tray addiction. I had always thought magnetic cases were pretty cool, but by the time they started becoming widely available, I was already heavily invested in my Army Transport (and now Game Plus) foam.

Then I met the EV Medical Droid.
Now holding the title of “worst model to assemble,” I knew that a foam tray wasn’t going to work for this guy, or I would be repairing him all the time (or throwing him away, which I had already considered after the 3rd attempt to assemble him). I knew I needed to do something about this, and wanted to keep it cheap since CIS is my secondary (probably tertiary once Shadow Collective drops) army. At least until an official Ventress shows up. There are some great magnetic cases out there, Battlefoam’s Magna Rack and TableWar‘s beautiful Tower Cases among them, but this was to be an adventure in frugality and craftiness.
The Build – Casing the Joint
I had tinkered with magnetic trays before. I once made a matching pair of magnetic displays for a team tournament. My half involved some buildings that bugs were crawling across. We got a ‘best painted’ trophy due to that contribution! Based on what I learned from that build (and just general availability) I decided that I didn’t want to go with a metal sheet. The magnets hold to that metal pretty hard, and I felt that trying to remove those fragile little droids might defeat the purpose of switching to a magnetic tray. I wanted to find a different way.
In the past I had seen others use a ferro-magnet sheet and washers under the bases of the minis to achieve this hold. Neodymium (say that three times fast) magnets weren’t as widely available as they are now and this was a relatively easy solution. It also eliminated the problem of some minis being unnaturally attracted (or repulsed) to one another. I discovered that there now exist flexible, self adhesive neodymium sheets (now say THAT three times real fast) and thought that might be a solution, but at nearly $30 a sheet, that was looking pricey, and also would likely be a stronger hold than I was looking for. I already had some 6x2mm magnets from my adventures with the Vital Assets expansion, so I decided I would put magnets in the bases after all and look for an attractive surface for them.

I have an old Plano 1233 case, long discontinued, that served as Baby’s First Miniature Case. The removable organizers made for perfect shelf space. Almost any case or tacklebox with a similar design should work. I cut a couple of shelves out of 1/4″ birch plywood that will slide in and out easily. Birch is super strong even in thin pieces. The top section had a divider in it, but my Dremel tool made short work of that. The shelf ‘brackets’ on either side is what makes it work so well. They’re designed to hold the organizer boxes you’re probably using to store your tokens.


The Build – The Gooey Part
Having remembered a blog post I had seen some years ago, I decided to try out the magnetic paint option. I acquired a 16 oz can of “Magnetic Paint & Primer” for half the price of just one of those magnetic sheets. In truth it’s just ferrous paint and not actually magnetic, but I’m not in marketing, am I? I’ve never painted with pudding before, but I’m fairly certain this is how it would go. This stuff is THICC.


The tin suggests at least 3 coats and no more than 6. I was planning on going for as many as a can would allow (2 shelves and the interior of the top section) but after the third coat had dried I was far too excited and had to try it out. I was delighted to see that it not only held the models, but it would do so vertically. It wasn’t a terribly strong hold though, a slight push would knock them loose. Nevertheless, she persisted.

At 5 coats of this “paint” (and 3 in the interior compartment up top) I checked and found that the pull on the magnets was very satisfactory. They held very well even with moderate pressure on the base. I still had enough in the can to go a bit further but decided to stop there and save the rest for a future project. Thankfully this paint is water based and cleans up easy, so I put everything away and let my new shelves dry. Everything (so far) fits really great and I have room in the top compartment for my two AATs with room left over for my future Spider Droids. I’ve even magnetized my tools (and objectives once I get a 2nd set) and store them inside the lid!

Conclusion
I did encounter one flaw with my magnet case, on my first outing to the LGS, someone pulled out in front of me and I had to stop suddenly, causing my case to tip over. I had to continue on to the shop with Schrödinger’s minis in the back of my car. Thankfully, nothing was broken (not even the EVil Medical Droids), just in a messy jumble at the back of the case. Further to that, my completed minis (Dooku and Bane) held on tight! Maul fell with the rest, and some of my B1s decided to stick around. I’d say that was some good magneting!

As the Separatists are my ‘back burner’ project I’ve not done much with them, nor the case, since. I still need to touch up the front of the shelves to make them nice and I want to plaster it with stickers which I have been collecting (where’s my TFT sticker, Jay??). As for the army, I had started using them in our LGS’s Escalation League (1-1 so far) but since Shadow Collective dropped last week, I’ve turned my focus (and boy have I) there. I will continue adding to the force as time and money permits, but it may be a long time before I’m ready for a viable 800 point force.


