Another mission, another guide! The last few months have had a lot going on – like the first ever Shatterpoint World Championships and a major unit update. First Contact was officially released at the start of April, leaving a good month for me to grind some games before shifting focus to the unit updates. And I certainly needed all those practice games. Of the four missions currently released, First Contact is definitely the most unique. Let’s dive in to see why, and how to deal with that uniqueness!
Overview
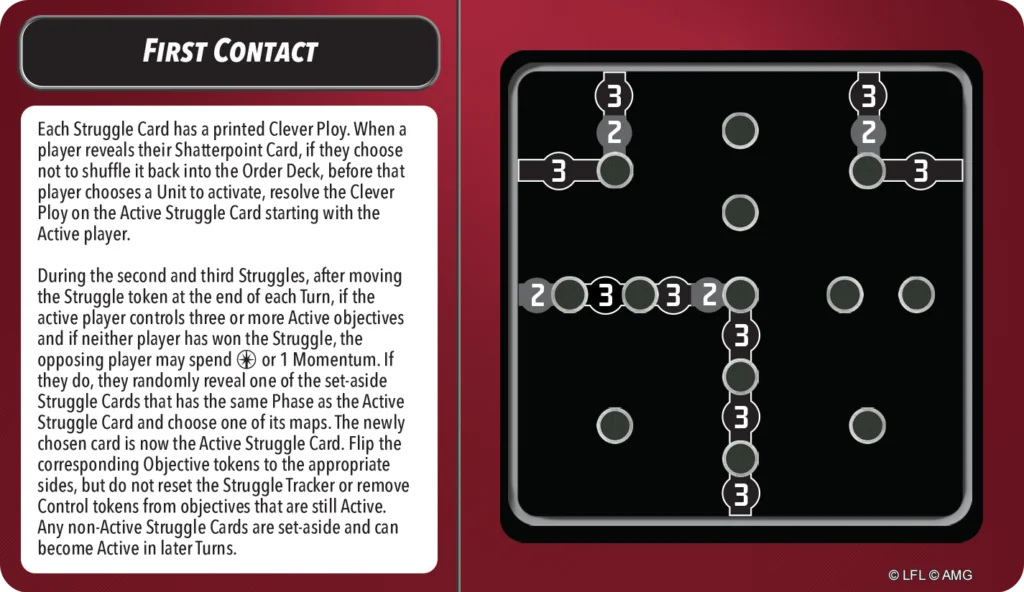
The rules of the mission bring two big new concepts: Clever Ploys and mid-struggle layout swapping. We’ll focus more on Clever Ploy abilities later in this guide, and the layout swapping will fit better in the dedicated struggle 2 and 3 discussions. To discuss the objective layout, let’s hop right in to our struggle 1 discussion!
Struggle 1
The first thing that jumps out to me is Surprise Assault and We Get One Chance are mirrored. As a result, it isn’t immediately clear if there’s a bias for which of our squads go on which side. This is in contrast to something like Never Tell Me the Odds, where the first struggle layouts encourage putting a faster squad on your right side. However, Shifting Priorities has mirrored layouts in struggle 1, and a bias still emerges. The later struggles in that mission favour the near-right more than the near-left, so I favour a slower squad on my right for Shifting. We’ll see later if any similar trends emerge with First Contact.
Let’s go back to Never Tell Me the Odds for a moment, because I do think it shares a lot of similarities with First Contact for the first struggle.
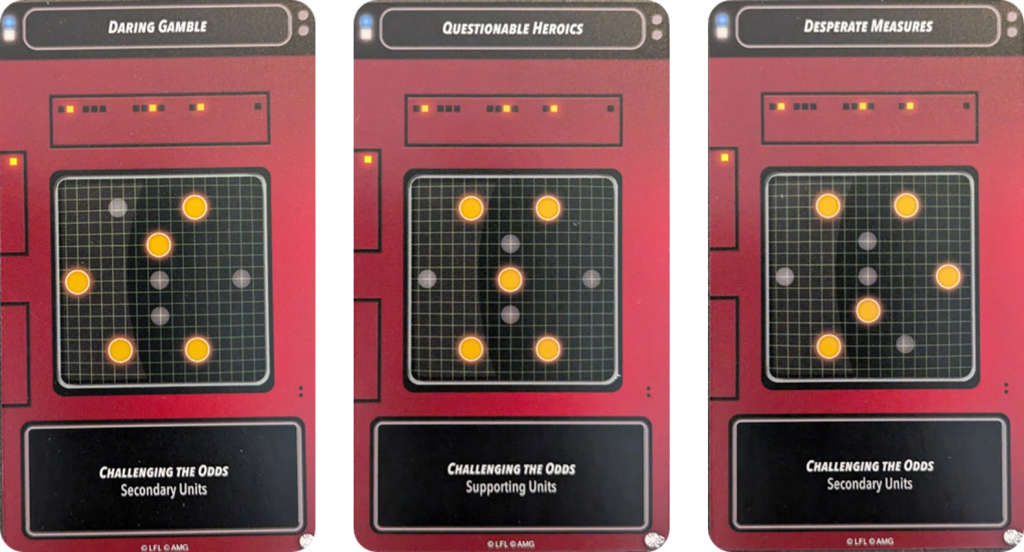
As I say, lots of similarities! Both missions have an X-style layout, both have wide midline objectives that each light up 1/3 of the time, and both have a triangle of backline objectives where 2/3 light up each time. However, the relative placement of these objectives is important.
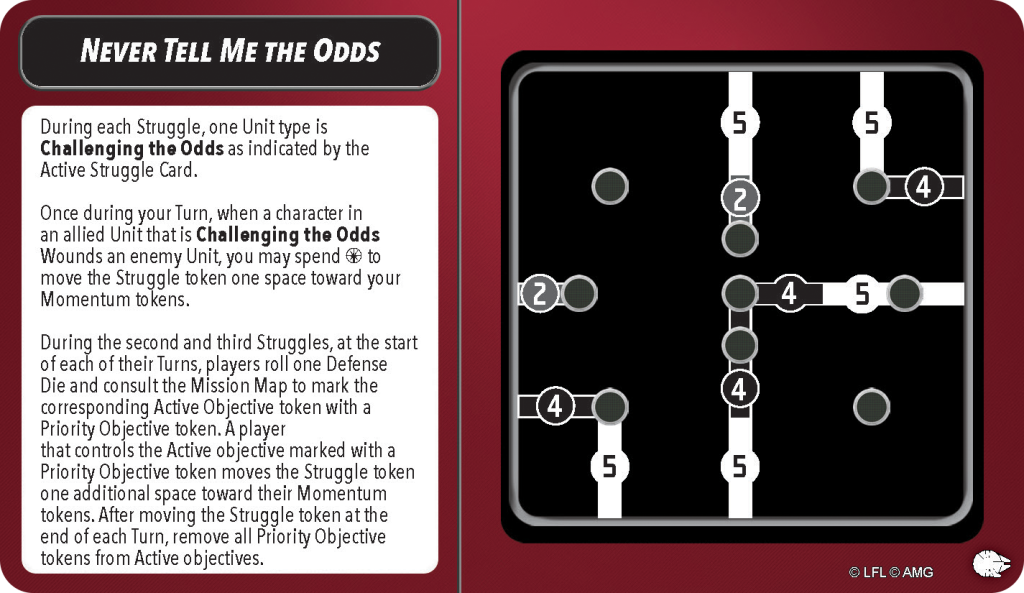
Comparing the measurements for Odds and Contact, the wide midline objectives are in the exact same spot. Therefore, units that had issues affecting the midline in Odds (such as many of the slower, melee-only Jedi) will usually have similar struggles in Contact. The triangle of “home” objectives are a bit closer to each player’s respective board edge. Attacking your opponent’s home objectives will require more mobility since they’ll be further away than in Odds. Given that only one midline objective is active in struggle 1, attacking home objectives is certainly important. I’d want at least one unit in each squad that can routinely threaten to steal an opponent’s home objective.
Considering there is only one midline objective, and it will be easier to defend home objectives, sticky units can be extremely valuable. If I have General Kenobi in my list and put a hunkered Hunter on the midline, for example, chances are pretty decent I can force a dead turn where my opponent doesn’t flip any objectives. Such turns can often be the key to winning the all-important struggle 1.
Before moving on, there is one other thing I want to highlight regarding the objective locations. Since the middle home objectives are a bit closer in Contact than in Odds, it’s easier to move a friendly unit into contesting range with a dash. On Odds, if you don’t have units with Infiltration (Rebel Commandos, Imperial Special Forces) or Ponds, then you usually need an advance or favourable terrain to move a unit from deployment onto the middle home objective. Contact is a bit more forgiving, and out-of-activation (OOA) dashes are more plentiful than OOA advances/repositions, making it easier to secure and defend the middle home objective.
Struggle 2
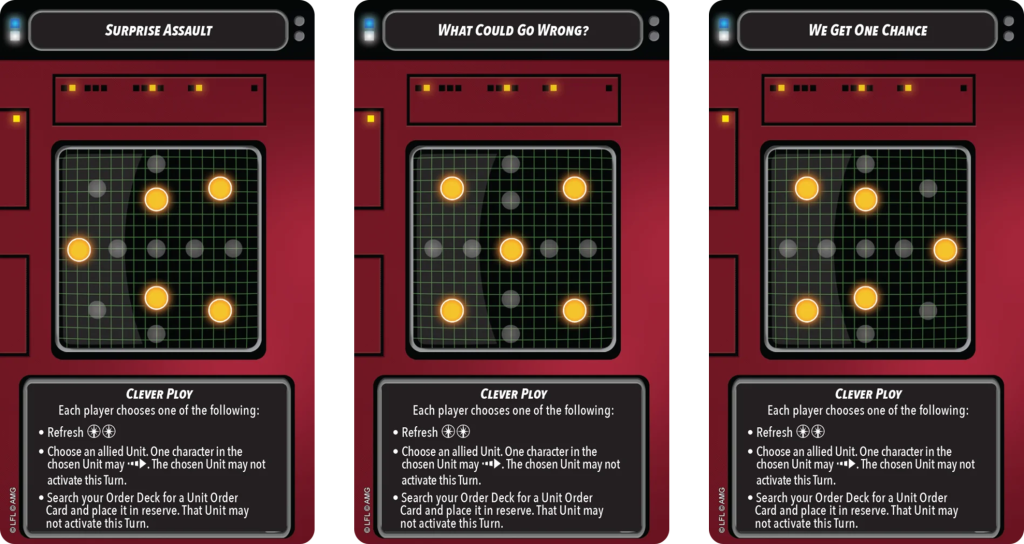
OK, here is where things get funky. Traditionally, three objectives are active in struggles 2 and 3, with each having an equal chance each turn to be the priority objective, which essentially scores double. Contact gets rid of that in favour of four active objectives and no priority. However, there is a twist. If the active player scores three or more at the end of the turn, their opponent may pay a force or momentum to draw a new layout card, picking which of the two options is now active. 90% of the time, I’d say I pay momentum rather than force, but it depends on the list and game state.
One side-effect of the layout swapping is that scoring can be much slower than on other missions. Scoring 2, 1, or even 0 is much more common on Contact than ever before. As such, here’s a scenario that I’ve seen play out relatively frequently: Player A wins struggle 1. Player B scores first on struggle 2, which puts the struggle tracker on their side of the board. For the next while, Player B might slowly pull the struggle tracker closer to their momentum, but Player A is racking up tons of free momentum since their turns usually end with the cube still on Player B’s side. If Player B ever scores three or more, there’s almost no reason Player A won’t toss one of their many momentum to change the layout. Player B isn’t getting as much momentum and flipping the layout may prove costly. If Player A can eventually pull the struggle cube back, they can win quickly thanks to their stockpile of momentum. As such, Contact can result in a lot of two struggle games. However, if Player B can win in this scenario, then in struggle 3 the roles are reversed and Player B can gain a lot of free momentum and possibly gain a big advantage. I’m not saying this is how every game plays out, but it’s something to consider before taking a juicy 3 or 4 points on the first turn of a struggle. If the struggle cube is coming over to your side

It’s important to note that my test games were all played without mission critical. When mission critical is active, it adds a timer to the game. The player to score first in a struggle will have a big advantage because the struggle cube will often stay on their side for a while. Eventually, the free mission critical momentum will catch up to the struggle cube. Therefore, winning struggle 1 is especially important since you’d score first in struggle 3, if it gets that far. I’ve found games of Contact can run quite long, so it’s not unlikely you’ll be in mission critical by the time Struggle 3 starts.
In light of the above, it’s now time for another list building tip: wounding is especially important in First Contact. This is for a multitude of reasons. Wounded units can’t contest, and when the layout keeps getting flipped less living bodies often means less points. Wounding generates momentum, which is important to either swap layouts or to close out the struggle. Finally, and I hate that I have to say this, wounding is a tiebreaker. Due to the slow nature of scoring, games between two evenly matched teams can often go to time, often even in struggle 2. When time is called, the player controlling more objectives wins the struggle. It sucks, but them’s the rules. Whoever controls more objectives when time is called can often be a coin flip. You could win struggle 1, then go to time n struggle 2 and lose the coin flip, leaving struggles as 1-1. In that scenario you want to have more wounds, since wounds inflicted becomes the new tiebreaker.
I should also note that one way to avoid constantly flipping layouts is to purposefully score only two points in a turn. This could be useful if you are confident your opponent will only be able to score one on their next turn. If you end up going back and forth, scoring two points each, that might not be ideal if you’re not farming momentum at the same time. Repeatedly scoring two while your opponent scores one is doable, but can be tricky to achieve. However, scoring two, opponent scores one, then scoring three is definitely a way to make some good progress with the struggle tracker.
OK, now that we’ve covered a lot of the layout flipping considerations, we can finally look at the layouts themselves! While I have previously done heat maps for which objectives are more or less likely to be active, I don’t think that’s as useful here because the odds will change depending on which two cards are not currently in use. As such, let’s first focused on “locked” objectives.
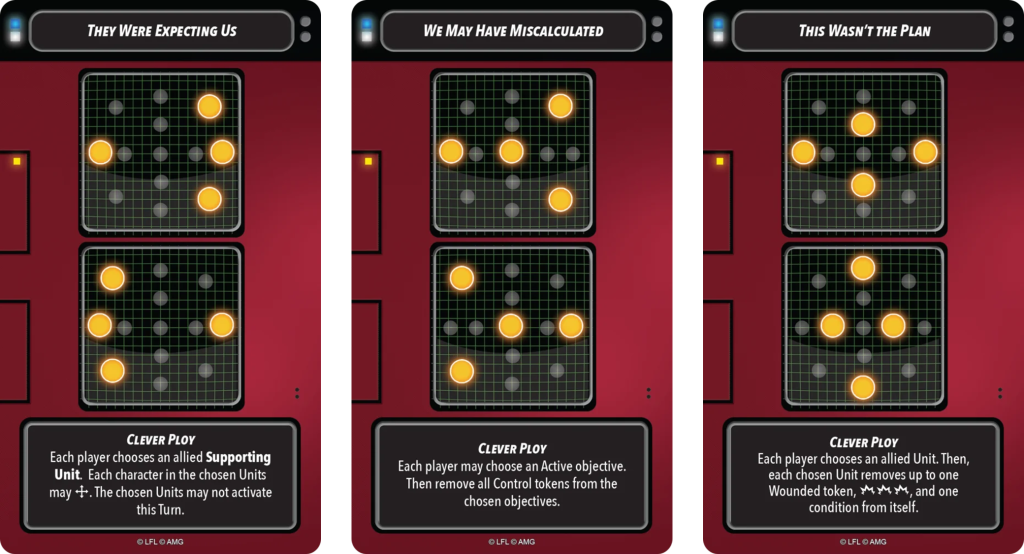
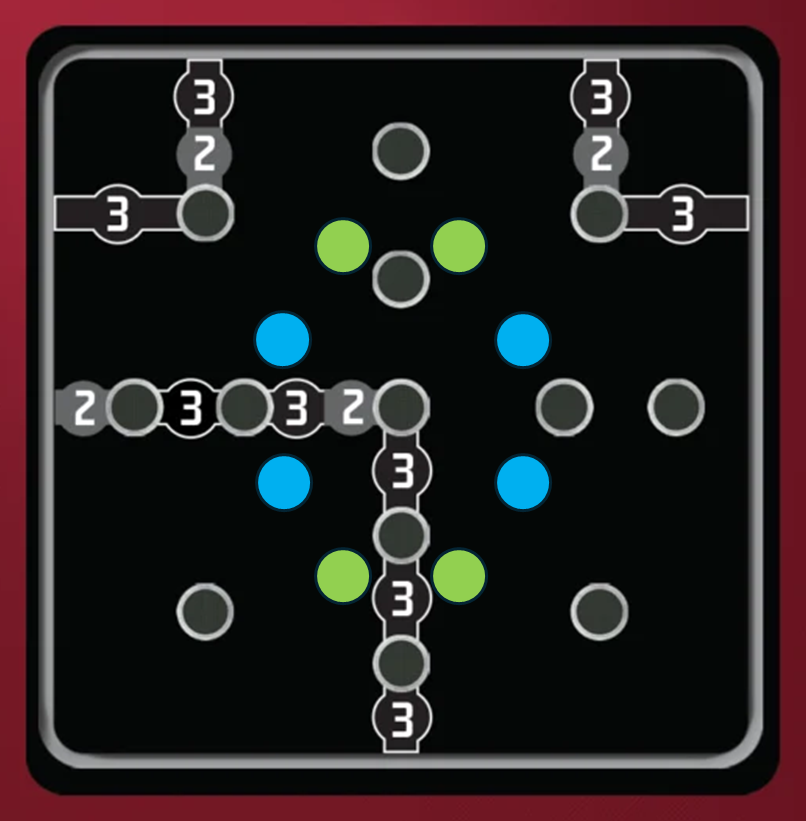
Both They Were Expecting Us and We May Have Miscalculated feature locked objectives. For the former, these are the two wide midline objectives. For the latter, it’s the center objective. If you are in a strong position on those objectives and your opponent is forced to activate them, that will make it harder for them to score big and could allow you to get a few good turns in.
We can also notice the left and right edges of the board light up more than the middle. Controlling both the top and bottom objectives on the same side could lead to an explosive turn if you’re the one to flip over They Were Expecting Us or We May Have Miscalculated. In the diagram below, the green dots represent some of my favourite spots to put miniatures in struggle 2. The blue dots are also good, because This Wasn’t the Plan still exists. These locations all put the characters within range 2 of multiple objectives, plus dash range of even more objectives. Of course, if you have a lot of access to OOA advances then that increases your wiggle room quite a bit.
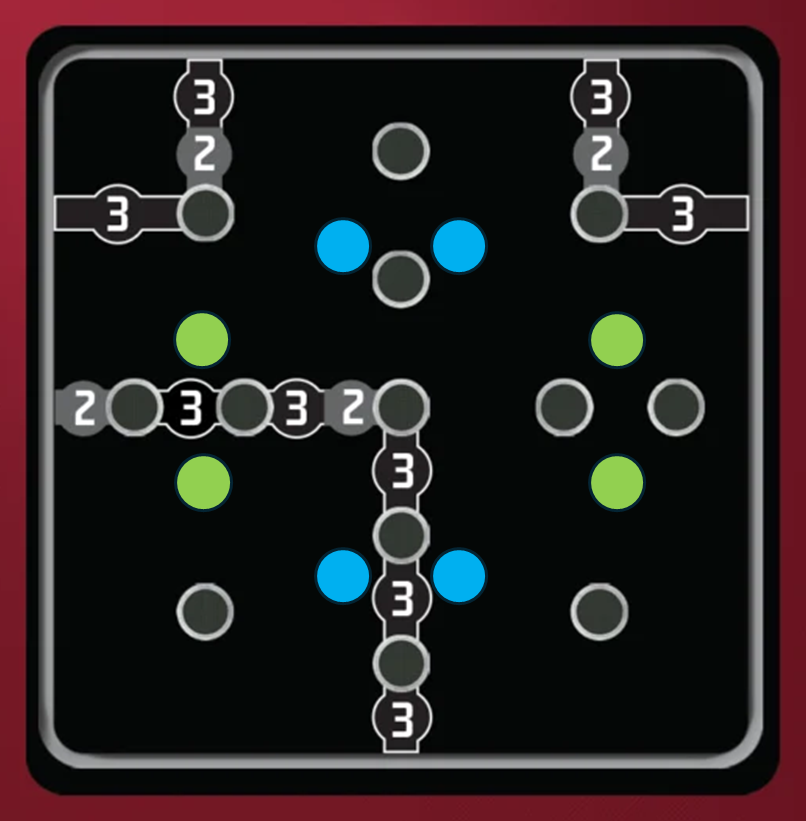
One thing to note here is that the locations shown are all in what I call “one shove range.” This means a single shove is enough to knock a character out of contesting range. Getting closer to the objective could get you into “two shove range,” which is more secure, but can also limit flexibility since it’ll be harder to threaten other objectives. Once again, sticky units are great since they open up more placement options without being easy to knock off objectives.
Struggle 3
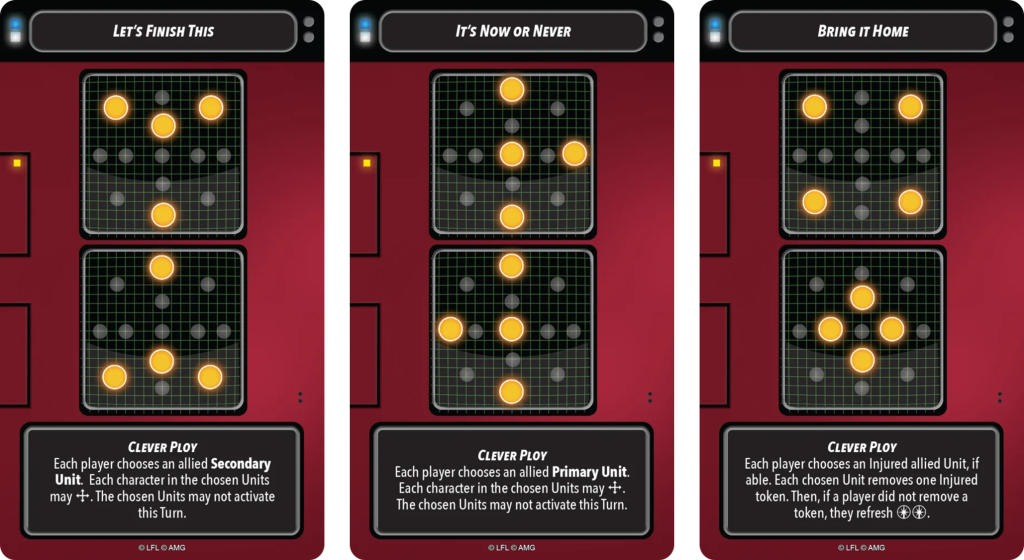
Struggle 3 is wild. It’s Now Or Never features three locked objectives, while the other two cards have zero. Games can and will be lost by flipping into It’s Now Or Never at the wrong time. While struggle 2 favoured the left and right edges of the board, struggle 3 cares a bit more about the middle. Of course, you can’t neglect the sides either. Both Let’s Finish This and Bring It Home feature options for the corners. The wide midline objectives are much less important, only lighting up once each out of six possible layouts.
The figure below shows some of my preferred locations for struggle 3. Generally speaking, it’s a loose cluster around the middle, getting range 2 on multiple objectives when possible and staying within movement range of the corners. Of course every game will be dynamic, but the point I really want to drive home is that the considerations for placing units in this mission is very different than usual, since you need to stay nimble rather than simply dig in.
Finally, it’s worth noting that struggles 2 and 3 have a lot of symmetry. Looping back to our earlier discussion, I see no bias from the mission that will dictate putting one squad or the other on a certain side. This frees you up to focus purely on factors like terrain and your opponent’s deployment (if you’re second player) when deploying your own squads.
Clever Ploy
Alright, I have to talk about the Clever Ploy mechanic. I won’t go through them one by one, but I will highlight a few different things.
One overall note that applies to all struggles: the Clever Ploy actually makes me want to shuffle the Shatterpoint back more often than in other missions. This is because giving your opponent things to do on your turn can really neuter your activation in the right circumstances. As the active player, you’ll resolve the Clever Ploy first, so even if you both get movement, for example, your opponent can do theirs with more information. Of course Shatterpoints can still be great and lead to huge turns, but take a second to double check what your opponent can do before you commit to using your Shatterpoint.
Struggle 1
Unlike the other two struggles, struggle 1 will always have the same Clever Ploy, but with three options. The first option, two force refresh, can honestly be a bit of a trap. I say this because you don’t want to fall into “it’s OK that this list struggles with the force budget on the first deck, I can refresh two or even four!” You won’t always get to play First Contact, and even if you do, struggle 1 might end before one or both players use their Shatterpoints. The effects of the Clever Ploy can be awesome, but never take them for granted!
Struggles 2 & 3
In the second and third struggles, the Clever Ploy should absolutely factor into your decision making when swapping cards. Perhaps you want to keep a certain ploy active because you can make big use of it, or you definitely don’t want it active because it’s great for your opponent. Perhaps you want to fish for a specific ploy. Whatever the circumstances, consider the Clever Ploys before you flip, especially if you know a Shatterpoint is coming up soon for either player.
Personally, given that games of Contact can stretch on, I often see units removed from the board. Particularly squishy supports. This is bad because more bodies more good. As such, I especially like the ploys on This Wasn’t the Plan and Bring It Home because they can delay units being removed from the game. Of course, they can also do the same for your opponent!
Now seems like a good time to mention – overkill is important to track now! Previously it only really mattered for Lord Maul, but the existence of This Wasn’t the Plan makes it more universally important. Let’s say I have an 8 stamina unit with 7 damage. They get attacked and suffer 5 more damage. It is important to mark them as 12 damage, because then even if I remove 3 and a wounded token they will just become wounded again. As the attacker, in games of Contact I have sometimes elected to do extra damage and overkill a unit (to prevent it from popping back up) rather than take other options on the combat tree, such as conditions or shoves.
Example Units
Rather than simply tell you the sorts of things I value on Contact, why not show some illustrative examples? To start, let’s look at Cassian.
Captain Cassian Andor
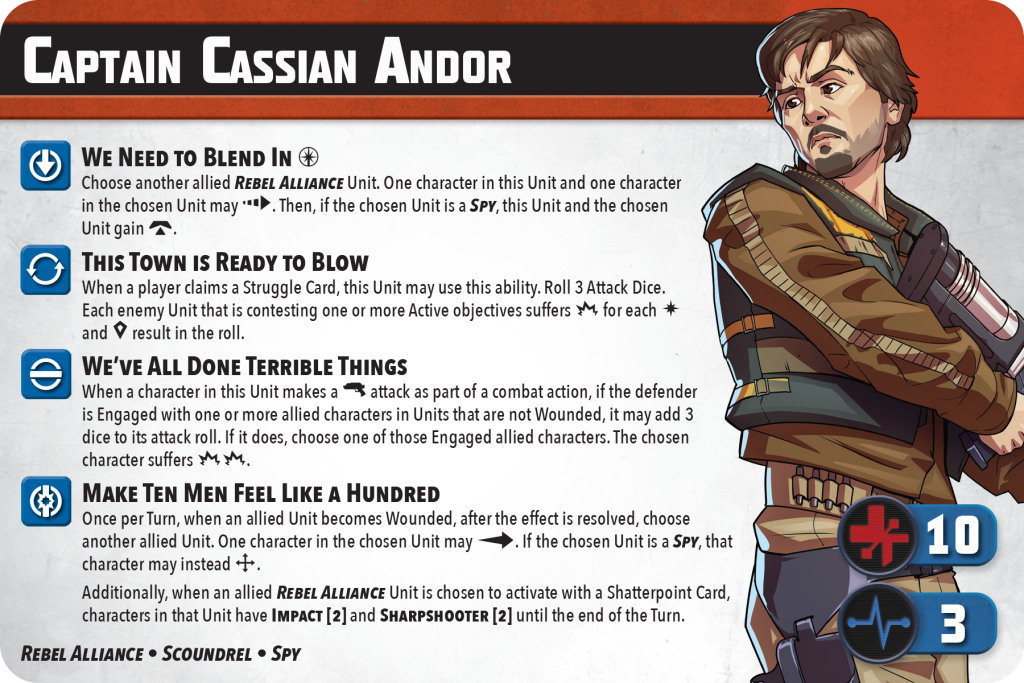
I’ve found Cassian to be a useful piece on Contact for a few reasons. One big one is that his movement abilities are not range limited. Units have a tendency to get spread out, so it’s quite handy that We Need to Blend In and Make Ten Men Feel Like a Hundred don’t care about range. Cassian isn’t an incredible combatant, but his attacks are decent (even offering repositions if he can spike) and defensively he isn’t bad. If he needs to go to a point and win it, or hold on to a point, he isn’t a terrible choice. I also mentioned wounding can be very important on Contact, so having a strong revenge trigger is quite handy.
TV Baddies
Instead of a single unit, how about an entire list for our next example?

Thrawn/Gideon was a strong list pre-changes, and it didn’t get hit too hard. It had good success on Odds, so I gave it a few spins on Contact. Spoiler alert, it was good there too! The list features a lot of OOA movement, meaning it can shift to match the new layouts pretty effectively. The movement abilities of Thrawn, Stormtrooper Sergeant, and Death Trooper Escort are all range-less, too. The supports are durable and sticky, keeping bodies alive and on objectives more often than some other lists. Thrawn, Death Trooper Escort, and Dark Troopers can all be very quick on their turns, if needed, to potentially reach a far-away objective. There are multiple tiebreaking units with Gideon and Fifth Brother, which I find particularly effective when things get spread out. Sometimes it feels like the fighting breaks down into little pockets of units, and many of these imperial units can hold their own in whatever pocket they’re in.
One downside of the board getting spread out is that bubble-type abilities, such as Coordinated Fire, can often be less effective. That doesn’t mean I will avoid taking them, Dark Troopers are still great regardless, but if it’s the unit’s main feature then Contact may not be their best objective. That being said, C-3PO is basically just a Steadfast bubble on a stick, and I’ve had some OK success with him on Contact. Taking the above list as an example, you’ll get some games where the X comes up struggle 1 and you’re using Coordinated Fire: Strain every turn. Other games the Dark Troopers might be isolated on the other side of the board and it might rarely come up.
Wrap-Up
I’ve seen a lot of people really enjoying First Contact, and that’s great. Speaking personally, though, I really don’t like it. I know a lot of people loathed the swingyness of the priority objective, but for me we just traded that randomness for even more randomness. However, I do think First Contact is a very demanding objective. A lot of lists will struggle with Contact, and lists that are good at it will often be good at all the other objectives, too. Bringing Contact to a competitive event could net you a big advantage, similar to Odds. However, the potential for long games and going to time worries me. Maybe I’m just a worrier. Maybe I just need to plan to win easily and quickly to avoid going to time. That’s a solid plan, right?
Even though we’re already two months in, there is still lots to be learned about First Contact. There are many moving parts, and mastering them all will give you a strong advantage. I can certainly understand the argument that it is the most skill-based objective yet, though I may not completely agree at this time.
Get out there, get games in, and let me know what you think of First Contact!