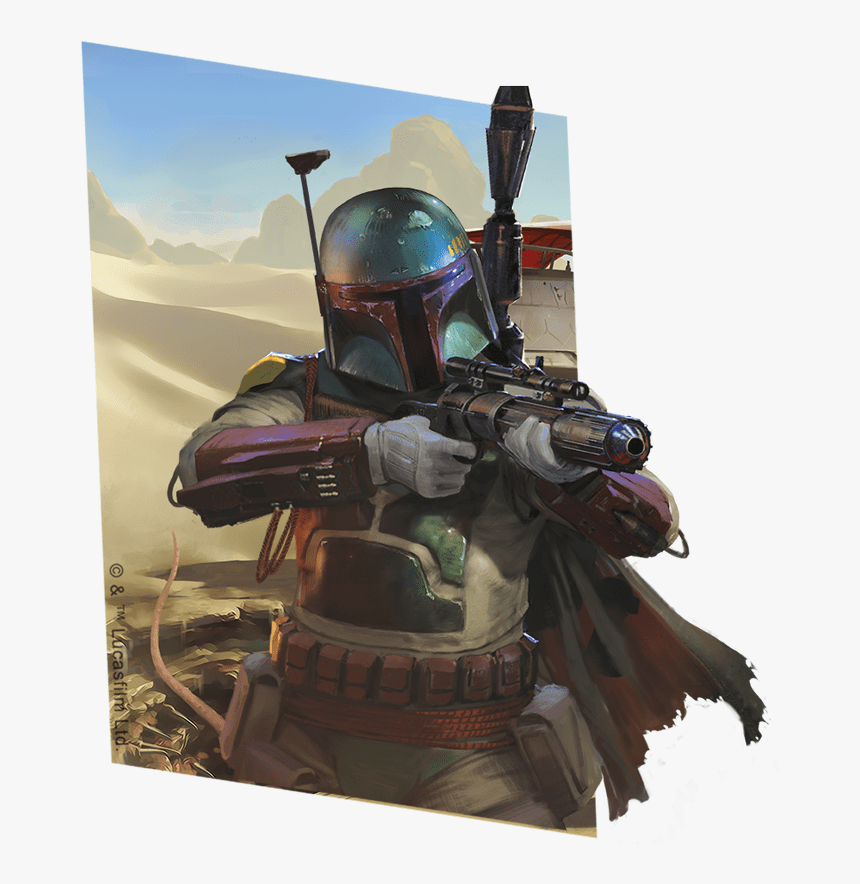

This article will be a guide to Boba Fett, Infamous Bounty Hunter, in Star Wars Legion. Here, we will dive into the pros and cons of using Boba Fett and why he is one of my favorite operatives in the Imperial roster. Boba Fett is a mobile short range bounty hunter who brings a wide range of tools to an Imperial army. In summary, his backpack has jets, he’s Boba the Fett.
Strengths
- Mobility (Speed 3 & Jump 2)
- Resilient (15 effective wounds & courage 3)
- Bounty
- Strong against all targets (Sharpshooter 2, Surge to Crit, Impact 1, Pierce 1)
Weaknesses
- Short range
- Order hungry
- Expensive (most expensive non-force user character in Empire)
Overview
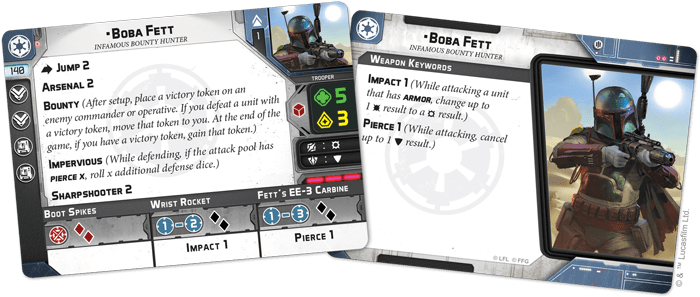
Points 125:
Boba Fett is the most expensive non-force user out of all the Commander and Operative options in the Imperial roster. Because of his expensive price and small dice pool, many players overlook Fett. However, Boba is well worth his price. He is well rounded and brings flexibility to an army. Boba, when played properly, can apply strong objective pressure on your opponent whilst being lethal to any units caught out of position.
Offense:
Boba Fett has surge to critical, Sharpshooter 2, and Arsenal 2 allowing him to utilize his two primary weapons for great effect. First, Fett has an EE-3 Carbine which fires from range 1-3 with two black dice and Pierce 1. His second weapon is his Wrist Rocket, which fires from range 1-2 with two black dice and Impact 1. Because of his keywords: surge to critical, Sharpshooter 2, Impact 1, Pierce 1, Boba is effective against virtually any target. At range 3 with no aims, Boba averages a raw 1.25 hits and at range 2 (combining both guns without any aims) results in an average 2.5 hits. Boba, outside of his 3 pip turn, is most effective at range 2 and should be treated as a close range threat. Boba’s 1 pip and 2 pip give him flexibility in close quarters and extra damage. Notably, Boba’s range two attack benefits greatly from aims going from an average of 2.5 hits un-aimed to roughly ~3.33 average with an aim. While these numbers may seem small it is important to keep in mind these shots will ignore cover and come with both Impact 1 and Pierce 1, meaning Boba can easily two-shot most core units if aimed. Boba’s 2 pip and 3 pip also heavily augment his damage giving him a damage boost for two out of six turns.
Defense:
Boba Fett has 15 effective wounds in the form of 5 health and surging red saves. Boba also has Impervious, making him resistant to pierce attacks. This is a solid health pool, which allows Boba to survive multiple attacks against him. Boba also benefits greatly from medic units since he has one of the best saves possible in legion. This means each heal adds an effective 3 wounds to Boba.
Utility/Support:
Boba is not a support character but he does bring some added utility with his 1 pip and Bounty keyword. Boba’s 1 pip Whipcord Launcher is great for stopping an aggressive unit in its tracks or preventing a unit from moving to score in later turns. Bounty also adds utility by creating pressure on your opponent’s Commanders and Operatives. You can gain a huge advantage in games where you are able to successfully claim bounty.
Mobility:
One of the biggest stand out features of Boba is his mobility. He is speed 3 with Jump 2, allowing him to move at the fastest speed possible for troopers while ignoring all terrain height 2 or lower. This speed makes him excellent at chasing down fleeing low health targets and at objective play. Boba can effortlessly jump in and out of a scoring zone turn-to-turn allowing him to remain safe while also scoring. It is worth mentioning that since Boba is courage 3 he is rarely suppressed and does not need a nearby commander to prevent him from panicking. This courage allows him to be a highly independent unit that can flank far from your main army.
Upgrades
Training:
Boba Fett comes with two training slots which are best used for gaining extra aims and order control. I almost always fill both of these slots as they provide excellent augments for Boba Fett.
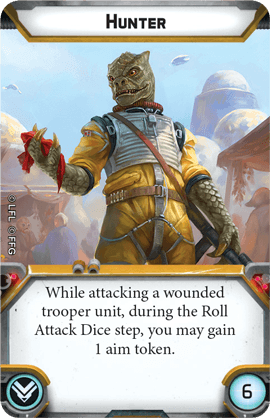
Hunter
I never leave home without Hunter on bounty hunters. Hunter gives you free extra aims when shooting at a wounded trooper unit. This makes Boba much more threatening when firing at multi-wound troopers such as Commanders and Operatives. Since these are the same units you can apply Bounty tokens to, Hunter makes the threat of scoring with Bounty much more viable. In the current meta there are popular non-hero targets such as B2’s and Wookiee’s which can also trigger Hunter. Overall, while Hunter is expensive at 6 points, it often gives Boba the extra damage he needs to finish off his bounty target.
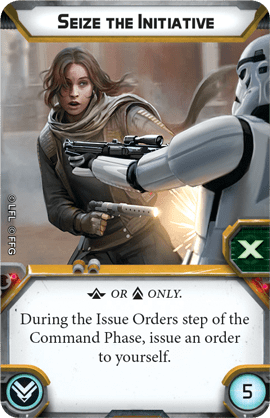
Seize the Initiative
The Second upgrade I typically bring on Boba is Seize the Initiative. Boba is very order hungry because he is best played by jumping in and out of cover. The recently announced changes coming to mercenary units prevents them from receiving orders from Commanders outside their Organization. This makes Seize even more valuable as the unit issues an order to itself. Boba wants as many orders as he can get and Seize the Initiative is an excellent way for him to get some added order control.
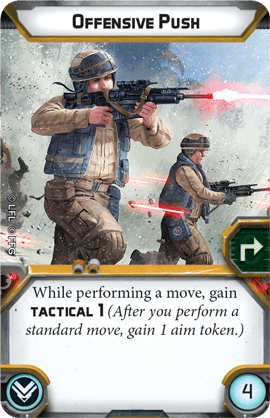
Offensive Push
I personally only take Offensive Push on Boba when Boba is run alongside Veers. Imperial discipline gives extra value to Offensive Push which justifies its cost. It is more flexible than Hunter as you can use the aims for any attack after a move action. In the current meta, you are typically able to trigger Hunter more than once a game so I feel Offensive Push is only justified when you can use it twice or more.
Equipment:
Boba’s gear slot is much less necessary than his training. If you are short on points, I suggest leaving these slots empty. However, if you do have space to add gear I recommend the following:
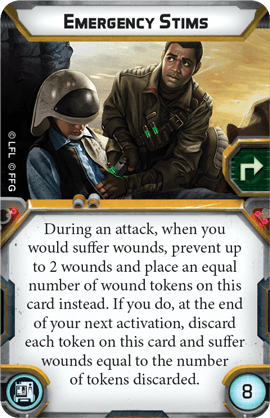
Emergency Stims
Because Boba has surging red saves, Emergency Stims create 6 extra effective wounds. Emergency Stims can often provide an extra activation for Boba which can be game changing. Emergency Stims can be the difference between Boba being able to fire off his 1 or 3 pip and immediate death. I personally tend to shy away from Emergency Stims since 10 pints is costly and I believe Boba can rely on his mobility to stay safe from enemy attacks.
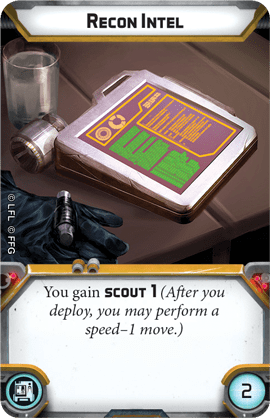
Recon Intel
The gear upgrade I regularly use with Boba is Recon Intel. It only costs 2 points and provides some added flexibility during deployment. On certain deployments, scout 1 plus his speed 3 move is enough for Boba to base a box in the center of the map. This means in a game of Recover the Supplies (with Recon Intel) you can move claim a box on turn one and then on turn two double move safely away with the box.
How to Play
General Role:
Boba Fett is a mobile play making unit. He is best utilized pressuring objectives, jumping in and out of close quarters, and finishing off priority targets. Boba relies heavily on his command cards to augment his damage and efficiency. Timing his command cards properly is important for getting his full value.
1 Pip: Whipcord Launcher
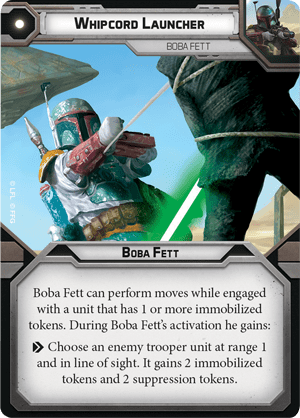
Whipcord Launcher is Boba Fett’s one pip command card. This command card gives Boba a free action which can immobilize an opposing unit at range 1. Whipcord is flexible and can be used as: a defensive tool against aggressive threats, an aggressive tool to create a safe engagement, and to prevent units from moving on scoring turns. On defense, it is fairly straightforward, you use this card to escape engagement with a force user or melee unit. This card can also be used to strand a unit out in the open where the rest of your army can attack. I will often go last with Boba on the turn before using Whipcord and jump out and shoot a close-range target. Then, on the next turn, I follow up with this 1 pip, shoot the target again, whipcord it, and then duck back behind cover. Whipcord can also be used to safely dive into melee. I only advise doing this if it is a unit that Boba can kill the following turn with his ZX Flame Projector. That being said Boba can shoot a nearby white save unit such as Rebel Troopers, or B1 Battledroids then move into melee and immobilize them so they cannot withdraw. The following turn, you can then free yourself by killing the unit with your Flame Projector. The Whipcord Launcher can also be used on scoring turns to lock down important scoring units or objective carriers. This command card is one of Boba’s most powerful despite adding no extra damage.
2 Pip: ZX Flame Projector
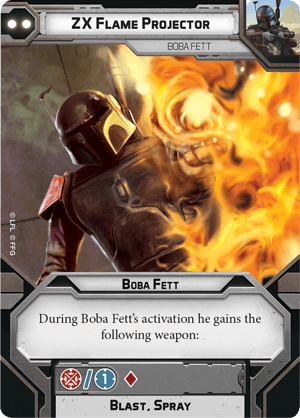
Boba Fett’s 2 pip command card is his ZX Flame Projector. I believe this is Boba’s most underrated card. Many people leave this card out when they bring Boba which, I believe, is a huge mistake. The ZX Flame Projector gives Boba an extra weapon which can be used in melee to range 1 and also has Blast and Spray. This means that Boba gains a red dice for every model in the target unit, plus the two black from his EE-3 Carbine. In the current meta, this card has multiple amazing targets such as Droids and aggressive Rebel units. Against a B1 unit with a heavy weapon Boba gets 7 red dice and two black dice which averages to 7.375 hits with pierce 1, which typically results in a dead B1 unit. This weapon is still solid against units like Wookie Warriors (4 red dice, 2 black, 1 aim from hunter = ~ 6 hits on average) since this is a multi-wound unit it is likely you will have an aim from Hunter and deal roughly 6 damage, wiping out half a Wookie unit. Even in the worst case scenario you are playing against a Phase II unit, his flame thrower scores 5.625 hits on average with pierce 1, which can cripple even the strongest red save units. You do want to be careful that you do not overextend with Boba just to use this card. Boba is played best by applying pressure to objective scoring areas as he is mobile and most deadly at close range with cards like this.
3 Pip: Z-6 Jetpack Rocket
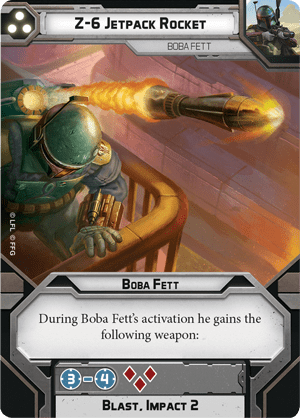
Boba Fett’s 3 pip command card is the Z-6 Jetpack Rocket. This card gives him an extra weapon during his activation and can be fired at range 3-4. It has 3 red dice Blast and Impact 2. The Jetpack Rocket adds a lot of damage to range 3 attacks averaging 3.875 hits un-aimed and roughly ~4.6 hits with an aim. This card is best used on the approach or to finish off a fleeing unit since it extends Boba’s effective range to 3 for a turn. I often will play this card on turn 2 when I start to approach enemy lines. The rocket can only be used at range 3-4, so be careful that you are not at range 2 of your desired target. Since the rocket also has Impact 2 it is a solid option for shredding armored units. Overall, this card is a great augment to Boba’s base damage and adds even more flexibility to his kit.
Lists & Archetypes
Competitive:
Double Bounty
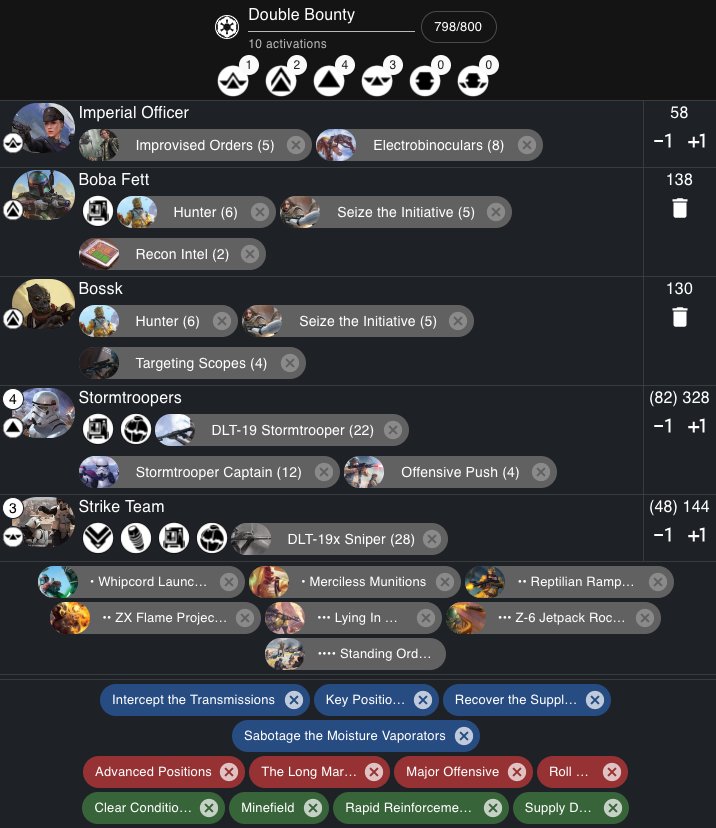
As you may have guessed already Double Bounty is my favorite list to run Boba Fett in. The Bounty keyword gets even more powerful when you can place two bounty tokens. This makes almost all your opponent’s Commanders and Operatives at risk of feeding you extra points. I already wrote a full in depth article about Double Bounty which you can find here: https://thefifthtrooper.com/double-bounty-revisited/. Because of this, I will only briefly touch on the changes I have made to the list since the article was published. The main change was dropping a single Stormtrooper and adding Stormtrooper Captains with Offensive Push. The captains help your core on turns where they would normally be suppressed allowing them to get a full turn when you need it. Also, offensive push makes the core units hit hard on the engagement turn as you can move shoot with an aim.
Boba Kallus
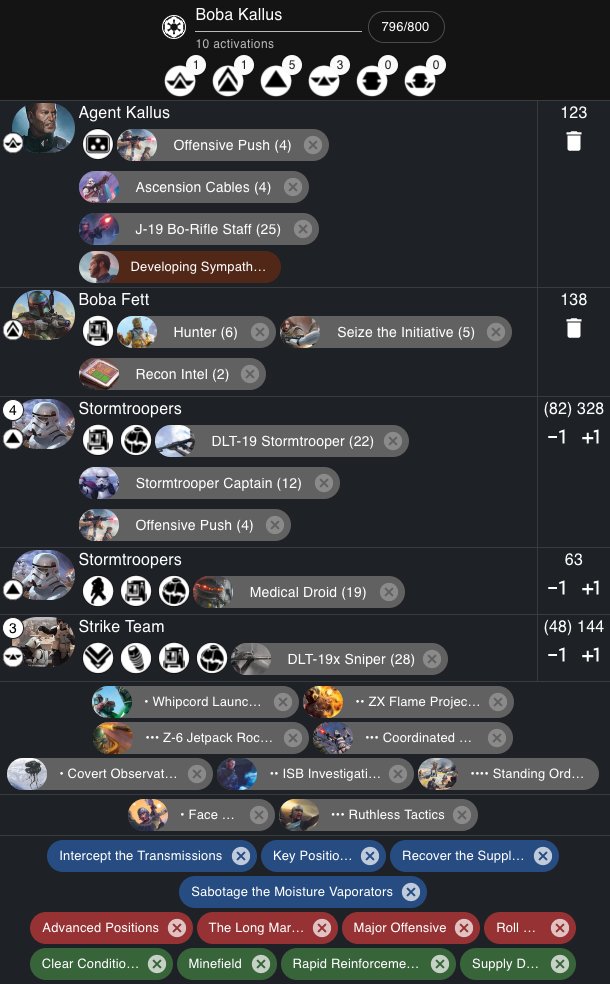
Boba Kallus mainly leverages the power of Cunning alongside Boba Fett. This list is basically an auto win on Recover the Supplies. Because of Cunning you can move claim the center box with Boba on turn 1 in many deployments, then automatically win priority on turn two and escape with Boba and the center box . Because both Boba and Kallus are red save characters, this list brings a Medical Droid to help augment their health pools. Kallus and Boba can both play aggressively and apply pressure on objectives. This is a very fun list and has a lot of utility between both Boba’s and Kallus’ command cards.
Viable Lists:
Boba Veers
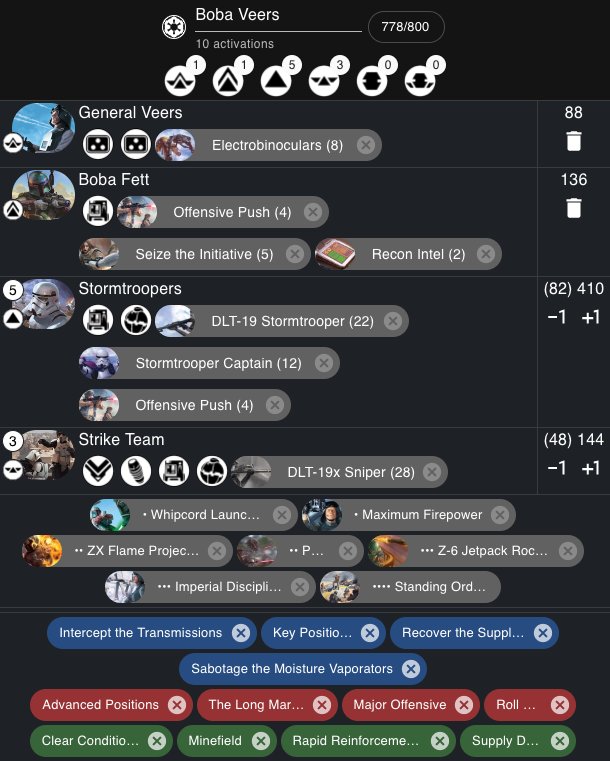
Boba and Veers was the list Luke Cook used to win worlds back in 2019. This list at the time was arguably one of the best armies in the game. Recently, however, Boba/Veers has fallen out of favor even though it is still a solid army. Boba Veers leverages Veers Imperial Discipline to get extra value out of Offensive Push and Stormtrooper Captains. Veers is still a solid support commander and pairs nicely with Boba.
Boba Bikes
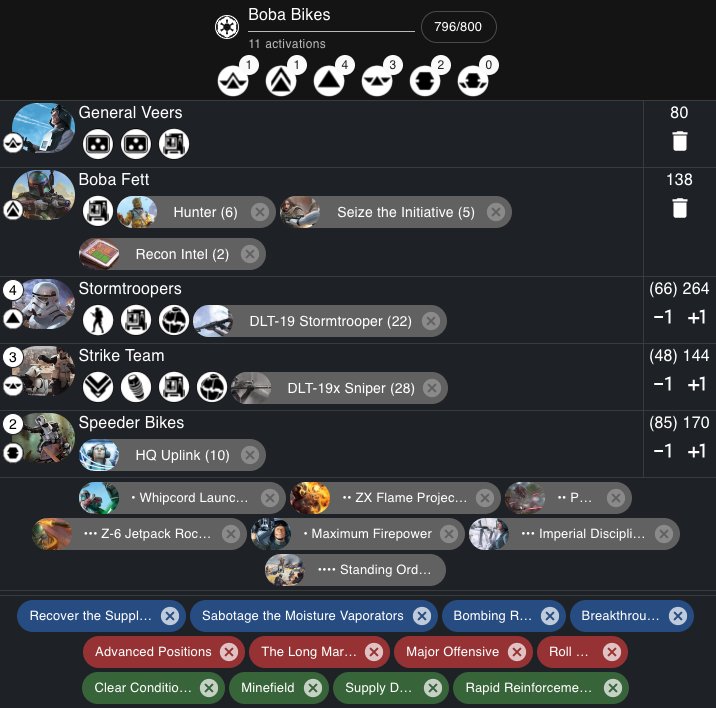
Boba Bikes may seem like a janky list, but it packs quite a punch. This list is great on Bombing Run and Breakthrough and is no slouch in a gunfight. Because of the combination of HQ Uplink and Imperial Discipline the army is able to maintain effective order control between Boba and the two Speeder Bikes. Since the speeders and Boba are highly mobile they can catch a bounty target out and quickly finish it off in a turn. Once your target has been obliterated, get out clean with the bounty and your speedy Bikes.
Flavor Over Function:
Empire Super Friends
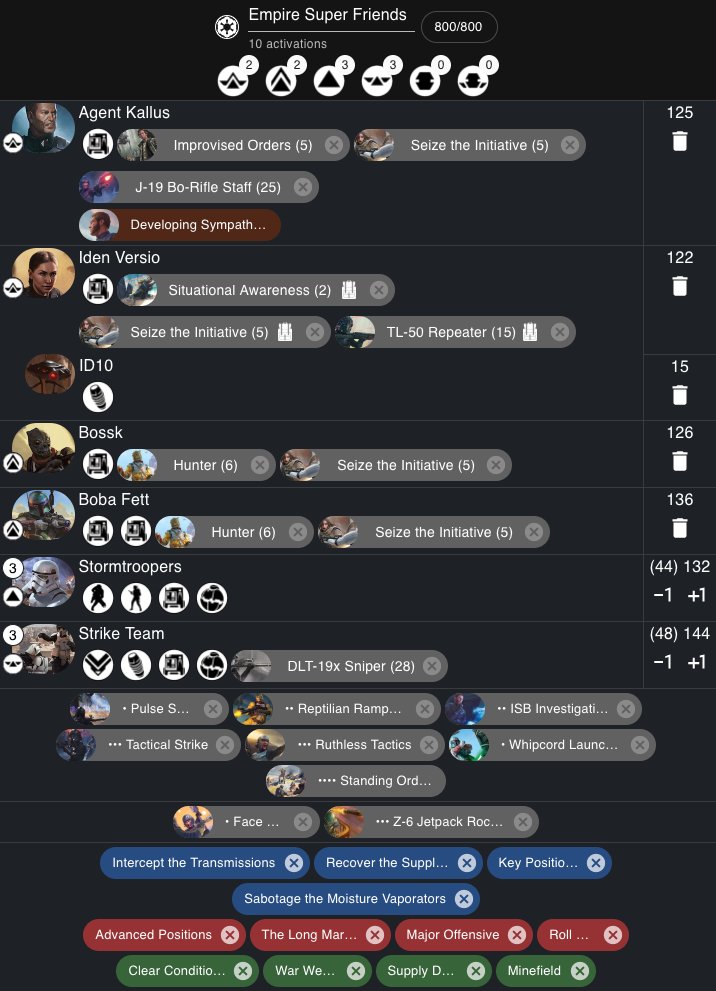
Empire Super Friends is not the most powerful army. However, if running an army with as many named characters as possible is what you want, then this list will satisfy. Empire has great Commanders and Operatives and this list tries to leverage that to the fullest. Because of contingencies you can take most of the necessary command cards to make each hero worth bringing. You will find this list has a tough time with full order control, but between Seize the Initiative and the 3 pips you can have orders where you need them. It is worth noting you only have 3 naked Stormtroopers as your core so be careful not to lose your heroes early as they make up most of your firepower.
Conclusions
Overall, Boba Fett is an extremely fun and rewarding unit to bring. Boba is a well-rounded play making unit that brings great firepower at close range. He does take a lot of practice to use properly, but nothing is more fun than claiming bounties with the universes most infamous Mandalorian.

