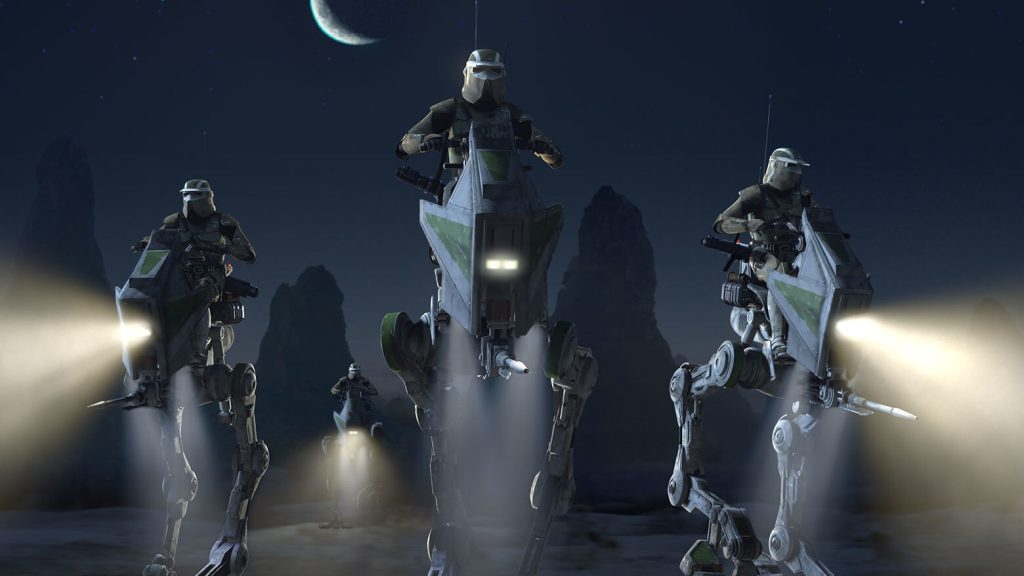

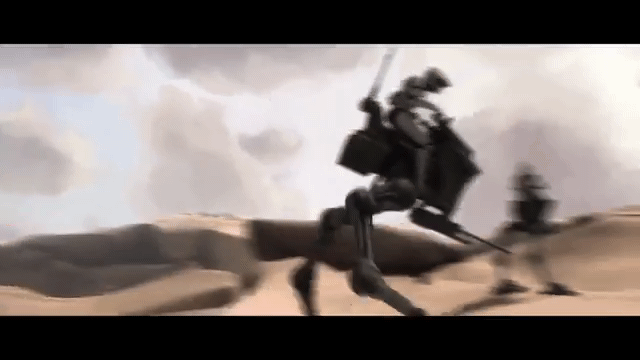
AT-RT stands for All Terrain Recon Transport, which makes it either a mini AT-ST or a giant chicken.
What happens when you cross a chicken with a Flamethrower? Let’s find out.
Take note that since the original guide was written in 2018 (!) and that we’re both updating it for 2.6 AND adding in elements to cover the Republic AT-RT, we’ll skip the usual blue text for updates because basically the entire thing would be blue. Original article written by Kyle Dornbos with rewrite by Evan “Doc Velo” Paul.
Pros:
- Can fill multiple roles
- Fast and has a Scout move (unusual for vehicles)
- Can navigate around terrain much better than it used to thanks to the free pivot vehicles get as of the Legion 2.6 update
- Can provide cover and LOS blocking to your trooper units
Cons:
- Only has Armor 2
- Very limited utility once it hits 4 wounds (mostly true for Rebel version)
- Is a pretty big target
- Dice pools are usually fairly small, aside from big flamethrower attacks
Overview
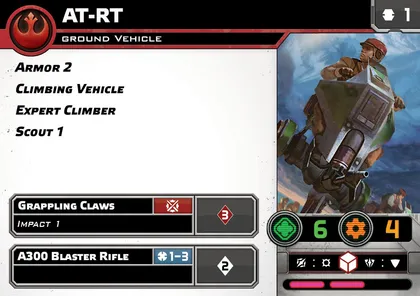
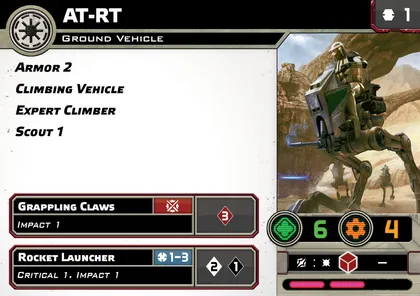
Cost: The Rebel version is 50 and the GAR version is 60 since it has a couple extra bells and whistles. Generally, this puts it in the same category as Corps units with heavies once you add the hardpoints (since you usually will).
6 Health, 4 Resilience, Armor 2, the same defense dice as the standard trooper of the faction: In a funny twist, the Armor 2 basically mimics the old version of heavy cover, which this vehicle can no longer benefit from at all. When this was revealed during Ministravaganza 2024, the devs commented that the old unit (which had full Armor) didn’t make a ton of sense for something that literally had an exposed trooper on top of it…and I fully agree! I think the new health profile, where both these units got a step-up in terms of their actual defense dice, makes a lot more sense and makes the unit feel more thematic than before. That said, they also die more easily than they did before (except perhaps against impact specifically, but there are generally more standard dice pools out there than impact pools so it’s a net loss at the end of the day).
Climbing Vehicle, Expert Climber: This used to be really clunky because back in the day “climbing” required that you start the turn adjacent to the terrain, and now it’s just a speed 1 move where it’s allowed to overhang the edge (unlike troopers) so this is now fairly useful on busy tables to get the angle you need.
Surging: Funny enough, the Rebel version was the original “surge to crit” vehicle so props to the old man walker. Who knows why they shot more poorly out of the factory when clones used them (the GAR version only surges to hit), maybe its some sick illegal mods the Rebs are using.
Grappling Claws: Three red dice, Impact 1. I feel like getting stepped on with giant spiked metal feet should actually hurt MORE than that but maybe that’s just me.
Base Weapons: Rebels get an adorable little slot machine that will only rarely be relevant and Clones get a legitimate weapon that will usually push one damage through thanks to the combination of three dice with Critical and Impact. Apart from the defense dice, this is the main reason the Republic version is 10 points more.
Hardpoint Upgrades
There are three very different hardpoint upgrades available to the AT-RT. Each upgrade allows the AT-RT to fulfill a very different role on the battlefield. Broadly speaking, the Laser Cannon is anti-armor, the Flamethrower is in-your-face trooper melting, and the Rotary Blaster is somewhere in between, providing flexible fire support at Range 3.
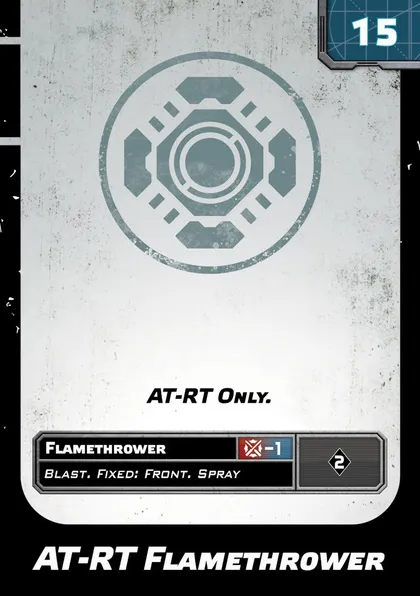
The AT-RT is basically tied with the Spider Droid for having the best Flamethrower in the game (all of which share the very important keywords of both Blast and Spray). Two black dice per model is usually a lot when you’re shooting at something non-unique, and since every list needs to have at least a few multi-mini trooper units there won’t be anybody out there who is truly immune to your flamer charms. Now that we have super-squads in Legion 2.6, there are even more appetizing potential targets out there. You’ll get to roll 20 black dice against a full squad of the fairly popular super-Fleet troopers, which averages out to a little over 8 dead troopers. Hope you brought enough to roll for that! The less common but possible and even more ludicrous potential target is a 14-droid B1 unit, where you’ll get to roll 28 (!) dice, which as you might expect would usually finish off a unit with non-surging white defense dice.
Of course, over here in the average real game of Legion, your targets are much more likely to be the “usual” 5 person Corps units, but 10 dice sure ain’t bad against that especially against units like Veterans and Ewoks (Rebel on Rebel crime I know) that rely on Low Profile, which Blast completely negates. Also notable is that this, like all prior flame weapons, got upgraded so it can be used in melee as well which used to be a weird loophole against the weapon…no longer!
On the negative side, there are, of course, the situations where you’re facing low-mini count units. The flamer ironically doesn’t feel particularly great against multi-wound models like Wookiees and especially not against red save multi-wound models like Magna Guards. Then there are characters and most vehicles, where the weapon is nigh-worthless. This is another area where the Republic AT-RT shines a little brighter, This is because it can switch to its respectable default weapon in situations where the dice would be better than the flamer, while the Rebel AT-RT, unfortunately, does not have that option.
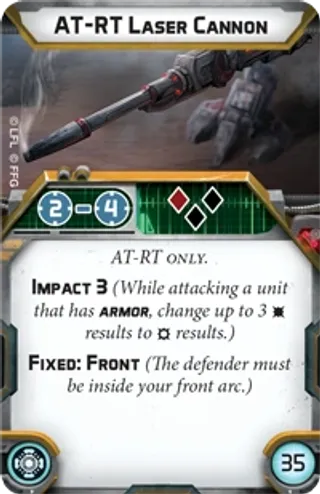
This is only 10 points now, can you believe it was so expensive?!
Basically, this is the opposite of the flamer weapon, low dice but long range. In the “old” days this weapon was really only playable on the Rebel version because it had a native surge to crit, otherwise this thing would basically never get past cover, even if it was against big vehicles (since they’d often get cover too). Well, now cover in general is no longer a specific detriment to low dice pools and armored vehicles rarely get cover at all (the T-47 and Infantry Support Vehicle are the only exceptions). This makes the laser a legitimate choice for both factions, though I’d say that’s especially true for Rebels. It indeed has more range and better dice than the standard GAR AT-RT base weapon, but it’s not by enough for me to want to use that slot to make it slightly better at long range when its ability to use a flamethrower is the thing that makes it unique in the faction. If you wanted reliable impact, you’d almost certainly be better off with an RPS clone infantry unit, which is more survivable and throws many more dice at range 3. Also, while they’re much more expensive, GAR can field other vehicles with big anti-vehicle guns like the ISP or the Saber tank. Also, there’s the whole…commando issue, but we’ll talk about that at the end.
Rebels, however, have very little as far as that goes. If we agree to put the T-47 in a different category due to its enforced mobility from the Speeder keyword, this is the closest they’re gonna get to a tank. A list with three Laser AT-RT’s (which comes in at a relatively modest 180 points) will almost certainly be able to put 3 aimed (because of the scout move) impact 3 shots on whatever target presents itself. Given the nature of the first round, when units can’t be shot until after their first activation, this means that you’re guaranteed to get those dice off. If you can manage to deploy all 3 after, say, an AT-ST, you could expect to take off close to half of its health in that first volley – that ain’t nothin’! Against something like clone troopers the damage will be more modest, but you can still bank on taking out one per shot IF there are no dodges built up. This would actually be a decent way to soften up an enemy Clone Commando unit since you won’t be too worried about Katarn armor taking your wounds away.
AT-RT Rotary Blaster
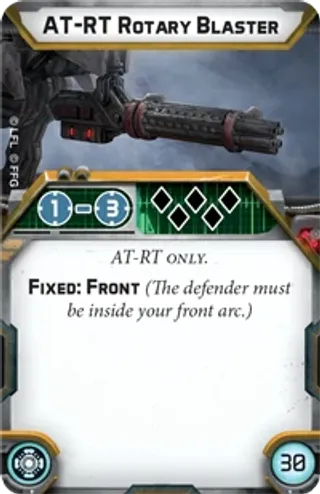
It’s funny that this was once cheaper than the laser cannon but it’s also down from the past, to 20 points this time
This weapon used to be a way for Rebels to get decent firepower out of decent durability, and since it surged to crit it would get past the old system of cover fairly reliably. For Clones its purpose was more mysterious, aside from being a decent starter to the now-obsolete rules for Fire Support.
Somehow though it got worse, now I’m not sure this weapon has a purpose at all. The flamer gives you burst potential for big units and the laser gives you a turn 1 attack and sniping potential from the back…but what does this get you? For Rebels it’s a 70 point unit that can shoot at range three and is slightly more survivable than an MPL-7 Rebel Trooper unit that shoots more dice, with critical 1, AND ion, AND impact (67 points) or a Veterans unit with its heavy that shoots EVEN more dice and at longer range while still keeping critical 1 (74 points). For Republic, pretty much any corps with a heavy off the street will do more damage than this and for fewer points on top of that.
Perhaps this will get a refresh next year, but for now, I’d just stay the hell away: the opportunity cost is too high to play it.
Comms Upgrades
This slot is usually empty (most of them don’t mesh well with their role in an army) but there are a couple to consider

This is not a bad choice for flamer units since it will often give you order control when you’d usually be digging into the bag hoping to get it before it dies.
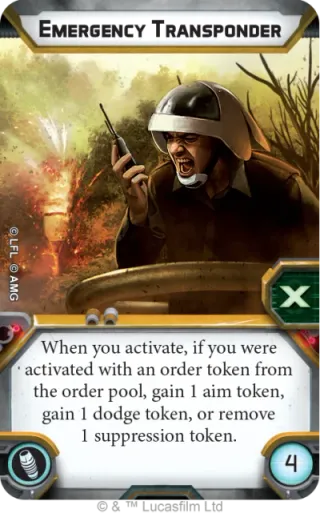
Also for flame units, this is a decent way to get the most out of your big initial attack by getting an aim token to use when your actions are pretty much always going to be move-shoot.
Strategy
General
In the past, the angle at which you ended your turn used to be crucially important because you could inadvertently get “stuck” because of the terrain in front of you, that’s much less likely now that most vehicles get a free pivot at the beginning of a movement. Still, when you end your movement, you do want to try to keep your next movement in mind as much as you can, while maintaining your target for that turn in arc of course.
Given that both the Flamer and Laser AT-RT’s benefit from order control, I’d advise you to get face-ups on them when it’s possible. It’s probably not worth playing HQ uplinks JUST to do that in Round 1 but it may be worth playing Assault instead of something else.
Blocking
Remember that your AT-RT functions as a moving cylinder of line of site-blocking heavy cover-giving terrain when it comes to your troopers. Don’t expect to be able to hide much more than a single model with a single walker, but with practice, some players can cleverly march them in unison with each other or with the help of OTHER blocking terrain to make the wall bigger. Even if you don’t completely block LOS, providing heavy cover in territory that would otherwise be wide-open can be really useful for something like Fleets that always want to be moving up no matter what.
Flamer AT-RT
Charge! Just remember to have your targets in mind from the second you deploy, because while it’s true that you’re fast you’re also a REALLY big target for your opponent, who will not want to be flamed. So, activate late and hide behind buildings on the way when you can.
Laser AT-RT
Activate late and pile onto whatever you think is the best target (usually their vehicles if they have any), then transition to a “babysit the back POI” role for the remainder of the game.
List Building
Here’s something that I think takes advantage of the Laser AT-RT as a backline-holder while the rest charge in
I’d also be remiss if I didn’t mention this silliness from Mowgli, which got top 8 at Crucible GT 2024. Obviously these AT-RT’s were there to…exist, as cheap units, though they did get some decent melee attacks in.
For Republic, I think the flame unit is a bit more up its alley
One last note about Republic…
As of this writing, one of the prevailing “issues” with Republic AT-RT’s is the fact that they occupy the same slot as Clone Commandos at around the same cost…but Commandos are just way better in pretty much every way. If they hadn’t been added to the 501st battle force then we’d likely see more AT-RT’s just so they can hang out with the quadruple ARC units in that army, but such as it is the GAR AT-RT is mostly in hibernation as of this writing. This isn’t for me to wag my finger at you if you end up choosing an AT-RT over a Commando unit, but just rather we should just acknowledge the truth as it is now. In any case, we’ll edit this out if things change because of a nerf but…it is what it is.
Summary:
- The role of your AT-RT and how you use it is highly dependent on your hardpoint choice
- The flamer is likely the best choice for Republic whereas Rebels can take either the laser or flamer
- Decide what role you want to AT-RTs to fill, and then take two or three of the same
- Flamer RT’s WILL get targeted and will probably eventually collapse into mechanical debris, but if you’ve taken out more than its value then it did its job.
- AT-RTs can be used as mobile cover if you move them up with other high-threat units
Now that you’re ready to put these on the table, try not to wonder too much about why these even exist in a fictional world with easy access to hovercraft!


1 Response
I think the rotary blaster could go down to 10 points and it would be fine! Perhaps give it critical 1 as well