
Today, we’re going to look at making a good table for Star Wars: Legion.
I’m not going to get into how to actually make the terrain pieces themselves (I’m hardly an expert on that), but which types of pieces you should have and how to arrange them.
For this article I’ll be using a couple of pictures of tables courtesy of the illustrious Nick Bodnar, the Tzar of Tables. Nick has no less than 32 of his own self-made Legion tables and provided the entirety of the terrain for Pax Unplugged as well as many other tournaments.
First we’re going to define some terms, then we’ll talk about what types of terrain pieces to use in what quantities and how to arrange them.
Table making terminology
There are a number of terms and phrases that I’ll be using throughout this article that don’t represent explicitly defined terminology in the CRB.
Long Edge – The edge of the table that is the 6′ side, or the side that the players generally stand on when playing. This is the edge that players would deploy on when playing Battle Lines.
Short Edge – The edge of the table on the 3′ side. This is the edge that players would deploy on when playing Long March.
Line of Sight (LOS) Blocker – A terrain piece tall and wide enough to completely block line of sight to a trooper silhouette. Generally you want these to be at least twice as tall as a silhouette so they can’t be easily seen over by vehicles or from elevation, but I’ve seen functional tables with short LOS Blockers.
Lane – The space between LOS Blockers on a table. Think of these like “streets” between your terrain pieces. This is where most of the action happens in a Legion game.
New Cover – When I say this I’m referring to the current cover rules as reflected in the CRB (and crucially, additionally clarified in the forums). I know we’ve had these for a year now, but that’s still a lot shorter than the five years of cover rules we had before that, so they’re still new, in relative terms. Of particular relevance to this article: I still see a lot of people designing tables and terrain pieces that are functional with the “old” cover rules but not the new ones. The new ones are more abstract and less flexible than the old and require some adjustments in how you design tables, which we’ll get into.
Additionally, there are several relevant terms that are explicitly defined in the CRB. There are three distinct terrain types, three separate ways each type can be defined relative to movement, and three ways each piece can be defined for cover determination. Note that it is ultimately up to the players how to classify each terrain piece, and that a given terrain piece can be broken up into separate sections if it is large and/or has clearly different elements.
Terrain Types
Scatter – Small bits of terrain such as crates, barrels, barricades, etc. Note that barricades are a specific type of scatter terrain that have their own CRB section defining them as difficult and unable to be overlapped. I typically define most scatter as difficult as well, though you could reasonably have some defined as open (acrylic holos, smoke, etc.).
Area – An area of terrain contained within a boundary, usually on some kind of base. This is typically things like forests, craters, ruined buildings, shrubs, or groups of boxes on a palette. The last one is a particularly versatile and easy way to make area terrain that fits nearly any biome. The individual bits of terrain within the boundary of area terrain are explicitly not relevant as defined in the CRB and are often “free floating” so they can be moved around. Area terrain has an imaginary silhouette, similar to vehicles.
Obstacle – Large or tall terrain features like buildings or walls. Note that trooper units cannot overhang the edge of obstacle terrain and must be completely on or completely off it; bear this in mind when you are classifying terrain. Don’t be afraid to put obstacle terrain on a base; it doesn’t automatically make it area terrain and if your terrain piece doesn’t have smooth edges putting it on a base makes it a lot more functional with the new cover rules (more on that later).
Terrain and Movement
There are three different ways to classify terrain relative to how units move over it. Note that a given piece can be one way for a certain unit type and not another. For example, a swamp may be open for a repulsor unit but difficult for troopers, while a forest may be open for troopers but difficult for repulsor units (we’ve all seen how those trees are speeder bike magnets).
Open – Terrain that does not restrict movement. Typically this ends up being light area terrain (forests, tall grass, crate pallets, etc.) but can also include some small scatter like lamp posts, smoke, or holos.
Difficult – Terrain that restricts movement, reducing a unit’s speed by 1 (to a minimum of 1). Most of the terrain on your tables is probably going to fall into this category.
Impassable – Terrain that completely prevents movement. Note that you also cannot technically climb over/through impassable terrain either, so be sparing with this designation (obstacle is going to be a more representative classification most of the time for things like buildings and walls). Generally I reserve impassable for things that models can’t balance on top of at all or things that any sane little plastic person would never walk on/over, like a lava pit. A unit can still move over impassable terrain if it has a rule that allows it to ignore terrain (like Speeder or Jump).
Cover
And now we get to the most relevant part of terrain; how it protects your little plastic spacedudes.
No Cover – Terrain that doesn’t provide any defensive benefit. This is generally going to be reserved for things like ponds, rivers, etc. that would also be difficult, or there wouldn’t be a huge reason to have it on the table at all.
Light Cover – Strips one hit from the attack pool (Cover 1). Typically I try and make all my scatter terrain (except barricades) and area terrain light cover, even if it is things like rocks or boxes. Under the new cover rules each terrain piece projects a huge area of protection, so if you have any heavy scatter on your table you’re going to run into a lot of situations where everything is just in heavy cover all the time. Making your scatter and area all light cover at least creates some scenarios where that may not be the case.
Heavy Cover – Strips two hits from the attack pool (Cover 2). Obstacle terrain is generally going to be most appropriately classified as heavy cover depending on what it appears to be made out of. Anything that looks like it is made of metal, concrete, or something similarly durable (which is going to be most buildings and other LOS Blockers) would likely be heavy cover.
What makes a good terrain piece?
Now that we have all those terms out of the way, let’s look at what makes a good, functional terrain piece.
It should be obvious what it is supposed to be
When you are making or selecting a terrain piece for use on your table, make sure you have a clear idea of how it is supposed to be used given the separate classifications above, and make it so it is easily identifiable as such. If you want a piece of light area terrain in a temperate biome, make it primarily or entirely trees and bushes and put it on a base; if you want a piece of heavy area terrain, make it primarily or entirely rocks or ruins. Don’t leave your players wondering whether that piece is a bushy rock or a rocky bush. Something else that is a dead giveaway (and also adds a lot of functionality) that something is “supposed” to be area terrain is if you make the pieces on the base removable, either via magnets or just having them loose on the base.
Conversely, obstacle terrain should be big, blocky, and solid looking. Buildings make great obstacle terrain as they tend to have flat tops and clearly defined edges.
Scatter terrain should be small, sparse, and not on a base.
Below is an example of a table with easily definable terrain pieces.
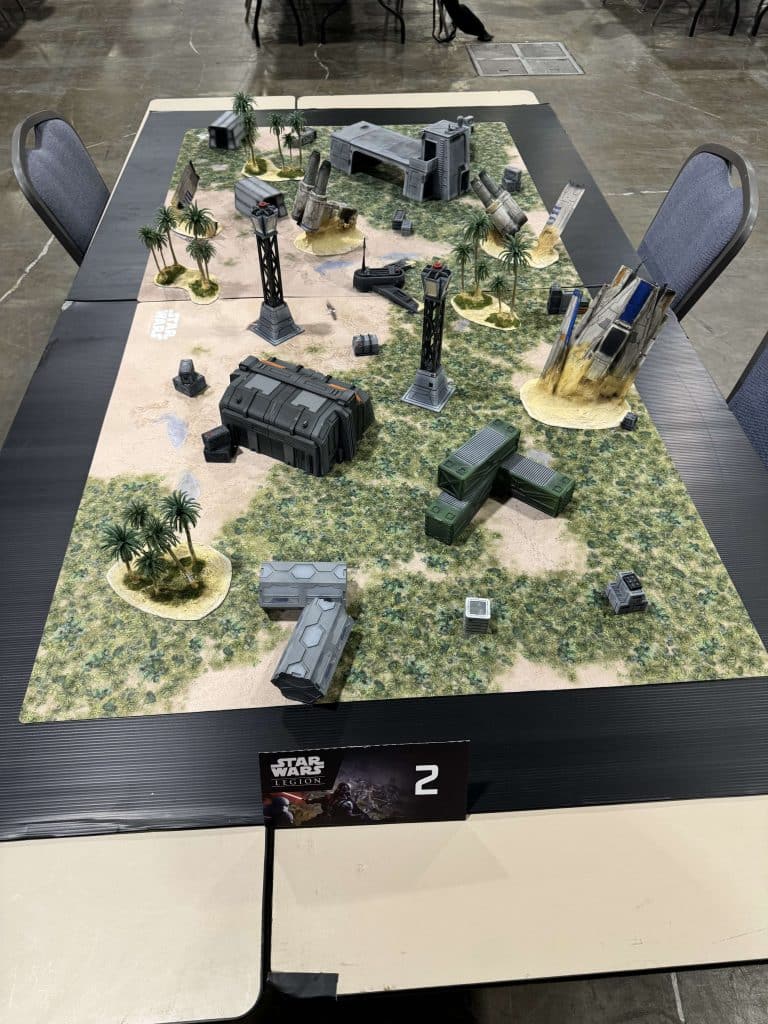
It has groups of palm trees on bases (light area), rectangular, large metal boxes and buildings with straight edges (heavy obstacle) and random bits of small boxes (light scatter). It also has some crashed U-Wing parts that are at extreme angles without flat tops and clearly not meant to be stood on (heavy impassable).
It should have clearly defined, smooth edges
With the new cover rules now drawing from an infinite number of points instead of from a single fixed point to a single fixed point, it introduces a lot of weirdness to cover determination, particularly on the edges of terrain pieces. Terrain pieces that have bits that stick out 1) get easily clipped when drawing the “flashlight” beam from base to base, even from extreme flanking angles, and 2) can be harder to discern if the line is clipping and “catching” the terrain, particularly if the defending mini is flush with the terrain piece (which is common for various reasons). For these reasons, it is much more functional to have terrain pieces that have smooth edges without bits that stick out. The easiest way to accomplish this is to just put everything except scatter terrain on a base; if you are using big blocky pieces with straight edges it may not be necessary for those, but even blocky buildings tend to have pipes/doorframes/window ledges etc. that stick out to be clipped by the cover beam.
The table below is an example of this, where Nick has put nearly everything on a base that isn’t obviously scatter terrain:
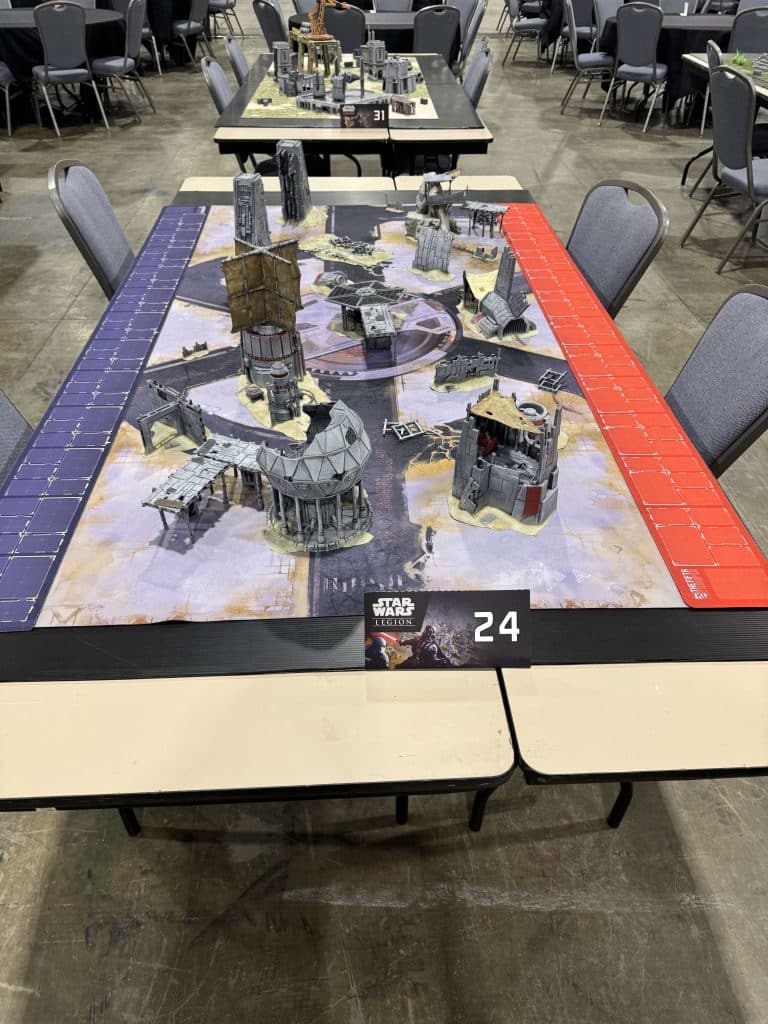
Even though a lot of the pieces on this table are buildings, Nick has still put them on bases to smooth out the edges.
It should be flat on top if it is meant to be stood on
With the new rule regarding overhanging trooper minis, if a terrain piece is meant to be stood on top of, it should have a wide, flat area on top for such a purpose where minis won’t slide off or hang over the edge.
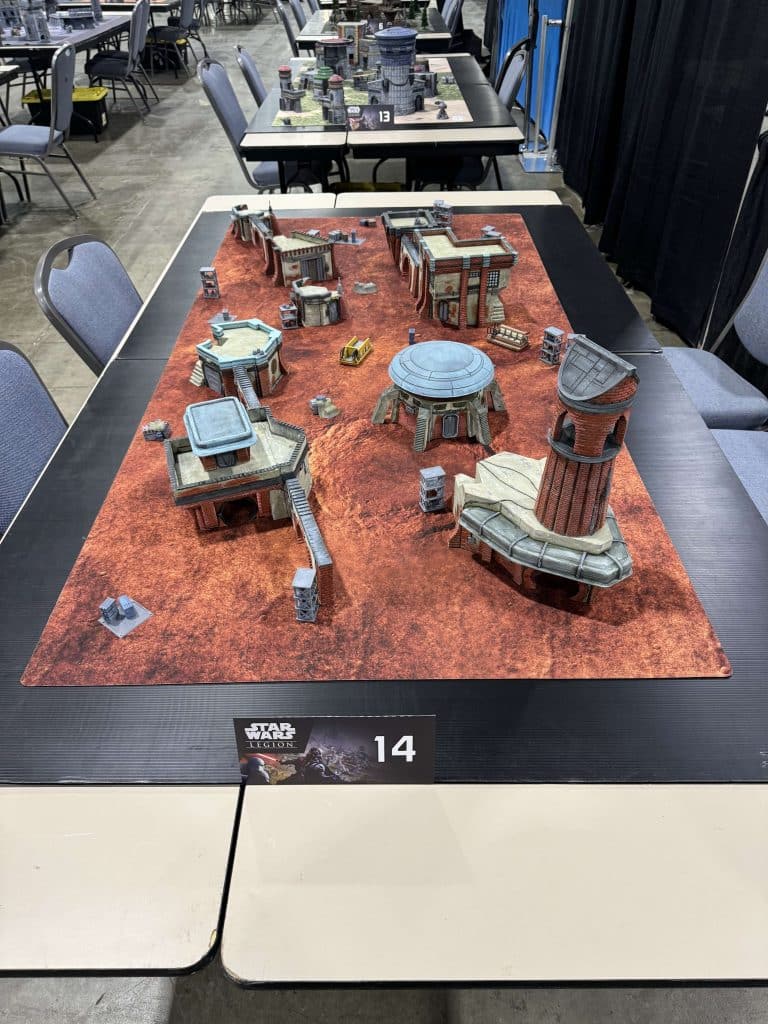
This table has numerous buildings that are clearly meant to have minis on top of them (except that dome thing) with wide, flat tops and walled edges.
Also note the presence of random boxes on flat pallets; this is an easy way to make light area terrain in a biome that doesn’t have vegetation.
How to arrange your terrain
Next, lets look at what you should actually have on your table and where you should put it. The CRB doesn’t have clear guidelines about how much terrain your should have or of what type, but the old FFG guidelines on this topic still persist and are generally followed. I’ve copied them below from the FFG tourney doc for your reference:
Tournament tables should adhere to the following guidelines:
» The terrain should cover 25 percent of the table at minimum, 35 percent of the table at maximum.
» The terrain should include a mix of scatter terrain, line of sight-blocking terrain, area terrain, and terrain of
varying heights.
» The terrain should include a mix of light and heavy cover.
» Medium and large pieces of terrain should roughly be placed beyond range 1 of each other.
3’ x 6’ tables should include the following:
» 3-5 medium-sized line of sight-blocking terrain of
height 1 or lower
» 1-3 large line of sight-blocking terrain of height 2 or
higher
» 2-4 pieces of area terrain (woods, craters, rubble,
tall grass, etc.)
» 0-2 pieces of difficult area terrain (can be the same
as the pieces above)
» 8-12 pieces of scatter terrain (barricades, crates,
etc.)
This is still a good framework under the CRB, though the scatter looks a bit high as the new cover rules don’t deal that well with scatter; I would probably cut that in half and say 4-8 pieces of scatter, shying away from heavy scatter/barricades in favor of light scatter.
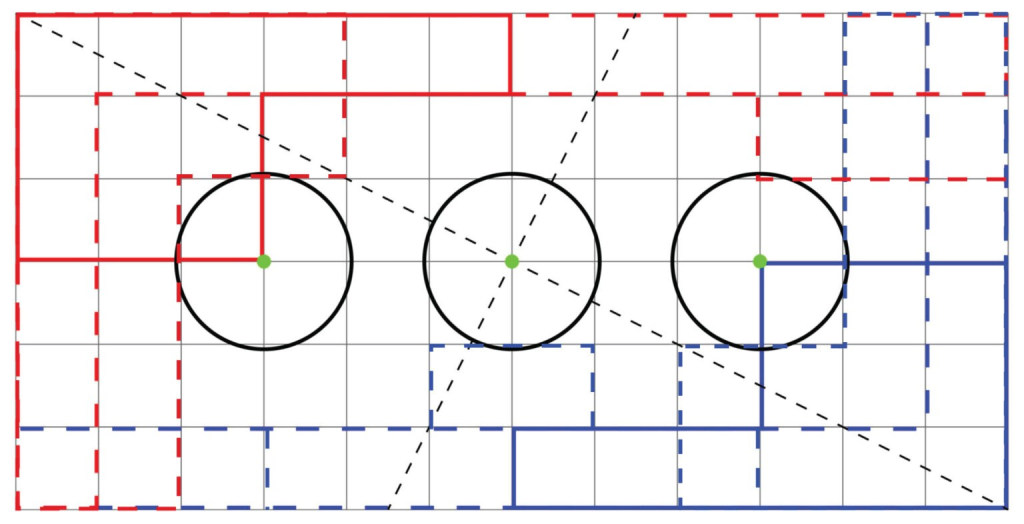
This graphic from Brad Neimczyk (Nerfley) is really useful to help visualize where the deployment zones and objectives will end up on your table and is a great reference when arranging your terrain.
Placing LOS Blockers
When arranging your terrain, you should have one or two LOS blockers near the center of the table, but not directly in the center of the table. It’s a good idea to have a piece of terrain near or in the center that isn’t a line of sight blocker to use as a KP and for models to use as cover in the middle, just make sure the dead center is still flat on the table for purposes of placing center objective tokens like Hostage and Recover.
I also like to put some LOS blockers near where the non-central intercept points would be (or the corner of the Major Offensive Deployment zone, above). These are kind of the “centers” of the home thirds of the table and typically see a lot of action.
Also consider putting some of your LOS blockers near the long edges of the table, in between where the Danger Close or Disarray zones would be. This helps to prevent a completely open lane in this area on those deployments and is also useful on Long March. If you keep it slightly away from the table edge it can also be used by units on the long edge deployments and corner deployments.
Make sure none of your LOS blockers are too close together. They should be at least Range 1 apart from each other, if not slightly further.
Placing Area Terrain
After you’ve put your LOS blockers down, you will still have some sizeable areas that don’t have a large/medium terrain piece in them. Fill these gaps with area terrain. Generally each corner deployment area should have access to at least one medium/large area terrain piece.
Placing Scatter
You can go a bit lighter on scatter than you might be used to, but you should still have some. Avoid using heavy scatter unless all you have is barricades. Place small scatter in the middle or slightly off center of the lanes between the larger area/obstacle terrain pieces and try and fill any remaining large/obvious gaps with larger scatter pieces.
Summary
As a tabletop miniatures game, Legion is highly reliant on the custom terrain that goes on your table to dictate the quality of your experience. If you make sure that terrain is clearly defined, smooth-edged, and well spaced, you will have a much better gaming experience. Hopefully you found this helpful; feel free to post your own table design tips in the comments!

