

Star Wars Legion Players!
“Ten Hut(t)!”

(It will make the reading process more bearable if you use your best drill sergeant voice. I apologize in advance.)
Don’t let this be you when it comes to Legion strategy. I’ve got news for you grunts, we’re in “Legion Bootcamp” now and you had better be paying attention to this article!
Hey, Private Snowball! Get your hand out of the Klatooine paddy frog bowl and form up!
Now I know you Nancys may think you can strategize, but what we have here is a full on, red alert, Defcon 1, “cocked pistol,” EEEEEEEEEEEEMERGENCY!
We are currently AT WAR with Dark Troopers and Blizzard Force, and I WILL NOT lose this fight! This means I need all able-bodied men and women at the FRONT LINES (speaking of which, make sure you check out some of the upcoming Legion tournaments from FLG!)
This training camp is designed to bend your mind! Break your will! It is solely focused on reinventing you as the lethal Legion warrior you have always wanted to be, but were too afraid to do because you were getting comfortable going 0-3 at locals! (Remember to keep using that drill sergeant voice)
I was once a peon! I was a bottom of the totem pole, no good, useless WIMP! Now, I’m a JERK!

So if you want mental muscles like these, listen to what I’m about to tell you. AND FALL IN YOU MAGGOTS!
Step One: Objective Consideration During List Building!
Disclaimer: There will always be exceptions to these guidelines that are based on a multitude of factors, but it is up to you as a player to figure out if and when an exception applies!
ONE-A: There are three types of objectives of which you must consider when constructing a list! This shouldn’t be anything new for you seasoned soldiers, but for you recruits, we need to establish your foundation!
FIRST!!! THUMBS! There are three objectives that fall into this category: Recover the Supplies, Hostage Exchange, and Sabotage the Moisture Vaporators (Bombing Run is excluded because while you CAN pick them up with trooper units, this objective is almost always dominated by lists with speeders). If it can be touched, grabbed, or picked up and brought home to Mama, you better have the thumbs for the job! ONLY NON-CREATURE/NON-EMPLACEMENT TROOPER UNITS HAVE “THUMBS”. You do not want to find yourself playing any of these objectives if you have more vehicles than troopers in your list. IS THAT CLEAR SOLDIER?! GOOD! NEXT!
SECOND? BUTTS! There are four objectives that fall into this category: KP, Intercept the Transmissions (THIS REQUIRES TROOPER UNITS TO SCORE), Payload, and Breakthrough. Breakthrough can be placed in this category since you can always choose between playing defense and going for a win on Kill Points while you sit on your butt. However, high activation lists with extra moves via scout or command cards, or other forms of “legal cheating” provide you with great options to actually get those butts to score at the end of the game. EVERYTHING IN THE GAME HAS BUTTS, BUT NOT EVERY BUTT IS A TROOPER BUTT. See the instructional diagram below for clarification!
If you can sit on it with your miserable little hineys, then you’d better have the guts to sit your butts on a Key Position, within range 1 of an Intercept objective, within range 1 of a Payload cart, or within the deployment zone of a hostile army!
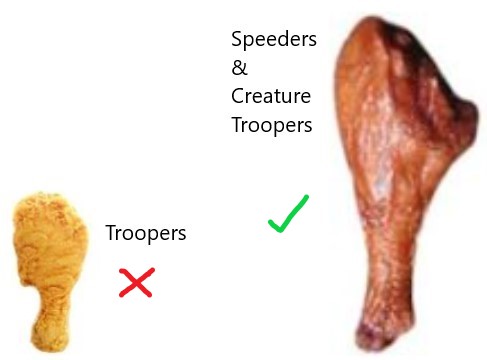
THIRD!!! LEGS! There are three objectives that fall into this category which basically requires units with high mobility capabilities: Bombing Run, Breakthrough, and Payload. Payload is in this category because units with high mobility like speeders, Taun-Tauns, Dewbacks, and speed 3 troopers are more likely to get opportunities to stall opponents’ bomb carts. WHILE (almost, sorry FD) EVERYTHING IN THE GAME HAS LEGS PRIVATE, NOT ALL LEGS ARE EQUAL! Little itty-bitty trooper legs are nothing compared to the capabilities of speeders and speed 3 trooper creatures! For those of you still struggling to understand what I’m spewing out of my pie-hole, take a look at our state-of-the-art, ultra high tech, top secret training diagram:
It’s worth noting, that for Breakthrough and Payload, melee focused trooper units with speed 2 or 3, and Charge/Relentless keywords do tend to excel above other trooper units thanks to their action economy, but I would still probably ban Breakthrough against speeders/fast creature troopers in 9/10 cases if you have fewer than your opponent).
Back to that drill sergeant voice. Really try to get into it for this next part.
ONE-B: DEPLOYMENTS ARE CRIT-I-CAL IN DECIDING HOW AND WHEN THE FIGHTING WILL TAKE PLACE.
Unless you were born yesterday you should know there are short edge! Long edge! And hybrid DEEEEEEEEEPLOYMENTS! CORPORAL, GET ME THE DIAGRAMS!!!
HERE WE HAVE THE LONG EDGES I-DEN-TEEEEEEEEEE-FIED!
HERE WE HAVE OUR SHORT EDGES I-DEN-TEEEEEEEEEE-FIED!

Now that you have seen the diagrams with which your tax dollars have been so integral in developing, we will reeeeeeeeview all the deployments!
General!!! I was just showing these Kowakian-Monkey-Lizards our state of the art diagrams and up next wa-…
Thanks Sergeant, but why don’t you take 5 and I’ll go over deployments and conditions.
Feel free to take a break from drill sergeant voice for this part. I know it’s getting cumbersome.
Step Two: Deployment and Condition Consideration During List Building!
ADVANCED POSITIONS: Hybrid. Half short edge to short edge, but a solid deployment for trooper-based gunlines with moderate flanking potential/risk. Deployment options are increased by up to 50% for trooper units thanks to Scout 1.
BATTLE LINES: Long edge to long edge. Maximum flanking potential/risk. Ideal for units with high mobility, although starting just beyond range 4 from the enemy army can make for early engagements.
DANGER CLOSE: Hybrid. Mostly long edge to long edge. High flanking potential/risk. This deployment really helps blue player regain some of the board edge advantage that red player gets, and it’s also good for high mobility units.
DISARRAY: Long edge to long edge, but with a twist. Maximum flanking potential/risk. Ideal for speeders/creature troopers/troopers that can operate independently of the rest of their army. This deployment also can regain some of the board edge advantage and in some cases, even telegraph where your opponent’s army will be. Units with infiltrate actually like this deployment a lot too because they can pick off a straggler enemy unit if they go for the “throw away” deployment.
HEMMED IN: Hybrid. Moderate-high flanking potential/risk. This deployment is heavily dependent on terrain, but it grants blue player the ability to basically start in the middle of the map (which is where most of the action usually happens). On certain objectives this is hugely beneficial, on others this could put you in the line of fire too quickly, and if you’re not prepared for it or get stuck with less than ideal terrain, you’ll be in for a rough match.
THE LONG MARCH: Short edge to short edge. Minimal flanking potential/risk. Lists with long range firepower and heavy vehicles are fond of this deployment. With an 18″ by 36″ deployment zone, your options for an approach are pretty open, and you have virtually no worries of being flanked. You do however, have a lot of ground to cover if you’re trying to engage in melee or get into close range to use certain weapons. I would avoid putting this deployment in your battle deck if you’re playing an aggro force user, or anything that needs to get in close to do its best work unless you have a very specific plan in mind. It does effectively turn the board into a 3′ x 3′ and allows for armies to stay huddled together, but be careful letting this make its way past turn 0 if you are facing an army that can overwhelm you at long range.
MAJOR OFFENSIVE: Hybrid. Mostly short edge to short edge with a small peninsula to deploy more aggressive units if necessary. Minimal-moderate flanking potential/risk. This deployment basically gives you some of Long March and come of A.P. without the additional Scout 1. I find this is a very safe deployment for most armies, and thus can probably be included in every battle deck and isn’t really worth considering when constructing a list. This deployment is somewhat of a mental break whereas you don’t have to put much effort into deciding if you want it banned or to stay put on turn 0.
ROLL OUT: Short edge to short edge. Minimal flanking potential/risk. This deployment is kind of like the happy medium of Long March and Major Offensive. Vehicles get extra room to try and get that sweet spot, but aside from that it’s a fairly straightforward. Most of the time I like Roll Out for gunlines because there’s usually a good alley or two you can hold down by simply deploying at the top and the bottom of the range 4 segment of the zone.
Conditions:
I won’t spend too much time on conditions, because usually those precious vetoes are being used for objectives or deployments. There are, however, some ridiculous conditions with specific lists that you want to actively avoid. Consider banning conditions a luxury once you have either secured a solid or winnable objective/deployment set.
Limited Visibility: Do not let this condition slip through if you are playing a long range gunline/vehicle list vs a melee skew or all close range army. Your guns that you’ve paid all those points for are basically doing nothing for the first round, maybe two.
War Weary: Vader, Yoda, and Palpatine (in that order) can use this condition to turn KP, Intercept, Payload, Breakthrough, Hostage, and Recover the Supplies on its head and panic a majority of your scoring units without you being able to react. The way they do this is as follows: Round 6 (worst case scenario is they just kill your commander so you can’t nominate a new one before the game ends) they do their suppression tricks to throw a bunch of yellow tokens out after all or mostly all your units have activated, and just move your commander out of range 1 of as many scoring units as possible. It’s not a condition I would actively be looking to veto, but one that I would be WEARY of in certain matchups. See what I did there?

Rapid Reinforcements: (Maybe use drill sergeant voice for this next sentence) DO NOT. I REPEAT. DO NOT GIVE DARK TROOPERS OR MULTIPLE FD CANNONS THIS CONDITION IF YOU CAN HELP IT. Yes the turn 0 flop may put you in a position where you have to let this through, but that is highly unlikely and I would consider this condition a priority ban if possible vs those units specifically. This one is also sneaky good on Breakthrough, so watch out for that as well.
Well, that covers deployments and conditions, so back to your best Gunnery Sergeant Hartman impressions.
Step Three: List Composition and Unit Synergies!
Now that you have been highly educated thanks to our world-renowned battle card foundation construction program, I will tell you how to build lists around these specific parameters! There are three main archetypes (each has their own sub-archetypes, but this article isn’t about different archetypes specifically, so I will just go with the three main ones for now) and they are as follows!
GUNLINES! These want to be doing one thing, and one thing only: SHOOTING. You don’t want to bring the biggest guns to the fight only to have them running their pathetic little hind-quarters off the whole match!! This puts Bombing Run and (usually) Breakthrough off the table! That would be the ultimate waste of resources, unlike our $100 million dollar training diagrams provided by the KFC (Kentucky Fried Combat) division. Lists with trooper-based range 3-5+ firepower excel when they can use the majority of their actions to aim shoot! You want center-focused objectives! You want short edge or certain hybrid deployments that create a bottle neck so you can keep your forces together! Gunlines love the following objectives: Intercept the Transmissions, Key Positions, Sabotage the Moisture Vaporators. You can add a, what do they call them space wizards…? THATS RIGHT, A FORCE USER! One of those FORCE UUUUUSERS can open up additional objective options for your battle deck: Hostage Exchange, Recover the Supplies, and even Payload!
Speeder/High Mobility Skews! These lists are fast, lethal on offense, and usually somewhat flimsy on defense! The idea behind speeders and high mobility units is they operate best when they hunt in packs! I remember like it was yesterday…we were on the hunt against an overwhelming force deep in the jungle. We struck first and struck hard in packs of three! This same concept applies here: If it’s worthwhile to play one, it should be worthwhile to play three! Yes there is one list that breaks this rule with four speeders, but we don’t take kindly to rule-breakers at this boot camp!
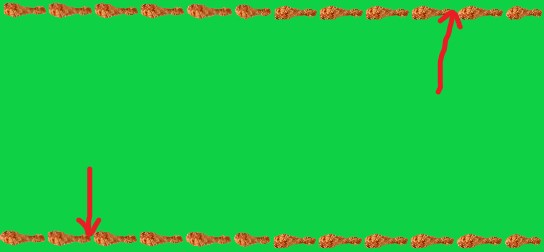
Melee Skews! These lists want to get in your face AS QUICKLY AS POSSIBLE! JUST LIKE I’M DOING RIGHT NOW! PRIVATE SNOWBALL!!! IS THAT A CHICKEN LEG IN YOUR POCKET OR DO YOU JUST LIKE MELEE SKEWS?! Melee skews are heavily reliant on terrain and LOS blockers! If they take too much damage or lose too many models before they get to engage in melee combat, their efficiency is severely reeeeeeeeeeduced! The best defense is not getting shot at all! Units like Magnaguards, Wookies, Force Users, Dewbacks, and Royal Guards all thrive in close quarters, so you want to make sure you include deployments with as little distance to travel as possible. The objectives should be center-focused and chosen in such a way that you create what’s called a “Scrum”.

I SAID SCRUM NOT CRUMB! I DO NOT WANT TO THINK ABOUT WHAT EVENTS HAD TO TRANSPIRE TO CREATE THE ABOMINATION IN THE ABOVE DIAGRAM!
Step Four: Planning, Execution, and Adaptation!
DON’T GIVE UP ON ME NOW! WE’RE IN THE HOOOOOOME STRETCH, AND I KNOW YOU SMELL MAMA’S SWEET SUMMER COOKING! Probably the SINGLE most important element in terms of upping your competitive play is having a game plan, whether it be good or bad you will not consistently do well without an initial plan. WE DO NOT, I REPEAT WE DO NOT WING IT. To help push this concept through that wet grey matter you all call a brain, our top advisors and generals created another state-of-the-art diagram! See here:

Whether it’s something as simple as telling yourself “I’m going to run everything forward at my opponent and just try to overwhelm them” or something as complex as “I’m going to bait with a specific unit to draw their forces into a trap,” a plan is always better than no plan! Again, REMEMBER THE DIAGRAM! If you bring a melee skew, part of your plan needs to be how to insert your costly melee units without taking too much damage. If you bring a gunline you need to plan out how you will deploy and if you are trying to start a firefight early or delay it. If you bring a high mobility list, you need to plan out how you will deploy against an army that can shoot you down and/or alpha strike your fragile units before they accomplish their mission(s). 74-Z speeder bikes for example, engage just shy of range 6 or 35.92 inches, so if the enemy force has range 4 units with speed 2 and a small trooper base (their engagement range would be 29.96 inches) they cannot engage you before you engage them. USE THIS TO YOUR ADVANTAGE! Once you have established your initial game plan, your last remaining duty is to formulate a plan B, and even plan C for those of you over-achievers! These plans should be based on worst-case scenarios and/or educated guesses on what your opponent’s plan may or may not be!
I’d recommend you take a small break from the drill sergeant voice because the grand finale is right around the corner.
Once you have established your plan both before and after turn 0, it is IMPERATIVE you stick to that plan. Indecision and deviating from my initial plan has lost me more games than I care to admit. The last thing you want to do in the beginning of a competitive match is deviate from your plan at the wrong time, and then have to come up with a whole new one on the fly while you’re trying to react to what your opponent is doing. Executing your plan takes at least as much mental effort as formulating it, so just keep it simple and stick to it! Evaluating your units in terms of where they will be the most successful based on the terrain placement, objective, condition (if applicable), and deployment zone is also an important part of executing your plan. This usually can’t be done until after turn 0 has concluded. If a 44 point corps unit can be grabbing a box, or tapping a vaporator, or safely holding down a back KP/Intercept point, then they should absolutely be doing so over an 80 point corps unit or worse, something way more expensive like a force user.
Finale:
NOW LISTEN AND LISTEN GOOOOOOOOOOD! THIS MAY JUST BE THEEEEEEE SINGLE MOST IMPORTANT PART OF YOUR BOOTCAMP, AND IT JUST SO HAPPENS TO BE THE LAST ITEM ON THE AGENDA.
A-D-A-P-T-A-T-I-O-N, A-DAP-TA-TION!!!
IF YOU LOOK IN THE DICTIONARY UNDER THE DEFINITION OF INSANITY, IT WILL SAY: SEE INSANITY AND BY GOD I WILL WATCH YOUR ASS REREAD THE SAME LINE OVER AND OVER AGAIN UNTIL I GET SO OLD MY CRANBERRIES (Edited for content, also hi I’m an editor now, mwahahaha – Evan Paul) SHRIVEL UP INTO LITTLE ITTY BITTY OCEAN SPRAY CRAISINS.
For reference:

IF YOU EXPECT DIFFERENT RESULTS, BY DOING THE SAME THING, OVER. AND OVER AGAIN. YOU. WILL. NOT. ACHIEVE. THOSE. DESIRED. RESULTS!!!
FROM ADAPTING TO A CHANGING META, BOARD STATE, ALL THE WAY DOWN TO SOMETHING AS SMALL AS A SINGULAR DICE ROLL COULD MEAN THE DIFFERENCE OF WINNING A GAME OR LOSING! (Knowing when to shift gears and move to plan B, C, etc, or abandon a set of plans entirely and form a new one on the fly is a skill that takes a long time to master, and one that frankly I am still developing).
“Is that you Luke Cook? Is this me?”
“Who the f–k said that?! Who is the little ________ ____ ____ __________ __ ___ ___ ___ ___ __ _ ________ ___! Why I ________ ____ ____ __________ __ ___ ___ ___ ___ __ _ ________ ___” (Sorry Austin but I looked up these words and let me tell you they aren’t very nice! – Evan)
For those curious about my inspiration for this article, I will give you this link. THAT IS ALL, SCUMBAGS!
Hope you enjoyed reading it as much as I did writing it and as always, feel free to post comments, opinions, suggestions, and anything else!

