
Hey Troopers,
This week we have a special guest author Brad Niemczyk! Brad is taking some time from Team Relentless to talk to us about terrain layout design and more!
What. A. Weekend.
LVO 2020 was an awesome experience, and I’m super happy I had the opportunity to go. I got to catch up with some people I haven’t seen since Adepticon in 2019, meet new people (including The Fifth Trooper’s own Michael Syrylo and Zachary Barry), and play and judge A LOT of Legion. But by and far the highlight of the weekend for me was getting my hands dirty designing tables. If you know anything about me, you know I can’t get enough of messing around with terrain. Well, that and my love affair with Darth Vader. But that’s a topic for another article. In this one, I’m going to tell you about my process for designing a Legion table. More specifically, designing three of the tables you saw on stream at LVO.
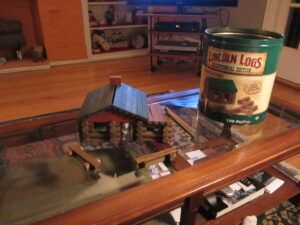
A quick clarification: I define map design as the process of taking existing pieces of terrain and organizing them on a game mat to create a play experience for the players. I did not create the terrain for the tables that you saw on stream, I simply reorganized the terrain in a particular way. Mad props to those behind creating the individual pieces of terrain so I get to have fun moving them around like the Lincoln Logs I used to play with as a kid. Those people include Daniel Roberts (Star Tours), Kyle Wright & Imperial Terrain (Yavin Temple), Graham “swordnamedfolly” Hamner (Jakku Graveyard), and Legion Terrain (Renaissance City & Jakku Graveyard).
TERRAIN THEME
When I go to design a table for an event, the first thing I think about is the theme. The theme of a map determines what kind of terrain to use and what kind of experience your players are going to have. Fighting on an airstrip in the middle of a city is very different from fighting in a ruined temple deep in the jungle, and you want your players to feel that difference while they play. The main determining factor for the theme of a table is the terrain you have available to use. If you really want to build a Sith temple, but all you have are palm trees and military buildings, you’re either going to have to get really creative or you might want to consider making a Scarif table instead.
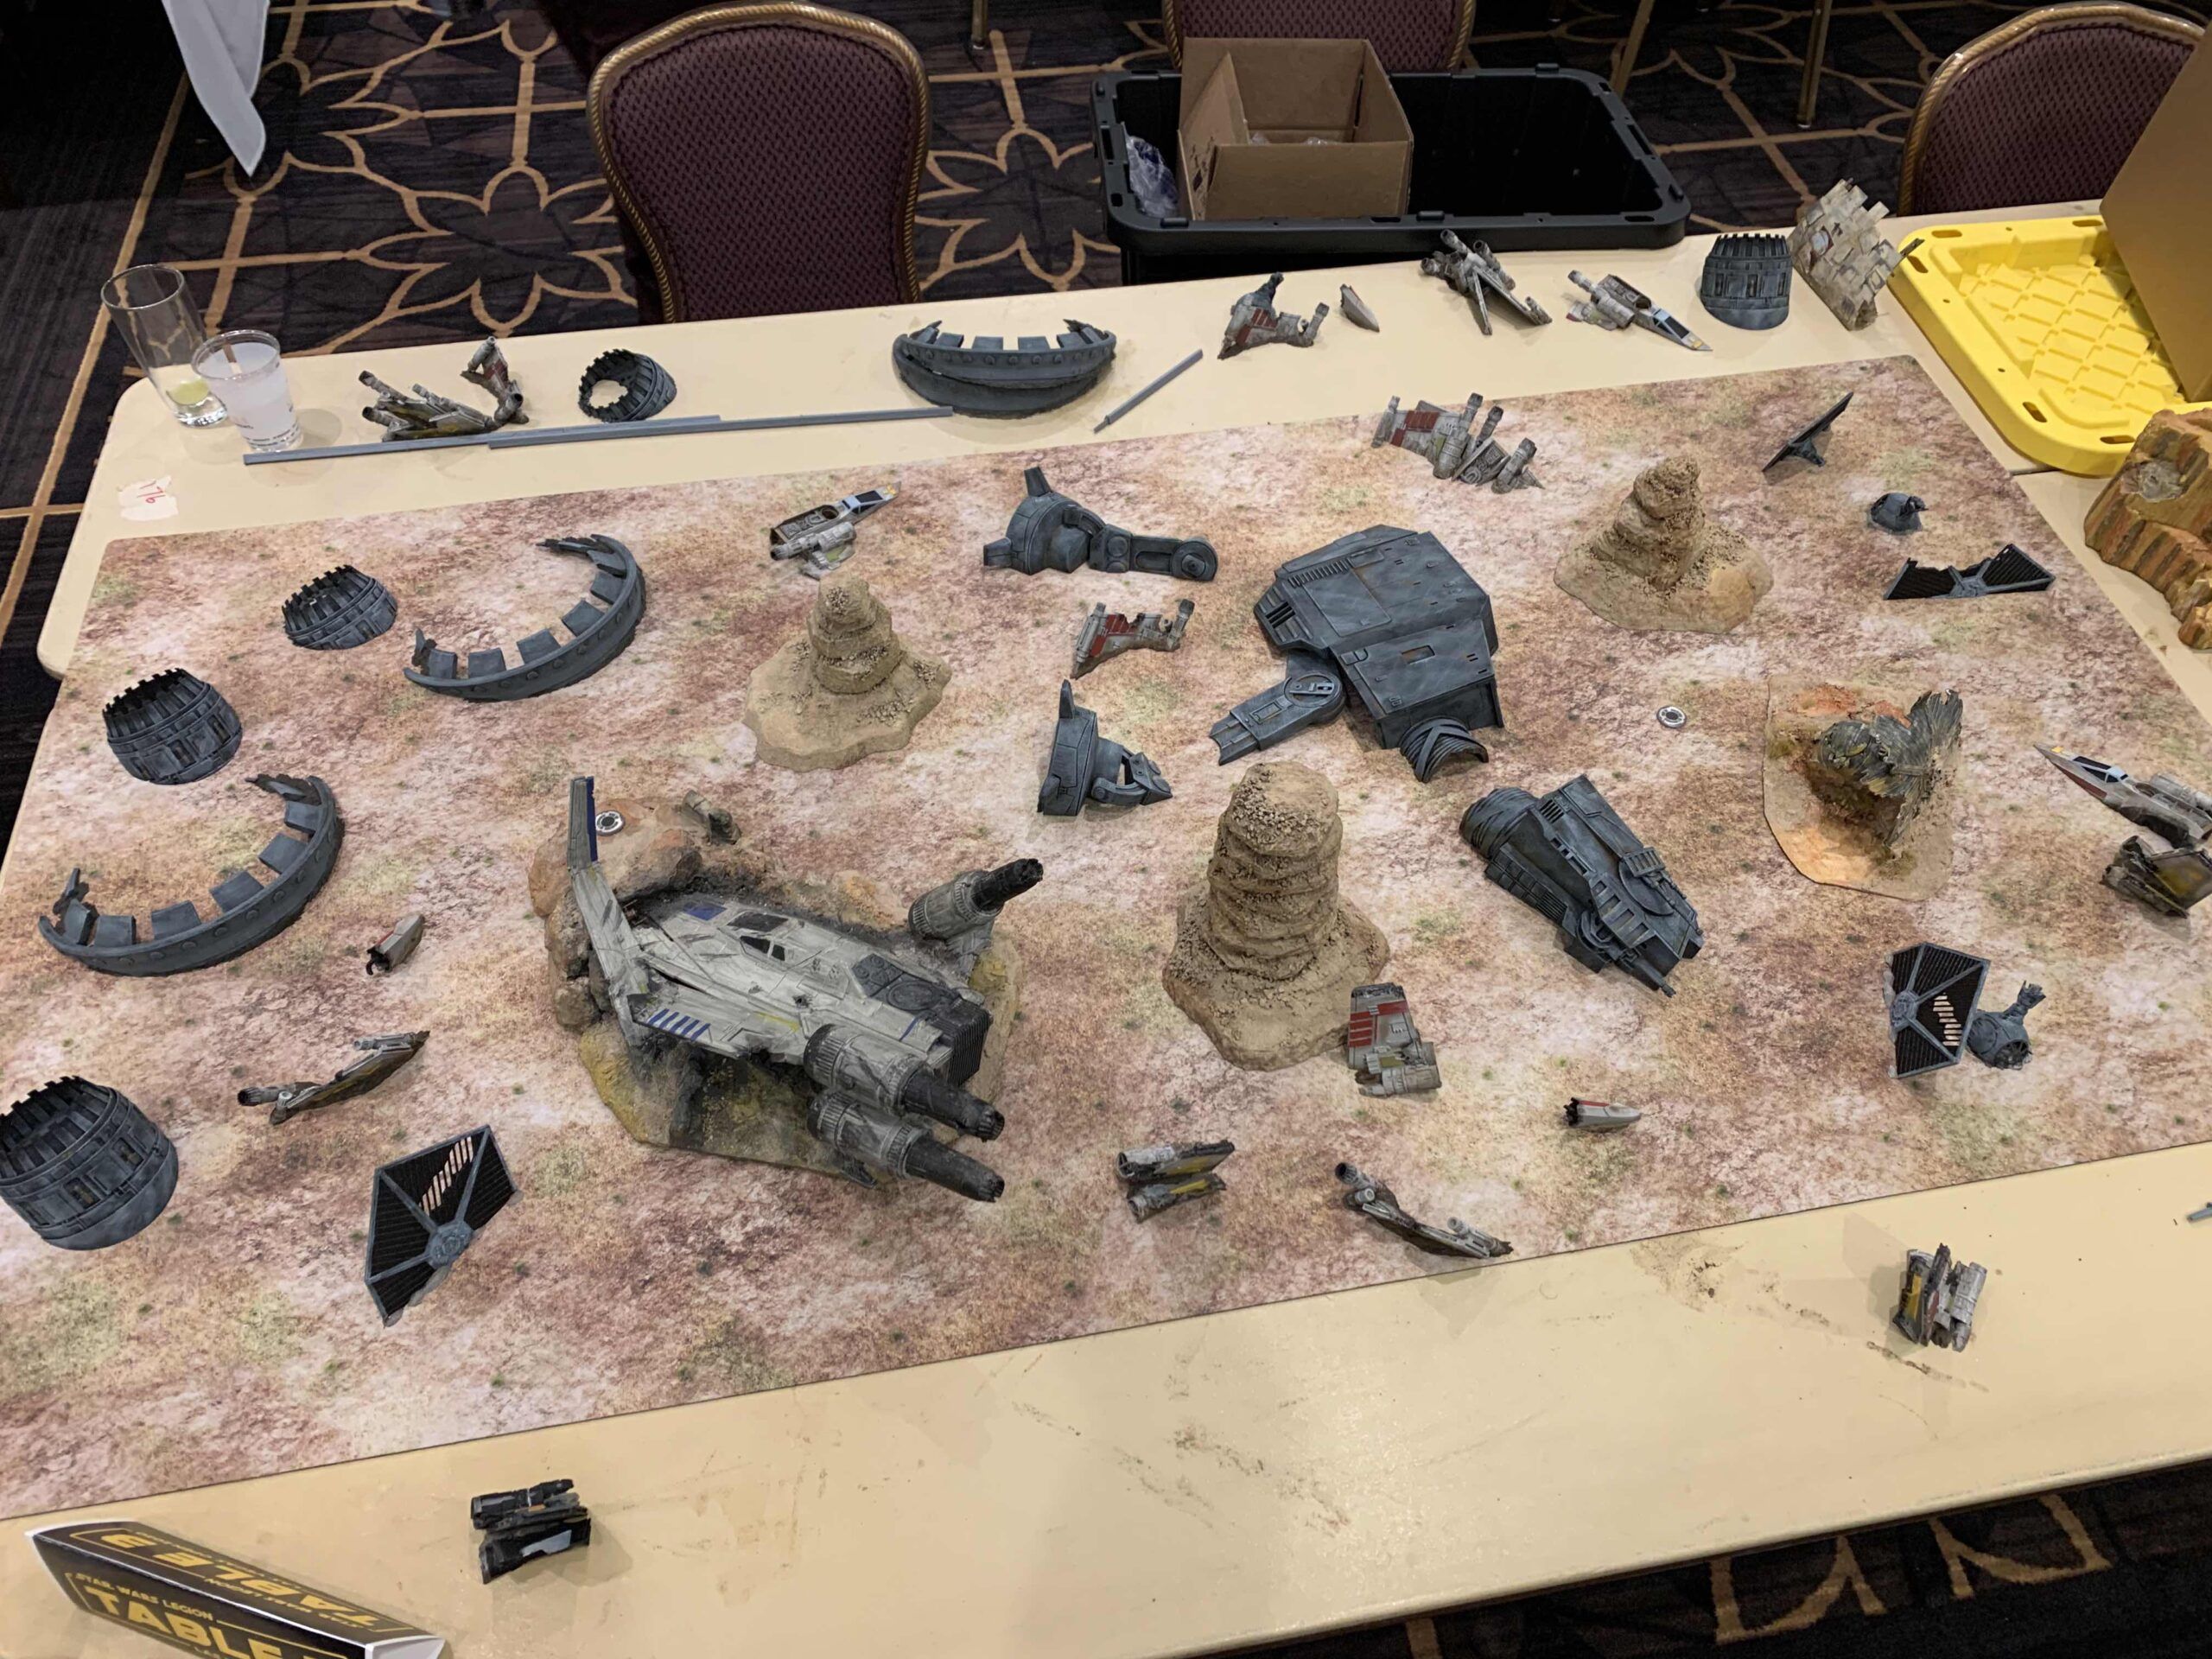
Let’s use the final table at LVO 2020 as an example. Our Marshall Brendon Franz told me to “go H.A.M.” when switching up the table for the final match, so I had complete freedom to create what I wanted. My only real restriction was that I had to use the terrain that was still around at the end of the third day of the tournament. A number of tables used on the previous days had disappeared already, and some were slated to be packed up as we moved into the final match. Legion Terrain had provided a couple of tables and a large quantity of their starship wreckage for the event, so that immediately went on my list. I was also aware that a desert map had yet to be featured on stream that weekend, and a new color palette would be refreshing for both the top players and those watching from home. And lastly, I wanted to tell a dramatic story based on an event from the Star Wars universe with this table, it being the final game of the final day and all. This led me to the Battle of Jakku.
Starship debris everywhere, a nice centerpiece in the downed AT-AT, and a couple of rocks to make sure there was enough line-of-sight-blocking terrain to tie it all together. I am really happy with how this table turned out, and for a quick scratch build I think I was able to nail the theme. A quick shoutout to Mike Barry of the Notorious Scoundrels and Nema Ashjaee of Team Relentless for helping me put this table together so quickly. That actually brings up another key point: get different perspectives while map designing. Other people may play the game differently than you do, and they might see certain problems in a map design that you otherwise would not have noticed. Just make sure that the people who are going to be playing on the map aren’t the ones giving you feedback if you can avoid it (looking at you, Luke Cook!).
After I placed the main pieces down for Jakku, I told Mike and Nema to “place scatter where you think the map needs it, and then I’ll come tell you what you did wrong after.” Jokes aside, having one or two other people contribute their ideas to a map, either during the process or by providing feedback at the end, will really help make sure you are providing a more well-rounded experience for your players. I ended up moving around almost all of the pieces they placed, but it got me thinking more about the overall aesthetics of the table and the interaction between terrain pieces instead of placing terrain somewhere that “looked fine.” This is super important for our next major point: balance.
TERRAIN BALANCE
In some cases, the theme is already decided for you. This was the case for streaming tables for the Saturday heat and the first two rounds of the finals at LVO. If that’s the case, the next major thing you want to focus on is balance. You want to ensure you are providing a fair play experience for your players as much as you possibly can. My favorite way to do this is with the following diagram.

The most important parts of the diagram above are the Intercept the Transmissions scoring circles, the green center box location, and the Major Offensive deployment zones. These give you your framework to build around. I balance around Major Offensive because it is easy to extrapolate almost every other deployment option from that zone, as seen by the dashed lines. Disarray of course is the obvious exception, but it is easy to remember as range 4 (four grid squares) from each corner along the long edges of the board. This entire diagram can also be built quickly using the range sticks and objective markers from the game, though you might need two core sets worth of sticks to do so.
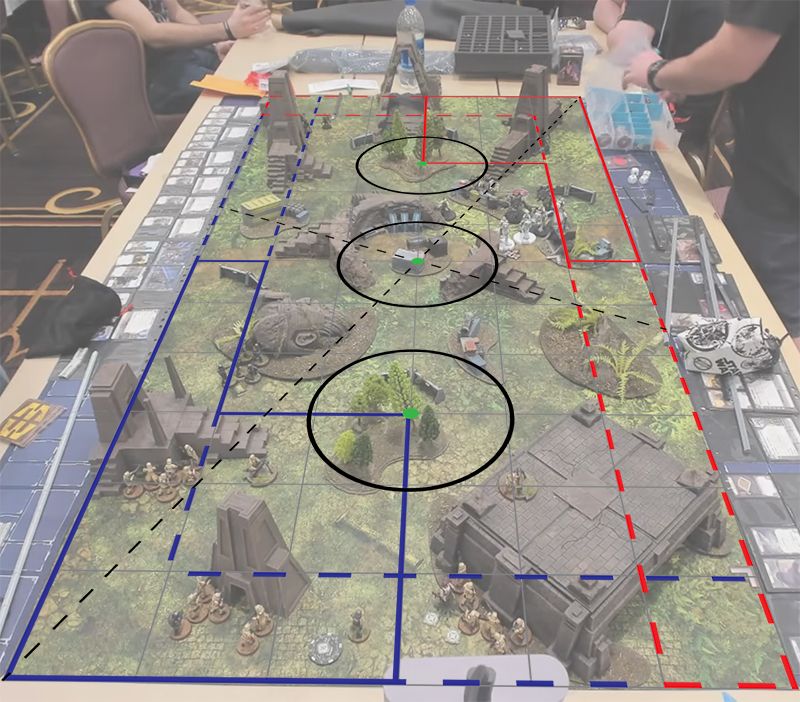 I’ve taken a picture of the Yavin map from Sunday at LVO and used some Photoshop wizardry to lay the diagram over it, so you can see what it looks like in action.
The grid didn’t line up perfectly thanks to some warping from the camera, but I’m sure you’ll get a general idea. I will be going into more detail on this diagram in the future, but here are some of the main points I use:
- Design your maps on an angle whenever possible.
- Choose a terrain piece and place it in the middle for key positions. Area terrain can be great for this.
- Make sure you can place the center box for Recover the Supplies on the same level as the primary play surface.
- Try to keep large pieces of terrain that would block movement for vehicles approximately 8 inches away from each other.
- Range 3 is the primary engagement range in Legion, so place terrain you can shoot over/through approximately 12-18 inches away from each other to encourage fighting.
- Make sure to put heavy cover or LOS blocking terrain at the inside edges of the Disarray deployment zones to account for long-range weapons on the flanks.
- Try to avoid putting LOS blocking terrain entirely within an Intercept the Transmissions scoring circle.
- If you place LOS blocking terrain inside the center Intercept the Transmissions circle, make sure both players have the same opportunity to score from behind cover or out of LOS.
There are a lot more of these unofficial rules, and most have become automatic for me at this point. But don’t stress about hitting every one of these points the first time you make a map. I learned these through trial and error on more maps than I can count. I have made tons of mistakes along the way. It’s all a process, and you get better at it the more you practice it.
OTHER FACTORS WITH TERRAIN
Sometimes there are additional considerations that need to be made when designing a table. It could be for a specific event, like the Narrative event at LVO, where the table needs to appear like it links up with the tables on either side of it as much as possible. Sometimes you are asked to design a table that is going to be streamed, so you need to make sure the cameras can see the action unfold. I had to deal with the latter when I volunteered to design the stream tables for days two and three of LVO.
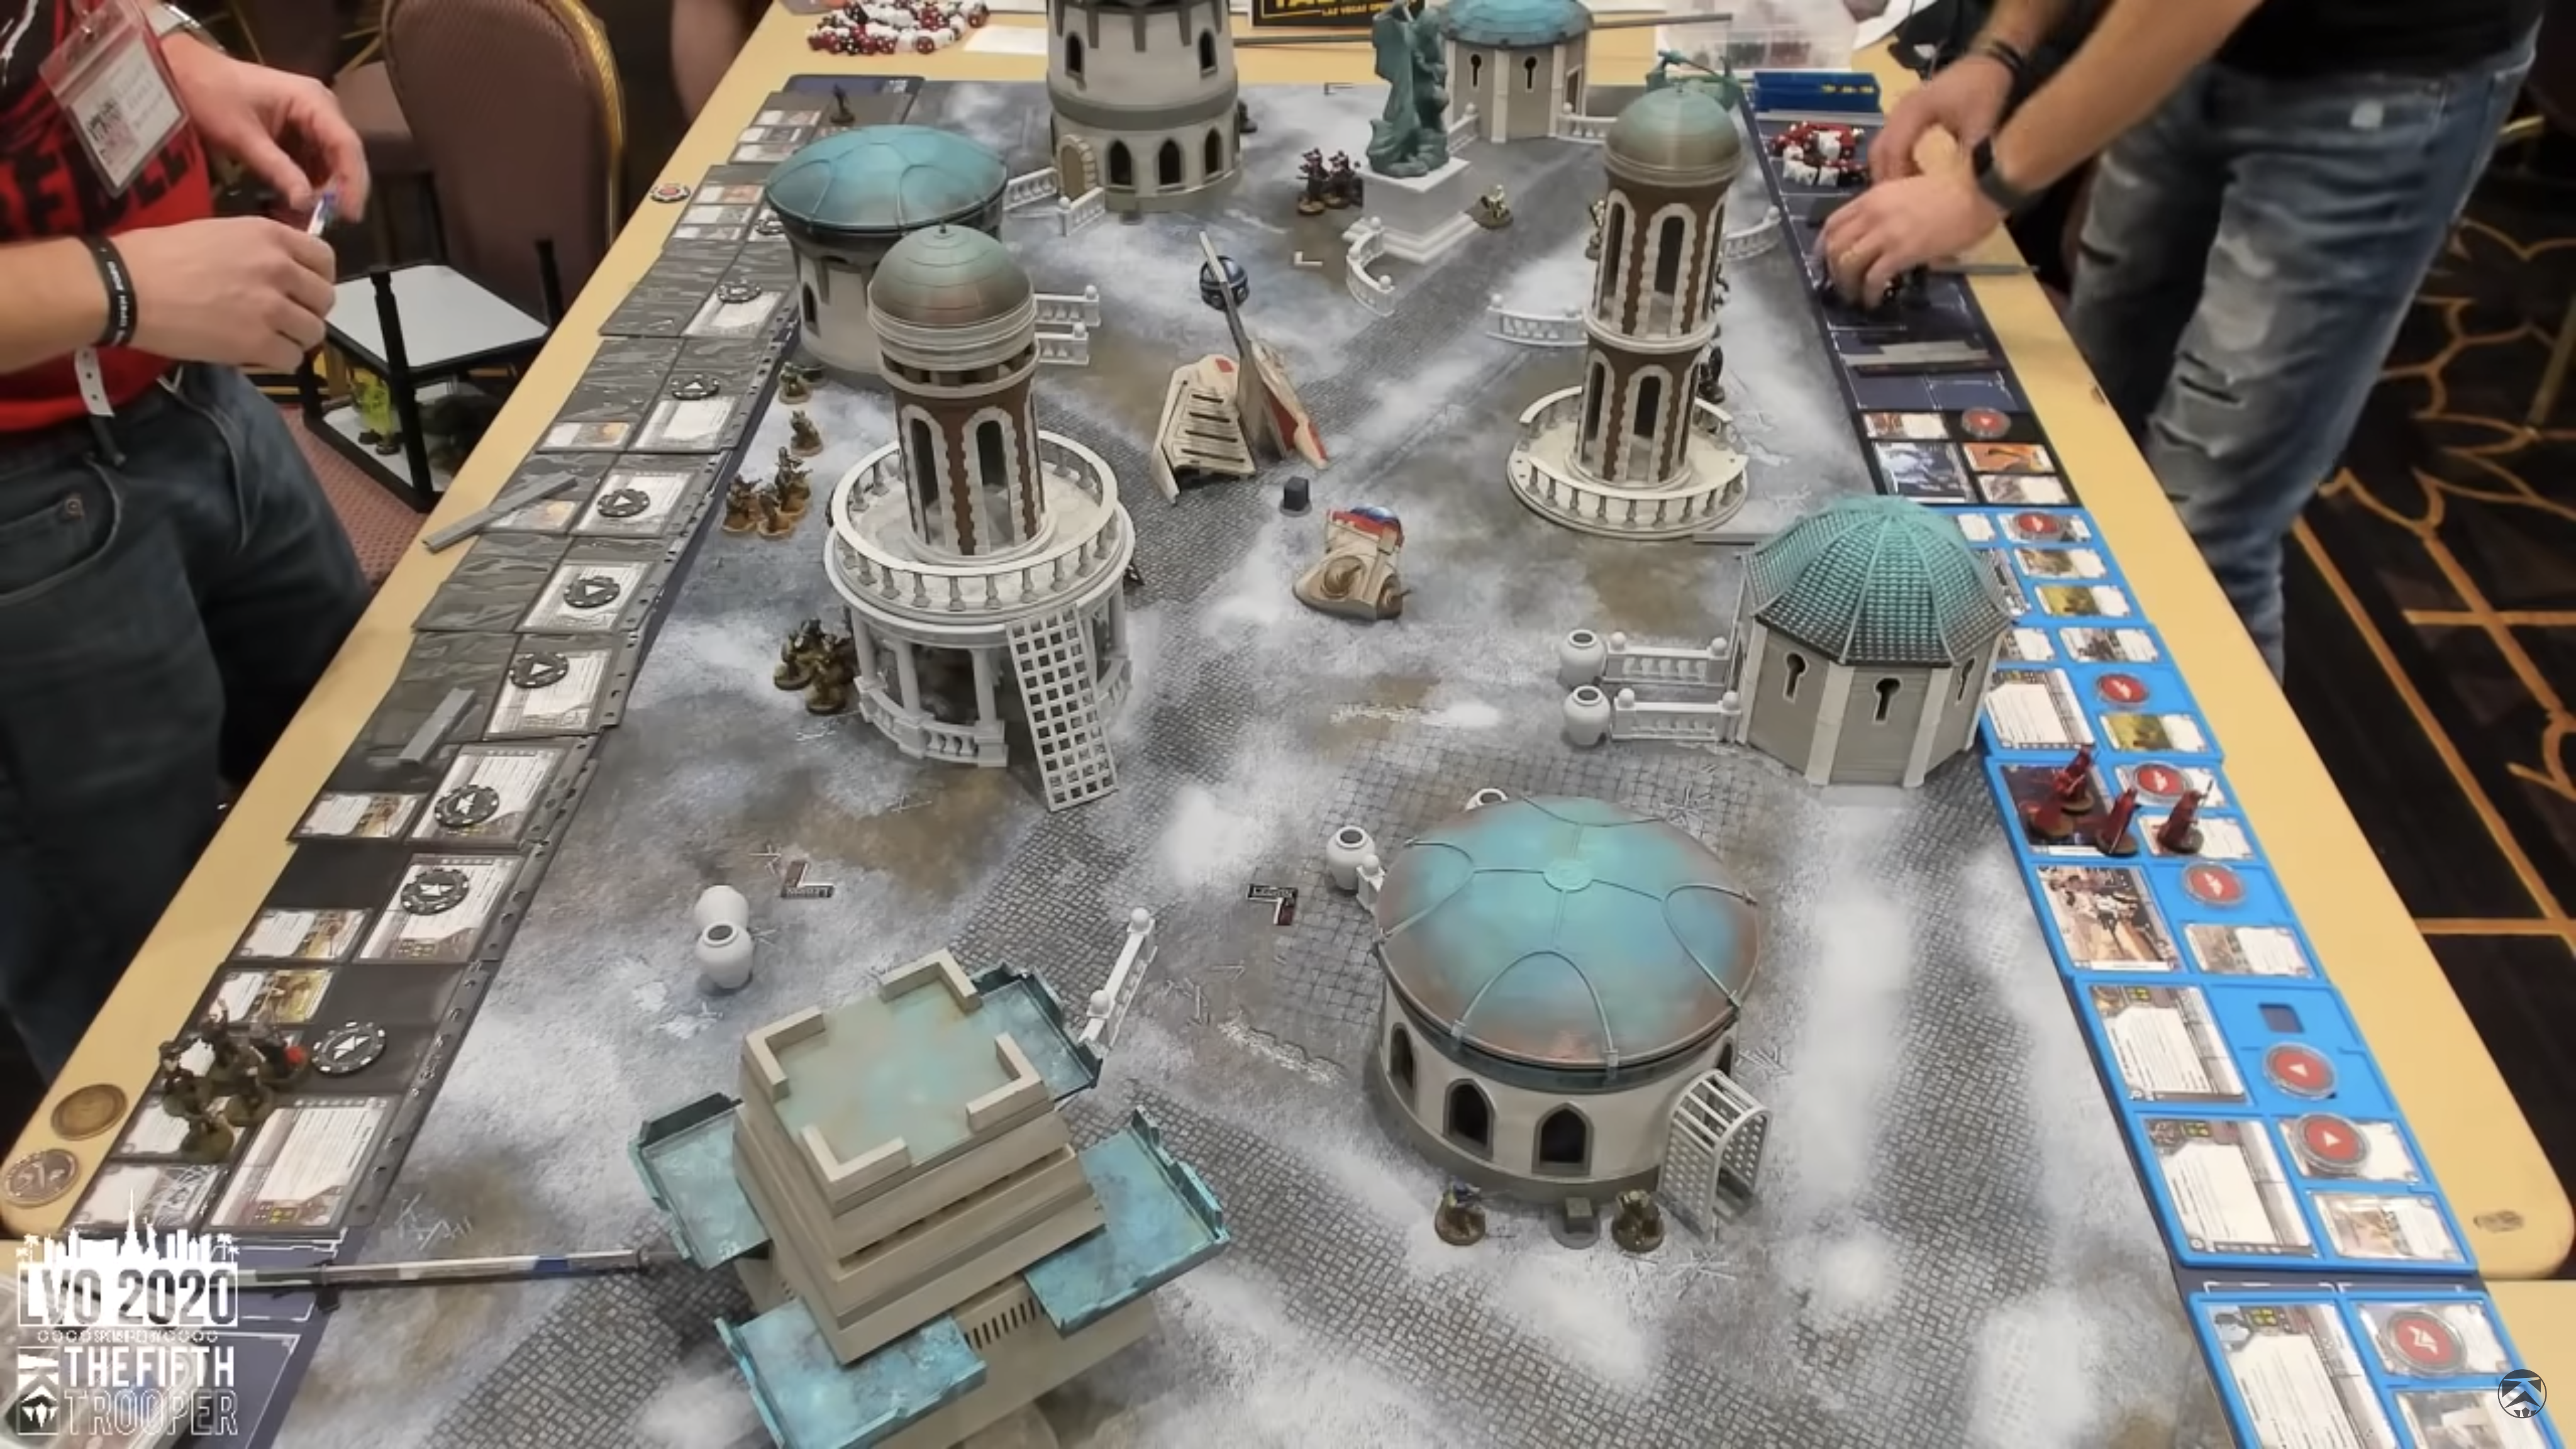 The streaming team from the Fifth Trooper had two cameras placed for the streaming tables. One was in the middle of the closer short edge of the board, and the other was at an opposite corner on the far short edge. For two of the tables, I had been given a specific set of terrain to use, that being the Renaissance City and the Yavin Temple terrain. Both of these sets of terrain had large pieces of LOS blocking terrain that would block visibility from the cameras, so I had to find clever ways of designing the map to make sure that at least one camera could see any part of the board at any given time. Of course, this couldn’t come at the expense of the theme or balance of the table. Below are some pictures of what I came up with for Saturday’s table.
This table provided an interesting challenge because of the number of tall buildings that could potentially block the cameras. I decided to lean into the angles provided by the streets on the base mat, creating streets for the buildings to be placed around. The first pieces I placed were the statues in the top right corner, framing the side camera, to give a cool visual on stream. I also wanted a low-to-the-ground, but thematic centerpiece to tie the narrative of the map together, as well as keep the center visible to both cameras because that’s where most of the action would be happening. So I settled on using the crashed LAAT terrain piece, with the cockpit section positioned as the KP. In the end, there was only one major blind spot near the center behind the raised wing of the LAAT, and that did not end up being a major issue for the stream team.
The Yavin table was used on Sunday, and I had a bit of an easier time with this one because the terrain pieces themselves were much shorter. This allowed me to put most of the terrain anywhere I wanted on the 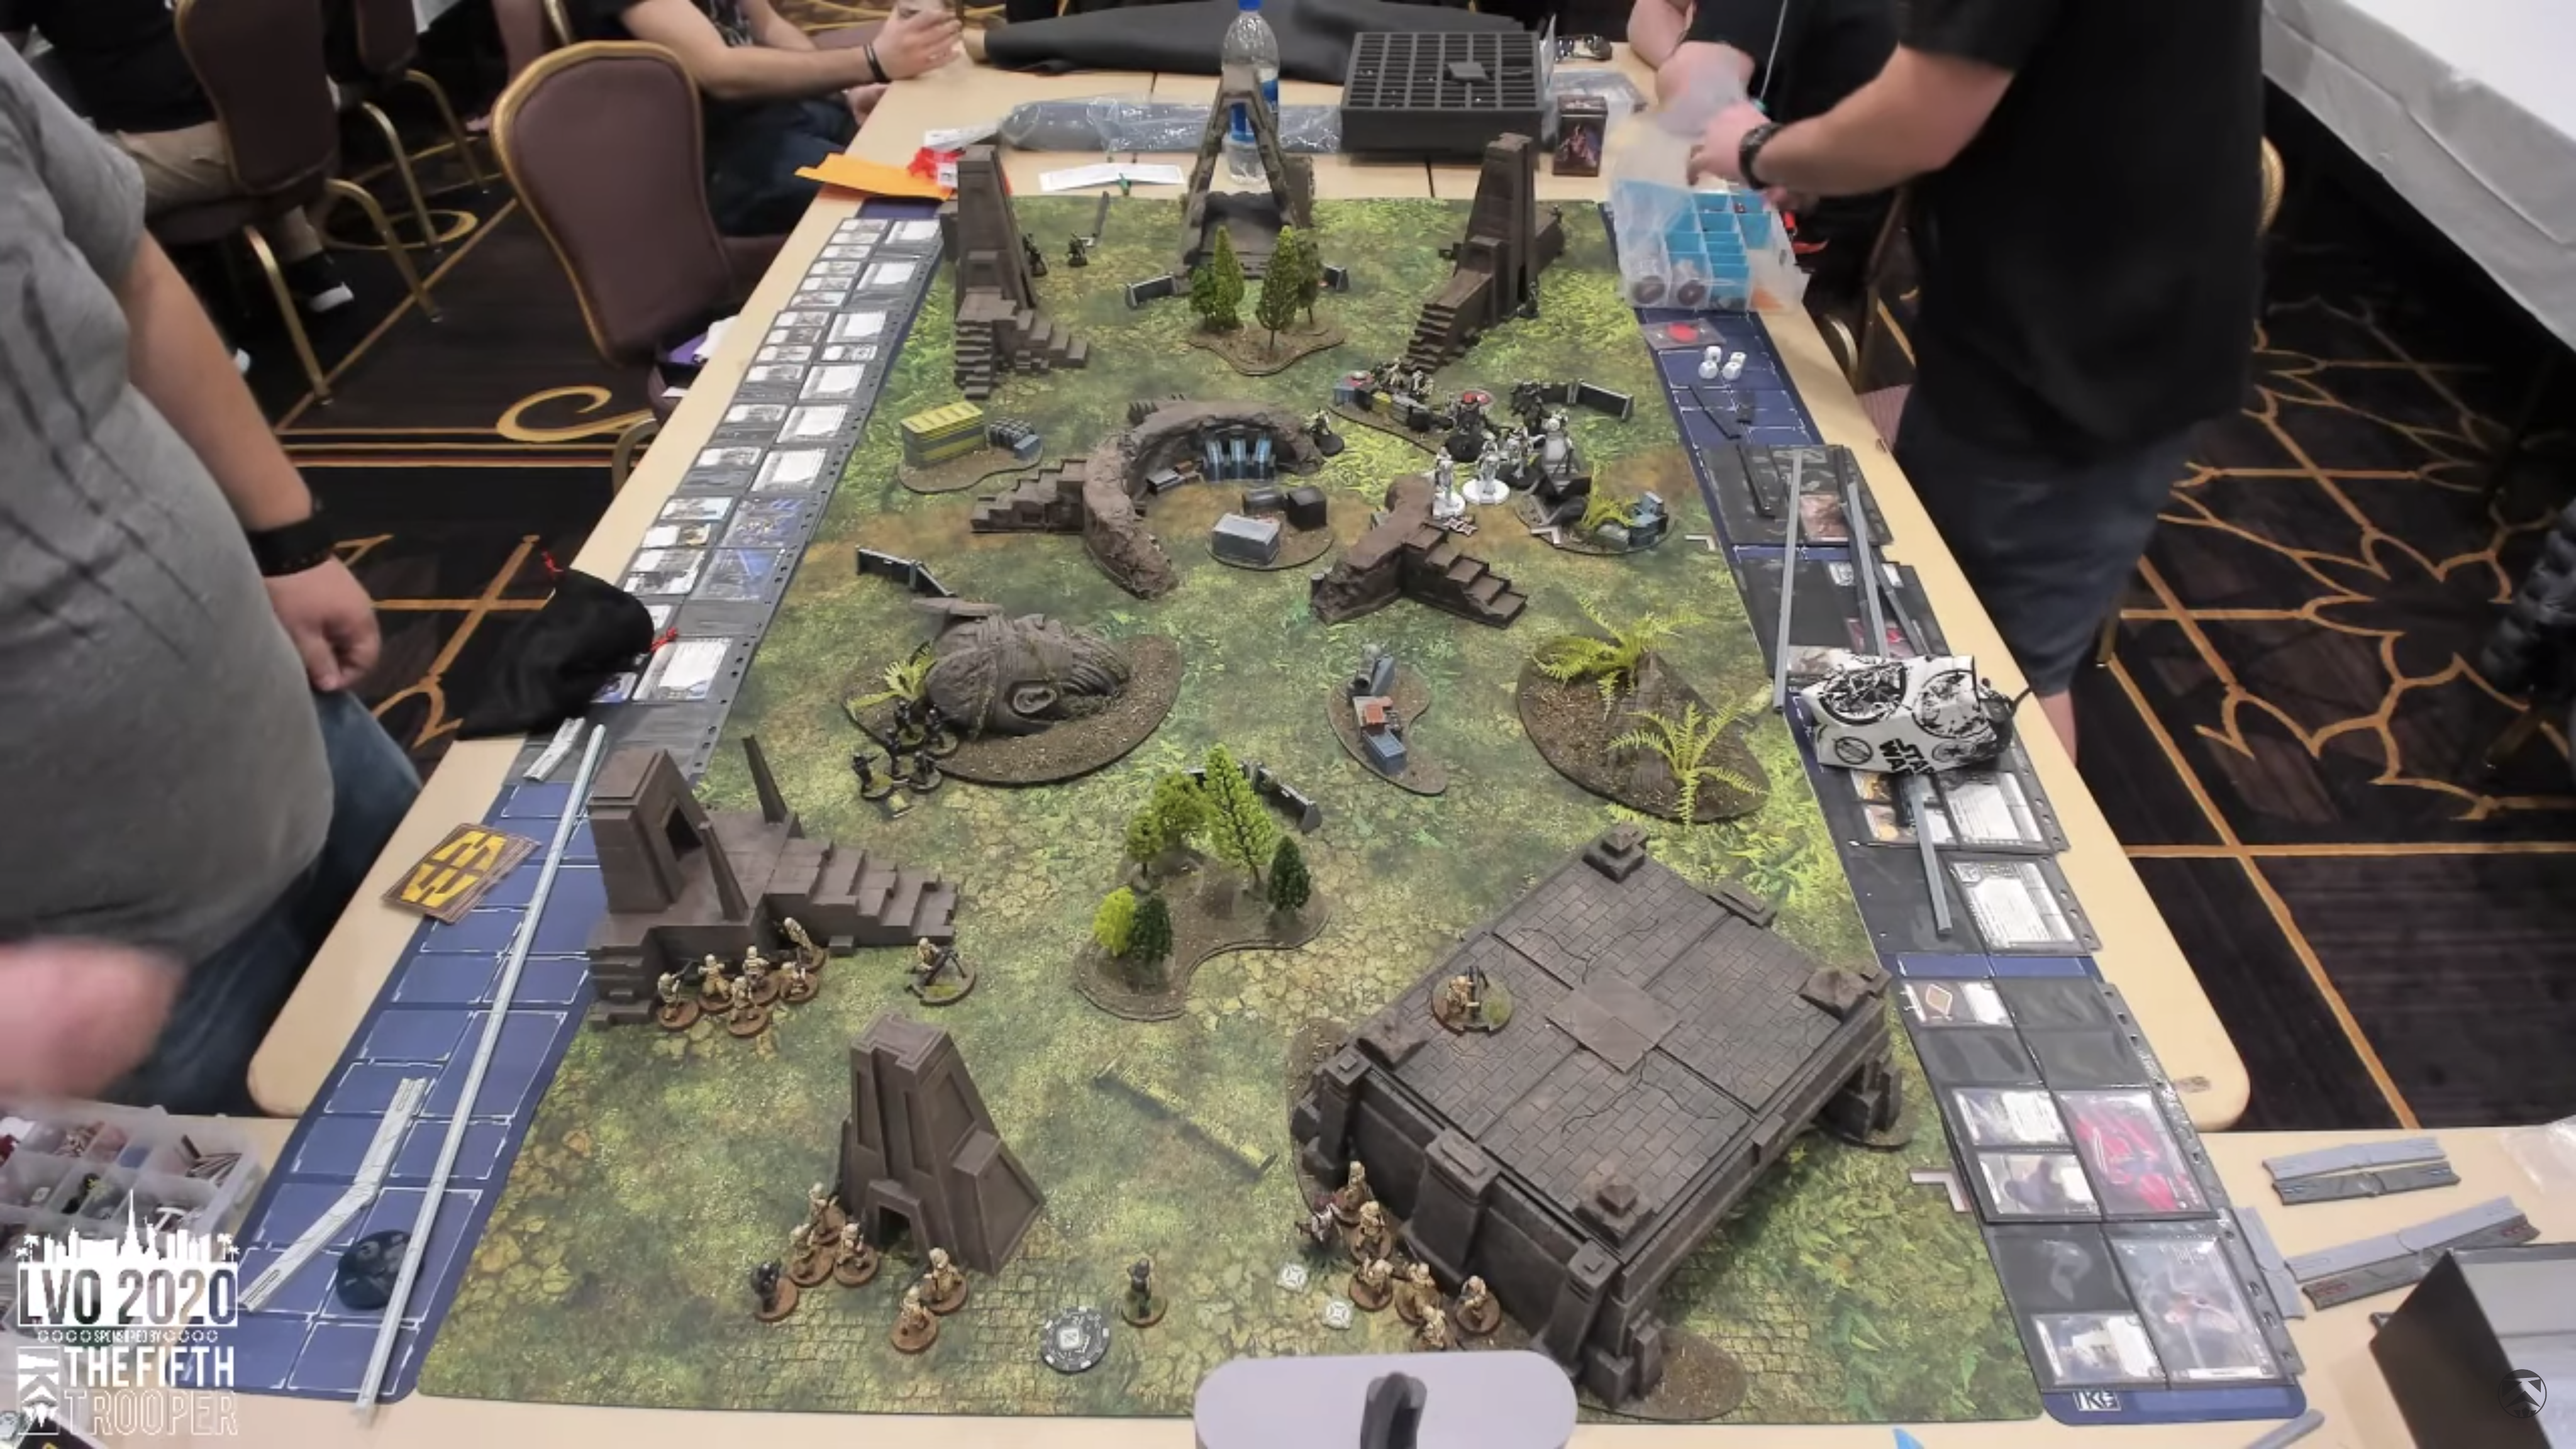 board without blocking the cameras. The main two exceptions to this were the large crumbling temple piece you see at the top of the image on the left below, and the hanger you see at the bottom right of that same image. I chose to put these pieces at the edge as a result, and I specifically placed the crumbing temple piece so the entire inside could be seen by the primary camera. This would allow any action taking place inside or around the terrain piece to be seen in there on at least one camera. I positioned the gaps in the center ring piece to line up with the camera angles so any action could be clearly seen there, and positioned the angled wall closest to the side camera so minis on either side could be picked up by the side camera. The rest was just placing area terrain and scatter in spots that were good for the balance of the board, and made it visually interesting.
THAT’S ALL FOLKS
Feel free to take anything you’ve learned here and apply it to your own tables as you design them. I get excited every single time and I see armies duking it out on awesome thematic terrain, and I can’t wait to see all the crazy stuff you guys come up with over the life of this game. Maybe I’ll even get a chance to play around with some of it! If you have any questions, please feel free to message me on the Legion discord, where my handle is Nerfley (Brad). Look for the big R, you can’t miss it. I also plan to kick off a weekly map-building stream on TTS in the very near future where you will see all of what I said above put into practice. Feel free to tune in at my Twitch channel (https://www.twitch.tv/nerfley) or the Team Relentless YouTube Channel (https://www.youtube.com/channel/UCxxHjZIQYddqdGq1MYU6Y0g), and check out your usual Legion media outlets for more content in the coming months. Thanks again to Jay and the rest of the Fifth Trooper staff for the opportunity to share my thoughts here, and I hope this won’t be the last time.
[message_box bg=”#EDEDED”]
 Guest Author: Bradley Niemczyk
Brad “Nerfley” Niemczyk is a founding member of Team Relentless, a leading map designer in the Legion community, and a massive Vader fanboy. He was a judge at LVO in 2020, streams Legion content on Twitch, and qualified for Worlds in 2020. Outside of Legion, Brad enjoys swimming and spends far too much of his free time watching movies and tv.
[/message_box]

3 Responses
Thanks for the article, great write up. I still got some questions considering different set ups, for example close quarter fighting: You take range 3 as standard engagement range, that leaves units like fleet troopers pretty useless like it seems it‘s the case now. Any advice for designing terrain that offers opportunities for close quarter fights in a balanced way? How would you design a balanced indoor terrain, say a huge hangar bay with a control room?
On the standard engagement range: There should be terrain at all ranges from each other, you just want to make sure that terrain pieces have other ones within 18″ in order to encourage fighting as opposed to range 4 potshots or not being able to move up. If you’re familiar with bounding overwatch, a way to move under fire used by the military, you want to encourage that kind of movement with your terrain. Let’s say you have a 6″ long piece of area terrain, and you have barricades placed 5″ from it on opposite sides. Two units behind the barricades can engage at range 3, and units with range 2 can move up to the area terrain to engage the enemy. So, make sure you allow for those things in your design. A table can function without terrain dedicated to range 2, the game grinds to a halt if there is no cover within range 3 of each other.
I’ll go into more detail about close-quarters fighting in a future article, as there is a lot to talk about there. So stay tuned.
I hope that helped.
Amazing job, so good to hear people talking about the art of organising terrain well.
Any idea where the “space bus” terrain from the heat 1 stream is from? And is it available to acquire? Thanks in advance.