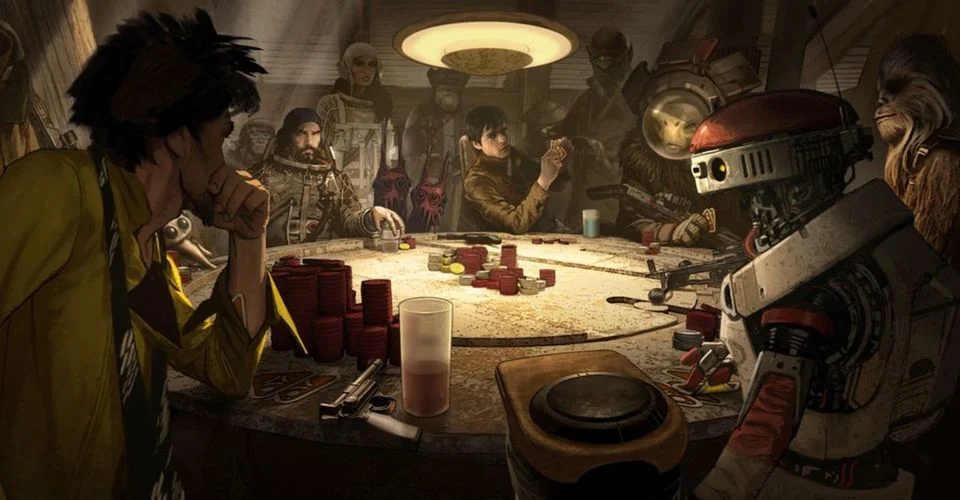

Hello! My name is Mike Syrylo. A long time ago, I wrote an article for TFTN on bidding: Pure Pazaak: An Introduction to Bidding. When it was published in 2019, bids were important, but that article might be just a little bit out of date, considering there were only five battle cards per slot. In this guest post today, I’ll discuss the reasons for bidding and look at some concrete examples of why you may want to do so.
As a general note, I’ll define the term “bid” as taking an army list with a lower point total than the allotted 800 points. For example, taking a list that has 793 points is a bid of 7, etc…
I’ll also define the term “Turn Zero” as anything to do with Legion before the game’s first turn begins; including list building, battle card selection, and deployment.
As all the casts in the Legion-sphere have discussed, we’ve also had some other changes in how Turn Zero functions, so let’s dive in and update our intro to bidding. This is not meant to be a comprehensive overview of everything related to bids, but rather an intro for players new to the competitive scene or anyone who just wants a refresher.
The Changes
Let’s initially recap the Turn Zero changes that came with the RRG 2.0.2 update:
- All four selected cards per category flip instead of just three
- Red player now picks the board edge instead of blue
The Why
So, why would you bid? The first and most obvious reason is to define the battlefield on your terms. When building a list, most players have a goal for a specific tactic or strategy they want to employ with their army. Due to the nature of Legion’s objective cards, this tactic’s effectiveness can vary wildly from card to card. As a reminder, the blue player wins ties on VPs if kill points are equal, so the impetus is immediately on the red player to make something happen, especially in low scoring objective games. Therefore, picking all four cards per category that will be put in play can help you win or lose before you even deploy. Here are some specific examples:
The Hostage Problem
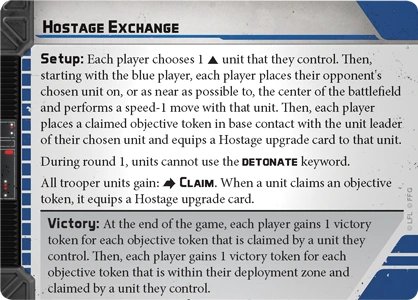
Hostage Exchange was one of the cards introduced later on in the game’s lifecycle, and significantly impacts how and why players make decisions in Turn Zero. Force users, Exemplar users, and units with Scouting Party have historically dominated this objective, and if your army does not include one of the above, you are at a significant, potentially game-ending disadvantage when this card enters play.
For example, if your list includes Palpatine, Dooku, Vader, Captain Rex, Padme, or Yoda, ensuring that the opponent has to respect your list’s ability to play this card and including it in your deck is mandatory. Even if the card never comes into play, your opponent will be forced to spend their turn zero bans to avoid it, giving you greater control over the remaining deployments, conditions, and objectives. If you run a list that is very vehicle focused, or more of a “regular guy” gunline, bidding to avoid this card can help you leverage your strengths over the opponent all the greater.
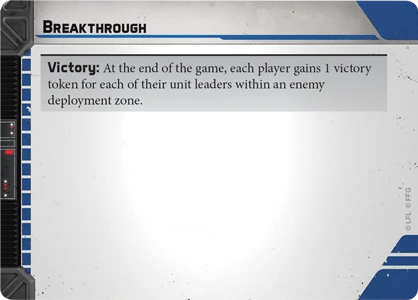
Breaking in with the Bombs
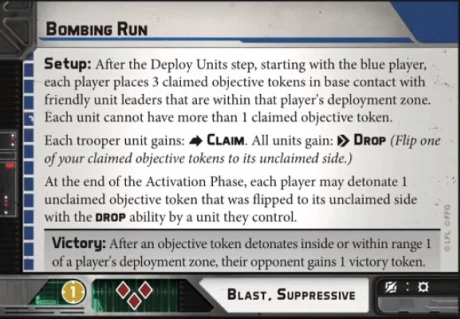
Now take everything I just said, and flip it.
The duo of Bombing Run and Breakthrough is arguably what forced the turn zero changes. For a time, bids reached over 30 points so that triple speeder lists had a ⅔ chance of forcing either one of these cards, giving them an enormous chance to win right from the start. Not only were speeder lists bidding, but non-speeder lists were as well, simply to avoid the prospect of playing these cards. While the four card flip change prevents blue players from forcing either of these cards, we still see speeder lists (such as STAPs, BARCs, T47s, and Speeder Bikes) bidding in the range of 10-15 points to ensure these cards are threatened.
One of the more common tournament lists these days is Anakin/Padme/BARCs. Which, if you might have noticed, contains units that I mentioned are great at all three of the above objectives. By taking a higher bid, and actively pursuing the chance to be blue player, you can immediately force the opponent to play an uphill game in three of the four possible cards, even if you do not gain the final say in which one is taken.
The R2-D2 Effect
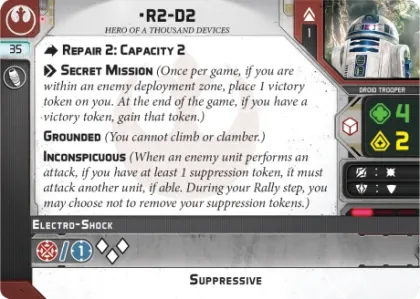
I have to talk about him eventually, right? Whether in GAR or in Rebels, R2 is the one of the most polarizing units in the game, and a crucial part of turn zero and bidding. Via his Secret Mission ability, he has the power to flip low scoring objectives in your favor and flip the comfortable deployments on their head.
Key Positions, Hostage, and Vaps are three perfect examples of why bidding with R2 matters. These low scoring cards are great for blue player lists, because they can be passive play styles, and force the red player to advance towards you. Therefore, sending R2 down the side flank (away from the opponent’s pressing army) and waltzing into a deployment zone for an easy VP on turn 5-6 is a common occurrence, and an easy way to snag a win.
But how do you set up this side flank? Simple: you also pick your four favorite deployments. R2 thrives on deployments like Battle Lines, Danger Close, and Disarray that have spread out zones, wide edges, and don’t let armies easily clump up to deny lanes. Remember the Anakin list I mentioned above? Well it’s also easy to sneak R2 in there, and setting up a dominant battle deck is quite simple. A battlefield scenario of Hostage Exchange and Battle Lines is a nightmare for opponents and a dream for you. A dream that bidding enables.
The Choice
There are definitely more objective and deployment card examples, but hopefully the above three give you the gist. Arguably, another reason to bid is to have the choice of selecting Red Player. Red player has gotten significantly buffed with the turn zero changes, so I’d like to cover those buffs and explain some scenarios where you may actually want to defer blue to your opponent.
Mirror matches (in which two of the same list archetype go head to head) are some of the most interesting, boring, and tactical games in Legion. Because both players are essentially set up to do the same things, you’re aware of each other’s tricks and tools, and employing a strategy to consistently win becomes more difficult. One of the ways you can turn the tables (haha) is by choosing the board edge you deploy upon, a feature now controlled by the red player. If you know what battle cards are in your opponent’s deck (since they’re the same as yours) you can more accurately pick the side of the table that has better Disarray cover, a closer Key Position, or a safer route to the middle of the table for Intercept or Hostage.
Due to the four card flip, the red player now also gets the final say in what cards are picked on the flop. As mentioned above, most mirror matches include the same battle deck, so both players tend to be pretty happy with any of the four cards coming into play. However, we just discussed how the red player gets the choice of table side; which combines nicely with the final ban to even further tilt the terrain into your own favor.
There is a case that choosing to take red player to gain access to the final deployment is an advantage. I personally don’t find this to be the case presently. In high level games, most players will pretty accurately be able to guess where their opponents are going to be deploying. Additionally, many lists currently thrive on an alpha strike philosophy, in which infiltrating early units set up massive kill zones (think Iden 333), and being able to deploy first is crucial to not being zoned out by your opponent.
In other words, try for yourself if you think deploying last is an advantage, but your results may vary.
The Why Not
Bidding does come with one significant disadvantage: you’re taking less points than your opponent. This isn’t exactly the end of the world, as you can very easily make up the 2-8 points worth of upgrades through smart plays, unit synergies, and getting your own battle deck. To be honest, there’s not really any other reason to not bid, but it’s worth going over some of the scenarios in which losing these bid points can hurt the most.
We just discussed the advantages of being the red player in the mirror, but it does come with the downside of literally having less of the same as your opponent (barring the exception of a roll off for blue). An example of this hurting is in an ISF mirror match. If one unit pops its tactical strike, whiffs, and moves back into cover, they lose a lot of their value. If the other player’s ISF has an Offensive Push upgrade that you don’t, it has a better chance of punching back harder than you did. This can tilt the momentum further into the opponent’s favor to a point that you’re now fighting far uphill. It’s an edge case, I know, but it does happen at times.
Similarly, we’ll use a scenario of a 12 bid Luke DLT list paired against a 14 bid Vader Stormline list. In this case, the Luke player is probably missing either R2 or two portable scanners on his officers (the equivalent of two extra dodges every turn). Now the Luke player has to fight on Vader’s terms, while missing some of the key aspects of his list’s kit. This concept doesn’t apply as much to smaller bids (under 5 points) but becomes a major thinking point for deeper bid lists.
Building a Generalist
I would be writing for days if I went through all of the lists that want to bid – so I’ll stick to referring you to the examples provided above: force users and hostage exchange, speeders and bombing run, and R2 and wide deployments. I do want to briefly discuss two list concepts that can handle being red player every time (probably…).
In my opinion, Rebels can trot out triple melee wookiees combined with Cassian/K2/R2 and some corps filler and CIS can field double magna/double spiders backed by a B1 line and a Super Tactical droid and be comfortable as red player nearly every time. These are not the only variants or lists by any means, but they’re my easiest examples, and two that I have played myself to good effect.
Both of these lists have melee threats that can combat opposing force users, mobile units that can hang at bombing run or breakthrough, and either overwhelming amounts of accurate ranged dice or close range pierce loaded dice. These factors are concepts that players can look to build around in order to comfortably compete in an event with a list that chooses not to bid.
My Recommendations
At the time of writing this article (June 2022) I do recommend that all players going to a tournament take some kind of bid. This past season, I was lucky enough to be able to act as the Tournament Organizer for Invader League Season 8, the biggest international event in Legion at the moment. Across all 216 participants, the average bid was 4.7. I think this is super reasonable, and a good indication that players should be considering a 6 point bid as a starting point. Even if your list is average to strong at all objectives; if you can eliminate the chance you face a Vader list on Hostage Exchange or Key Positions by cutting one tenacity, that’s an easy call, right?
If you’re playing a force user based list such as Dooku, Vader, or Luke, I think you should be bidding roughly 8-10 points. This gives you a good chance to outbid most traditional gunlines, and also gives you the opportunity to be the blue player in either the force user showdown or the dreaded force user mirror.
Finally, if you’re playing speeders, I don’t think you ever bid less than 10 points. These lists tend to be brutally effective on their “home” objectives, and can very quickly snowball a victory from Turn 2 onwards. Giving up your chance to do so is a mistake that can easily be punished by some bad dice variance or a bad blue player roll-off, so avoid this whenever possible.
This is all not meant to say that you have to bid to win, as many players are able to use their skill to overcome their uphill fights, but I do think it gives you the most consistent chance to win over the course of a 5-8 game tournament.
The Recap
If you’re still reading, thanks for sticking around. I know this is exciting stuff. To succinctly summarize the above article, I’d impart the following:
“If you want to define the battlefield, bid for blue. If you want to react to your opponent, max out for red.”
I personally think it’s better to fight on your own terms and box your opponent into an unfavorable situation, but everyone has their own styles. That’s what makes Legion fun, isn’t it? I hope the battle card and unit card examples above were enough to make my point, but if not, please feel free to reach out to me! I can be found on the Legion 99 Podcast as a host, as GhostWalking on the Legion Discord, and as Mike Syrylo on the Facebook group (as well as in real life).
Thanks as well to Jay and Kyle for letting me guest write this article, and I look forward to seeing you all at Legion events across the country!


2 Responses
Thanks!
This is the exact content that I come to The Fifth Trooper for. Great read.