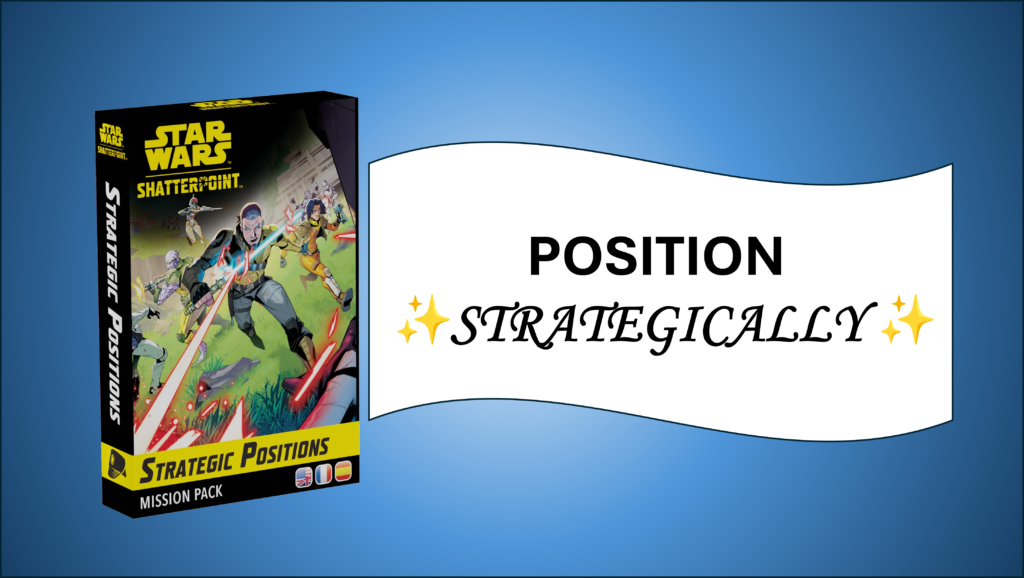

It’s that time again – time to talk about a new mission! Admittedly, missions have felt a bit stagnant since last year’s release of First Contact fell a bit flat. I have high hopes for Strategic Positions, though. Not only does it bring interesting, fresh mechanics, but I think it’s a mission that won’t heavily skew things the same way Never Tell Me the Odds does, for example.
Without further ado, let’s dive into the cards.
Overview
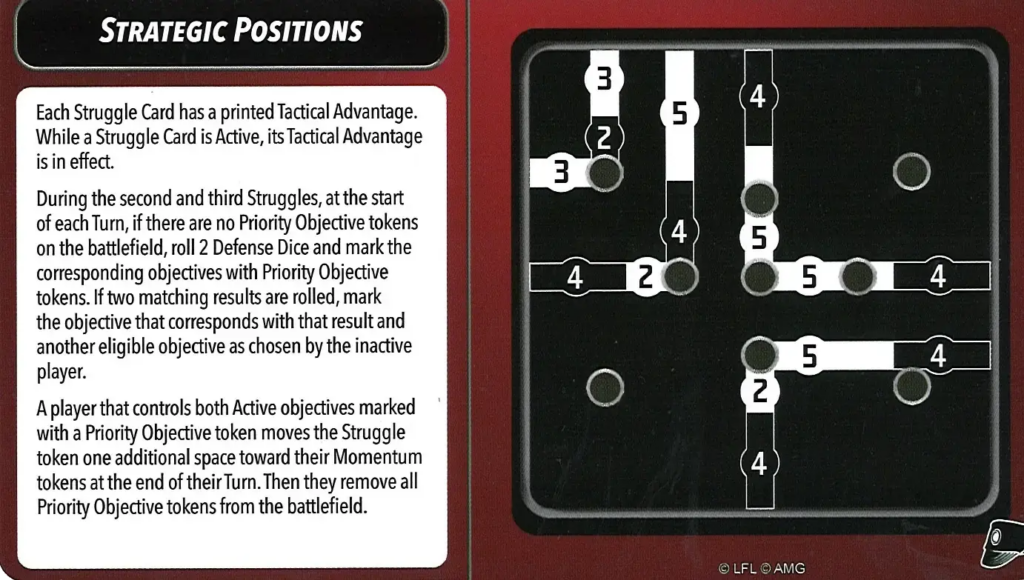
For completion’s sake, I’ll put this card here. Don’t worry too much about the text right now, we’ll dive into the Tactical Advantages and priority mechanics in a bit. The overall layout of objectives would most closely resemble Odds, but the two wide midline objectives much closer to the middle of the board. We’ll see soon that this makes a big difference.
Struggle 1
Layouts
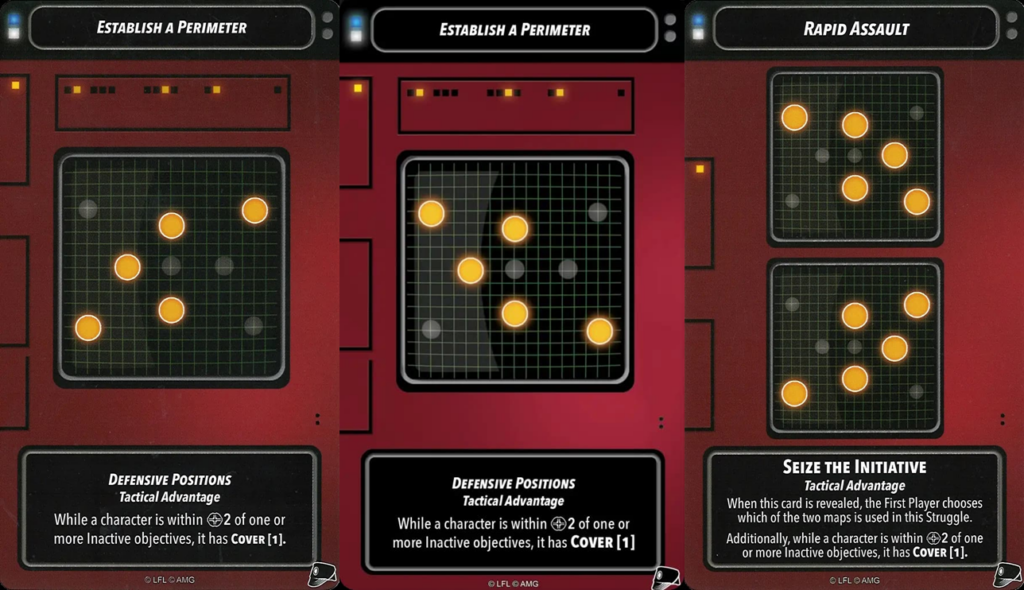
We can immediately see there will be a big fight over the middle. Bubble abilities will be highly valued here since they can often stretch over multiple active objectives. If Mace gets dug in somewhere central, for example, his Protection/Steadfast bubble can easily cover all three middle objectives. Coordinated Fire and related abilities, such as Fixer adding extra dice, can also be extremely potent. Brawler units that enjoy a scrum will generally be happier in the first struggle than units which prefer to sit on the edges.
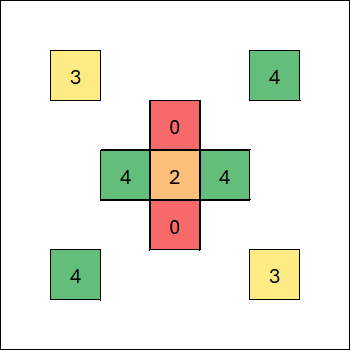
Due to the unusual nature of Rapid Assault, in the graphic below I’ve treated each of the two layouts as half a card for proper weighting compared to the other cards.
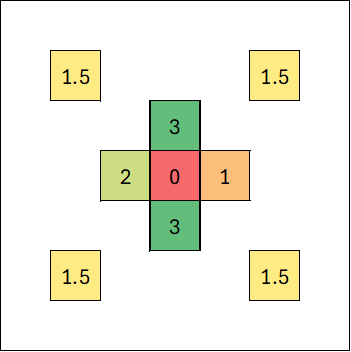
Regarding specific objective placements, two things jump out to me immediately here:
1. The same two middle-ish objectives are always on.
2. The left midline objective is twice as likely to be on compared to the right midline objective.
These observations will greatly influence deployment, so let’s dive deep there.
Deployment
First off, let’s examine the near-middle objective. If a squad has only small bases and no special deployment abilities then it won’t be able to contest this objective immediately. This can be a bit of a concern, considering this objective will always be active, but don’t go locking in your Infiltrate units just yet. Yes, those will be helpful, but they aren’t the only solution available. Unlike Odds, where terrain can really mess things up, in Strategic it’s pretty easy to deploy on the corner objectives with units in dash range of the near-middle. Lists with a lot of out of activation (OOA) movement shouldn’t be sweating too much. For visual marks, I try to keep the primary to the outside of the midline objective to ensure I can reach the corner with small bases.
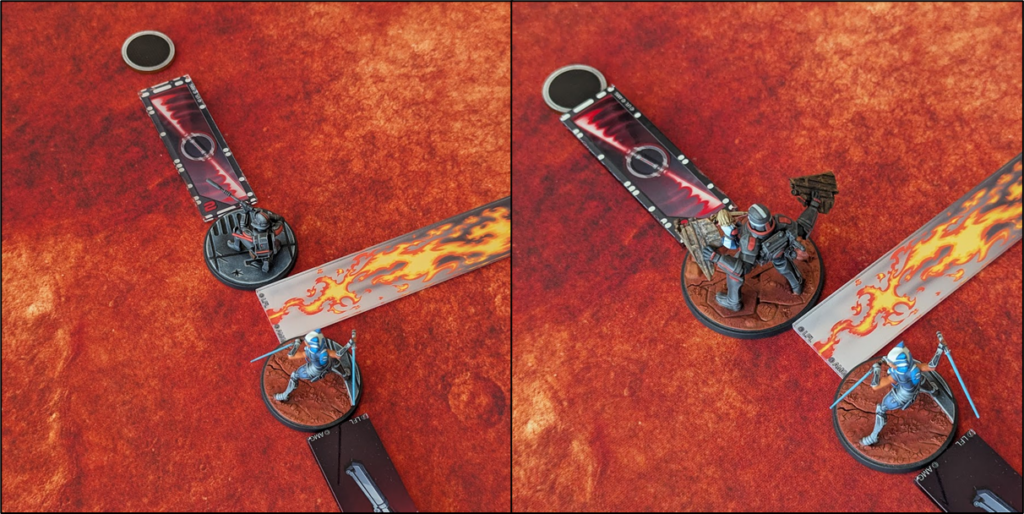
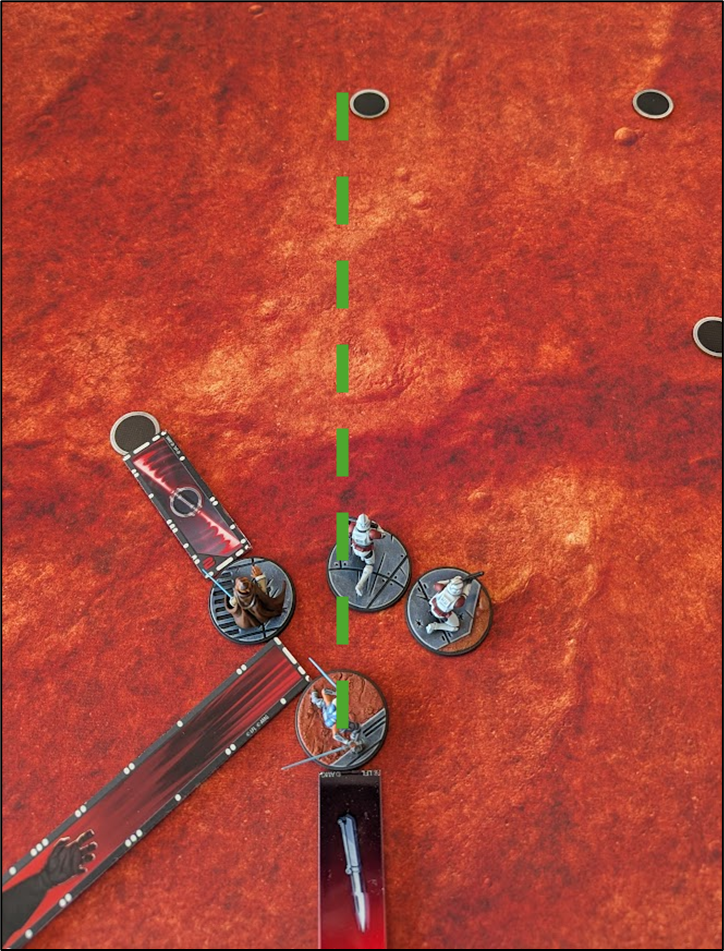
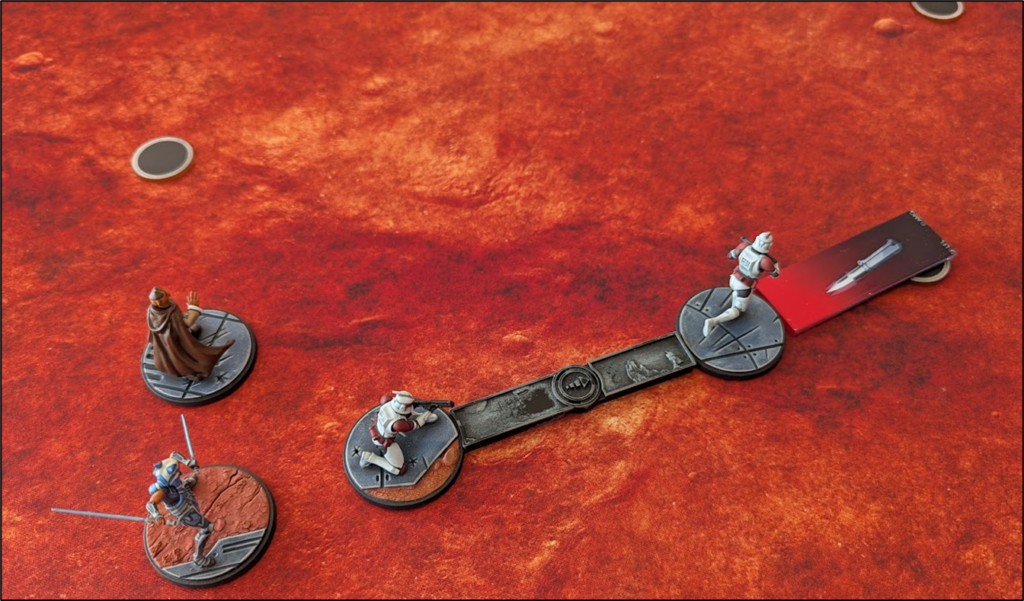
As first player, it’s often dangerous to toss a body on the midline immediately. They won’t score the first turn and usually give your opponent the chance to get damage on the board first. Using your first turn to set a unit on the near-middle, in dash range of the midline, isn’t a bad way to go. You’ll be harder to melee too, so with a hunker you’ll be relatively defensive.
When it comes to arranging my two squads, I usually try to align the slower squad on the left. The left midline will be active twice as often, meaning they’ll have less distance to travel to get into the mix. A fast squad on the right side would ideally be able to cross the board to contest the midline or attack enemy home objectives, depending on what is required. Of course, you do have to account for the possibility of the right midline objective being active, so keep that in mind. Note as well that “right” and “left” are from the perspective of the first player. As second player I’d usually want my slower squad on the my right and faster squad on my left, mirroring the first player.
Tactical Advantage – Defensive Positions
As far as advantages go, this one is pretty minor. It’s one die and only against ranged attacks. One extra die might be the difference, but it probably won’t be. Note that, to contest a midline objective and be within 2 of an inactive objective, you’ll have to be in what I call “one shove range” where one shove can take you off the active objective. Usually, I’d prefer to stay in two shove range rather than get Cover 1, but sometimes the terrain works out in a way that you don’t have to sacrifice much for the bonus.
The bigger advantage here might be for protecting your units before they activate since anyone diving your backline is probably making a ranged attack, but even then only one of the nearest objectives will be inactive to give the bonus.
If you treat this tactical advantage as “nice when it happens, not something I’m working to get” then you won’t lose out on much.
Struggle 2
Layouts
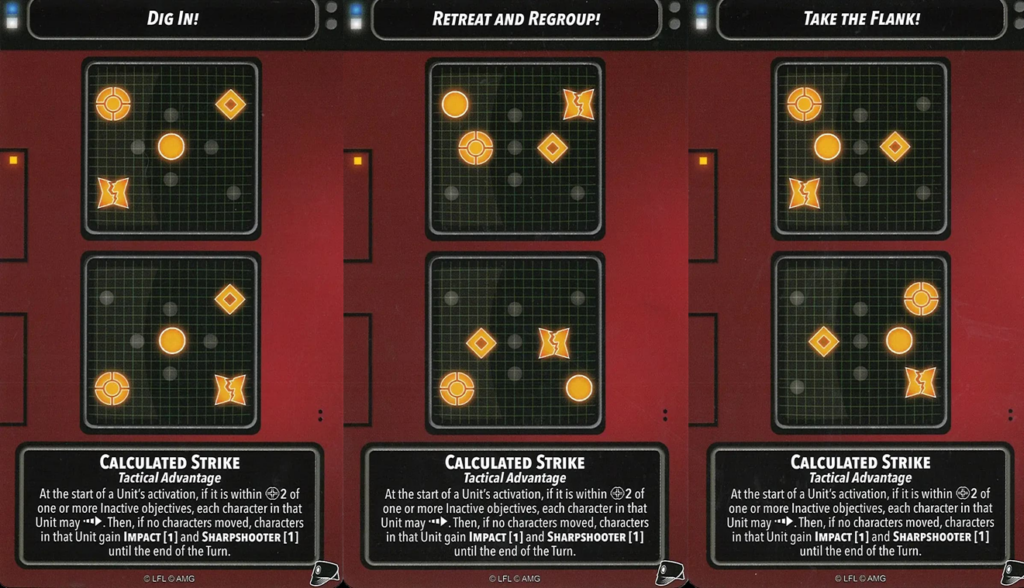
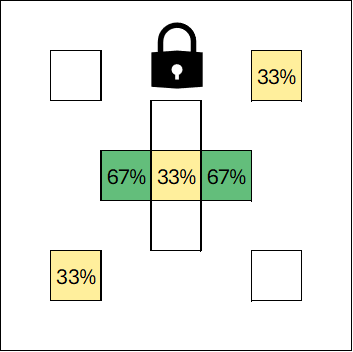
The second struggle layouts have more locked objectives than normal. Each card locks at least two objectives, and one card locks three. The two wide midline objectives are locked on 2/3 cards, which is interesting considering one of them will be carried over from the previous struggle. The loser of the first struggle could have their work cut out for them starting the second since it’s likely they aren’t controlling one of the midline objectives and they don’t have any choice in at least half the objective placements. However, there is a silver lining for that player: the objectives are fairly skewed. Should the two midline objectives be locked in, the loser of the first struggle will get to put the other two objectives on one half of the table, which is a big advantage. Obviously putting them both on your side can be very strong, but putting them both on, say, the right side can be handy depending on what units you and your opponent have left in the order deck. Should Dig In! come up then at least the middle wasn’t active in the previous round.
One other thing to note is that the loser of the first struggle can guarantee their near-left objective is active in the second struggle. Keep this in mind as you position your units in the first struggle, even if things are going well.
Tactical Advantage – Calculated Strike
Of the three Tactical Advantages this mission brings, this is the one I think about the most in list building and it’s not even close. One important thing to be aware of is that tactic abilities happen before start of activation abilities. As such, a unit with a tactic move can use that to get into range 2 of an inactive objective, then get the Tactical Advantage bonus. Note that only one character in a unit needs to be within range 2 of an inactive objective to give both the bonus. Support units with two bodies are more likely to trigger the bonus then get twice the benefit. Yippee!
Impact 1 and Sharpshooter 1 are nice, but usually not as good as movement. However, if the unit in question gets a focus for “free” (without spending one of its two actions) then the decision becomes harder. It’s still hard to pass up movement in Shatterpoint, but if you know you can get where you need to without it then extra dice are never a bad thing.
Struggle 3
Layouts
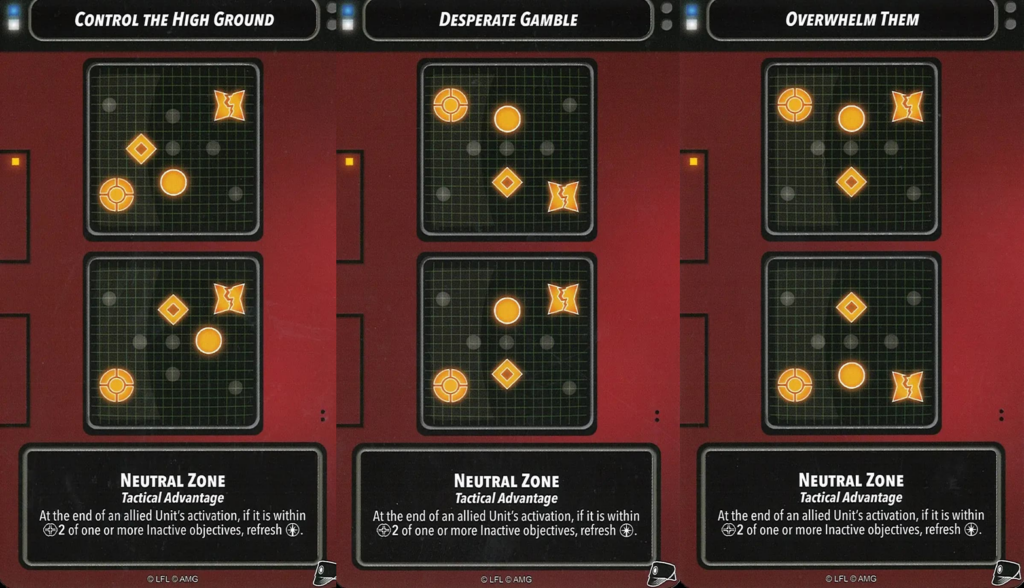
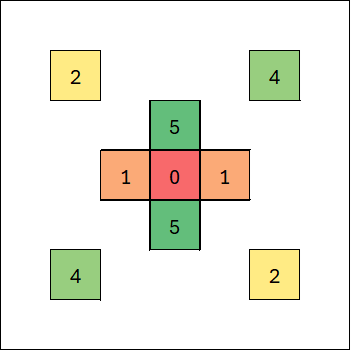
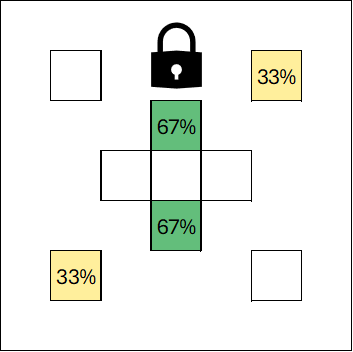
The near-middle objectives were always on in struggle 1, never on in struggle 2, and come back in style for struggle 3. One of the two will always be active, and most of the time both will be. The loser of struggle 2 can also guarantee that their near-left and near-middle objective will both be active, no matter what card is drawn. Looking at it another way, you can guarantee the far-middle and far-right objectives will be active, which might be handy if you have pushed up aggressively on that side. Either way, this kind of certainty is a huge advantage and should be kept in mind during the second struggle.
Similar to struggle 2, we see a bias in struggle 3 for each player’s near-left objective compared to the near-right. This phenomenon reinforces my deployment strategy outlined above. Some slower units on the left can often start close to the action and not have to move too far for the rest of the game. Faster units on the right can push to disrupt the far-right objective, which is the opponent’s near left.
Tactical Advantage – Neutral Zone
This Tactical Advantage is very strong, but not something I’d build for. “I’m going with a force-constrained list because I can regen it in the third struggle” is a mindset that will often leave you disappointed. First off, you have to make it to struggle 3 in the first place. Second, by the end of the game you usually have a number of wounded/injured tokens out, increasing costs, and might have to be spending aggressively to stay in the game. And, of course, you also have to play other missions. The extra force will help offset regular late game force constraints, but won’t be enough if the list also fundamentally lacks the necessary force to operate.
Priority Mechanic*
*As of writing this article there are a couple of rules questions without official answers. The first is when the priority markers get reset, the second is which objectives are eligible to be marked when a double is rolled. For the purposes of this discussion I am assuming priority objectives reset only after a player has scored the extra point and that only the three objectives marked with a die face can be eligible to be a priority objective. These assumptions align with the general consensus interpretation that I’ve seen and are how I’ve played it.
I will admit that the standard “roll for one priority objective every round” system used in previous missions doesn’t annoy me as much as it does others. However, for those who don’t like it, Strategic Positions offers a new twist: the priorities are double, and that might mean trouble. In the second and third struggles there are four active objectives, three of which can be selected for the priority mechanic. Two will be active at a time and won’t switch until a player controls both at the end of their turn (which also grants a bonus point on the struggle tracker).
In theory this makes it harder to score the bonus points and less likely that one player gets a big advantage due to chance alone. I think the former works out in practice, but with the latter I’m skeptical. In my experience thus far I’d say the number of “feels bad” rolls are about the same as before. Should a player at any time control all three potential priority objectives, I do find it very tough for the other player to mount a comeback. This was difficult before, sure, but first impressions are that it’s even tougher with the double priority system. Struggles can be over quickly due to one player snowballing, so starting a struggle strong is especially important.
This priority system does open up more defensive lines of play than what we’ve seen previously. If you know you aren’t going to score both priority objectives on your turn you can focus on defending the one you maybe control already so that your opponent won’t be able to flip it and score both on their turn, potentially buying time for you to draw a unit that can flip theirs. This sort of defensive play was kind of possible on previous missions, but generally less effective because you didn’t know where the priority would be next turn.
I do think it’s important to mention the non-priority objective for a moment – don’t forget about it! Once the fight begins, a lot of focus will be on flipping the priority spots. Getting a unit on the non-priority can mean easy points if they proceed to fly under the radar.
Usually, I’m not a big fan of momentum farming being Plan A. That’s my term for grabbing “free” momentum by keeping the struggle cube on your opponent’s side of the board. However, perhaps it can be a bit more effective on Strategic. The normal issue with the approach is that, after farming all the momentum, you still need some big turns to pull the struggle cube over to your side. With more active objectives it might be easier to maintain a holding pattern, earn lots of momentum, then flip the struggle cube with a big turn. This is mainly theory still, but something that I plan to explore in some future games.
Sample Strike Teams
Before wrapping up, I do want to quickly go through some example lists that might prefer Strategic Positions. I’ve done one each for the four main factions. These aren’t necessarily going to be the best possible lists to play on this mission, but I do think they are illustrative and I’ve given a quick reason for including each.
Republic

As I mentioned earlier, Mace can excel on this mission. He still needs to get dug in, which can be unreliable, but once he is engaged near the middle of the board his bubble will provide incredible value. The list overall has a lot of movement to get bodies flowing between objectives and decent survivability to stay alive and contest. There’s also enough speed to get units out to the corner objectives. All of our primaries and secondaries have tactic moves to make better use of Calculated Strike.
Separatist

Riff is absolutely licking his shark teeth looking at Strategic. Everyone grouped up near the middle of the board means he can consistently perform follow-up attacks and he’ll probably get a bunch of extra dice and force regen in the meantime. Obi’s Mind Trick will help bring some defensiveness that Separatists lack. Dooku is mainly there to bring lots of force, a bit of a deterrent for wounding the units who use it, and a small defensive bubble. Dooku and B1s could be swapped out for Grievous and B2s if you want a bit more speed to attack the corner objectives.
Empire

I believe there’s a tiny spot where Vader can, using his range 3 contesting ability, secure all three midline objectives turn 1. Is that reliable, or even useful when it happens? Probably not, but it is cute. Sticking ISB in the middle might just be cute, too, but I think it’s more than that. Everyone will be somewhat grouped up after the first struggle so threatening two damage for moving away isn’t bad. We can also take advantage of Calculated Strike in the second struggle with all six units either having a tactic move or easy access to a focus (or both for the Death Trooper Escort).
Rebel

The range 5 bubble 3PO brings isn’t as good as Mace’s in that it doesn’t give Protection, but it’s better in that it’s much more reliable. Mass Steadfast is handy, but sometimes rebels just die. Cassian helps there with his flexible revenge, which is especially potent with the tightly grouped objectives often found on this mission. Leia’s Coordinated Fire: Expose bubble can do a lot of work offensively and Infiltration from the rebel commandos is an advantage to deploy on the near-middle objective.
Wrap-Up
Quite simply, I’m a big fan of this mission! It feels balanced without resorting to too much randomness, which I appreciate. I think I’ll be playing it a bunch in the future, and doing so happily. As far as downsides, it may just make the good lists better. That was especially true when Cassian and Delta were around, but may be less of a concern now. The priority mechanic might be an improvement compared to what we’ve seen before, but I’m still not sold on that.
Competitively, because many lists can play this objective, bringing it may not give as much of an edge as other missions. While your chosen list might like it, if it likes it an average amount then an alternative mission may be a better choice.
There’s one way to know things for sure: play games, test it out! Have fun with it – I know I am.