

This unit guide will cover commander Han Solo in Star Wars: Legion for the Rebel Alliance.
We’ve actually done two previous unit guides on Han, but it’s been about two years since the last one, and he’s been on my mind recently, so I’m going to bring you this update.
As usual, let’s start with some strengths and weaknesses.
Strengths
- Disruptive command cards with unique effects
- Less squishy than other Rebel support characters
Weaknesses
- Ranged attack, which used to be a strength, is terrible with new cover rules
- Short ranged
- Low courage
- Training slot hungry
- Vulnerable to Pierce
Overview
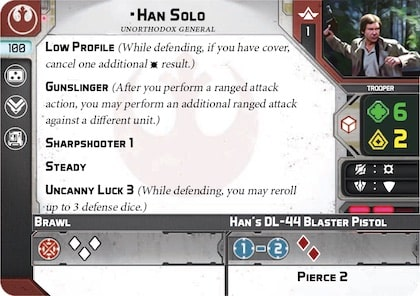
100 Pts: This is a hefty price tag for a unit leaning primarily on the value of his command cards. There are other support commanders that have similarly disappointing offensive output (Super Tactical Droids, in particular) but far more support abilities printed on their cards. This cost is a bit of a relic of when Han’s attack was actually good, but it might still be worth it due to the unique place his command card shenanigans have in the meta.
Defense: White/surge, Uncanny Luck 3, Low Profile. This is a quite a cocktail of keywords that actually makes for a reasonably durable package, particularly compared to other Rebel “white save” commanders. On average, a re-rolled white/surging defense die comes up with paint about 55% of the time, which means if you are rolling three saves or less, this is slightly better than a red/no surge save. Low Profile is obviously great after the change in the ’21 update that allows you to upgrade to Cover 3. Han can be Vulnerable to Pierce, Critical, or cover denial weapons since he depends pretty heavily on his save and his Low Profile for his durability.
Offense: DL-44 Blaster Pistol – Range 1-2, 2R, Pierce 2, surge/crit. With Gunslinger and Sharpshooter 1 this can be quite reliable if you are shooting both targets into light or no cover, which rarely happens now. Most of the time, half the paint here is going to bounce off that ever-present heavy cover with the new cover rules, and there isn’t much you are going to be able to do about it except try and get practically to melee range and touch the cover (not that I’m advocating for this; Han does not want to be in melee range). Han’s reliable “pick two minis up each shot” attack used to be one of the primary draws of his kit, but “pick one guy up from two different units” doesn’t have quite the same ring to it, especially when you need to be at range 2 which is typically a murder range reserved for the strongest ranged attack pools. That is to say nothing of dodge tokens, even one of which (after that pesky cover) will make Han’s attack bounce absent any crits you get.
Offensive: Brawl – three white. Han’s melee attack is really bad. One of the best ways to counter Han is to get him tied up in melee, with almost literally any unit, even something like B1s or Rebel Troopers. Han is probably not going to kill them with punches and he doesn’t have any good way to escape. This makes playing the range game with Han especially important given his short pistol range; think really hard about when and how you want to make his pistol attacks to get real value out of them and make sure you have an exit strategy.
Steady is nice and big improvement for allowing Han to actually take shots, but it is a lot better at getting him in than getting him out (since you can’t attack before you move), and it’s much less useful than when it was first added to Han for denying cover (since angles matter so much less now for that purpose).
Courage 2 – This is bad for a close range commander. Keep him out of sight until he’s ready to shoot, you don’t want him down actions. Bear this in mind on your Reckless Diversion turn and have an escape plan in case he panics, assuming you intend for Han to be the one taking the heat on that turn.
Slots: 1 Command, 1 Training, 1 Equipment. Each of these are solid. The command slot is particularly useful, as Han will often fill that second commander slot alongside Cassian, who lacks one. If I had a quibble here it would be a desire for a second training slot, but at his already premium price you don’t want to be loading up Han too much on the upgrades anyway.
Teamwork, Chewbacca: Okay, so this is technically not on Han’s card (it is on Chewie’s as Teamwork: Han), but the bottom line here is that Han and Chewie each get other’s tokens. Dodges are useful on both (especially on Han) and aims are useful for Chewie. Sadly Han doesn’t really have the dice pool to get good use out of aims, but free tokens are free, and those red dice do blank on occasion.
Command Cards
This is Han’s real bread and butter and why he is arguably worth 100 points still despite his offensive deficiencies. Han’s command cards have some of the most unique effects in the game, and they tend to be ones that force your opponent to do things they don’t want to do. Such effects are rare with good reason (being forced into a certain decision can feel bad) but having a handful of such effects on a premium costed package can be a helpful counterweight in their own right to other splashy effects.
This is primarily why I’ve been thinking about Han lately; Reckless Diversion and Change of Plans in particular can really throw a wrench in the gears of your opponent’s timing sensitive knockout punches (I’m looking at you, Yoda!).
I won’t go over the command card in detail but Chewie’s Notorious Scoundrels allows you to recycle any one of these cards, which is obviously great as these are unquestionably the best part of his kit.
Sorry About the Mess
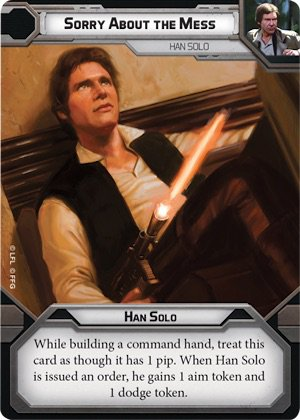
The free aim and free dodge are nice (especially if you are running Chewie, since he gets them too and actually really wants that aim token in particular) but the real sauce here is the zero pip. Sorry About the Mess automatically wins you priority, even if your opponent has Cunning, because there is no tie! Han just goes first. Sadly this will cease to be true once Interrogate becomes a thing, but that’s some kind of future fantasy land we aren’t living in yet and I just really don’t want to think about anyway. Palpatine’s “Give In To Your Anger” is also sort of a counter to this since he gets to pick which unit you go first with (presumably not the one you actually want to do that with).
You can combine this with other free order effects on other units such as Seize the Initiative or HQ Uplink to guarantee priority for another unit instead, which could do a nearly unlimited number of things for you, depending on what that unit is. Going first, guaranteed, is good. You can obviously also just fish for a token if you really need to try that in a pinch.
The primary use of this is generally to do a last/first with Han himself, going in with Steady on the last activation of a turn and then playing this on the following turn to immediately take another shot and get out of there. Just bear in mind that Steady nets you a lot more engagement distance on the way in than on the way out, since you can move-move-shoot but you can’t shoot-move-move. Also make sure you’ve assessed whether your shots are going to be able to catch units out of cover and if your opponent will have any dodges before you make this play, because it’s not going to be worth it if those quick-draw pistol shots are mostly just bouncing off cover or dodges anyway.
Reckless Diversion
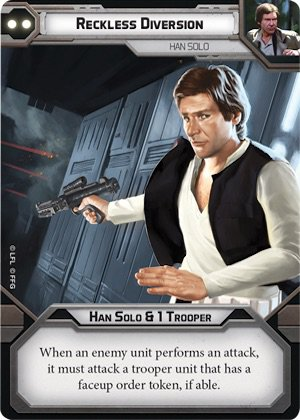
While the new rules neutered Han’s pistol attacks, they absolutely took this (already very good card) and turned it up to “should that really be allowed?”
I’m not talking about the cover rules. I’m talking about the casualty removal rules, where you can remove models your opponent can’t see but you can’t suffer more wounds than the wound threshold of the minis your opponent can see. To maximize this benefit, take a unit with a lot of single wound models in it (might I suggest Ewoks?), and throw one single model out there to be seen (but not the unit leader), hiding the rest behind a line of sight blocker. Make sure they are the closest unit your opponent can target. The trap is now set: play Reckless Diversion on them (you’ll need Underworld Connections if you are doing this with Ewoks). Now, each time your opponent shoots, not only will they be forced to target this unit, but they will never be able to do more than one wound per attack, no matter how beefy their attack is. This means a unit of Ewoks (which will have super-cover from Low Profile to add insult) could eat anywhere from 6-8 infinitely ginormous attacks depending on how many models you have in the unit. Fire support that, clones!
If you’ve done this properly and put a non-unit leader model out there instead of the unit leader, you can also save the target unit by waiting until the second to last casualty to remove the mini your opponent can see (or just whenever you feel like not having that unit get shot any more) and then your opponent won’t be able to shoot them anymore that turn unless they can get around your line of sight blocker.
A less obvious use of this is to force your opponent to split off their longer ranged weapons from their attack pools and split fire to target your Reckless Diversion unit, if your Reckless Diversion unit is slightly behind your front line. There are a lot of heavy weapon upgrades that have longer range than the rest of their unit and splitting those off can really reduce the effectiveness of a unit’s attacks.
Be wary of the suppression cost of this; Han (or your other faceup unit) is going to have a lot of suppression at the end of this, and you’ll want to make sure they’re in a position where they aren’t screwed if they panic or you have another plan for stripping suppression off of them.
Lastly, make sure you have a plan for how you are going to exploit your opponent being forced into shooting something they don’t want to. Han excels at creating opportunities for other units, and this is best paired with some kind of hard hitting unit that can take advantage of the opening.
Change of Plans
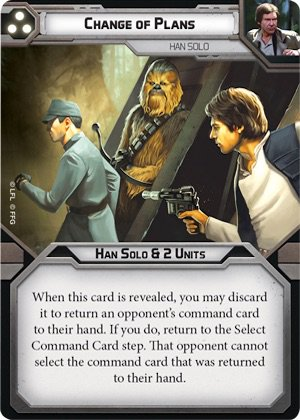
Well these cards just keep on getting better as you go up in pips.
Change of Plans is, quite literally, a counter to any other command card in the game. If your opponent really wants to play a specific command card in a specific situation, that is a good time to play Change of Plans. Just having this in your hand can mess with your opponent’s calculus when they are noodling over what command card to play; do they play the thing they want, only for it to be kicked back, or do they play something else, hope you play Change of Plans, and stick you with the three pip?
Generally speaking, Change of Plans is best played when you don’t necessarily need priority and your opponent has a highly telegraphed command card. That way, if your opponent plays the card you want to cancel, you cancel it and start the process over. If they play something else, you’re going to be stuck with a three pip, so make sure you’re comfortable with that. If that happens, however, Change of Plans has still done it’s job. Whether your opponent keeps their needed command card in their hand proactively in fear of Change of Plans or you cancel it, the result is the same; your opponent didn’t play the command card they needed to play on the turn they needed it.
Keep in mind when you discard Change of Plans you are permanently putting yourself down one command card, so you are going to have to play Standing Orders at some point unless you follow Change of Plans up immediately with Notorious Scoundrels. Most of the time, when I am playing Han/Chewie, I am playing Change of Plans and Scoundrels back to back.
Err on the side of playing Change of Plans to counter something early. There are two reasons for this. 1) Early actions define the game state for late game, and 2) a Change of Plans saved for an opportunity that never comes is wasted.
Cycle that, Yoda! I swear the timing of this article has nothing to do with me trying to find Yoda counters. Probably.
Upgrades
Command
This is definitely Han’s most valuable upgrade slot, especially as you are likely running him with Cassian.
Improvised Orders
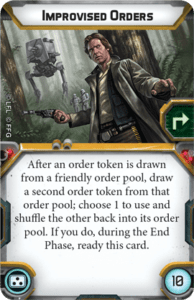
Improvised orders is a solid pick if you have the points and no better plan for this slot. As a Rebel player, your bag is likely to be pretty messy, and this helps mitigate the downside from that a bit. 5 points isn’t a lot to ask for an upgrade that can help you throw back a token you don’t want every turn.
Vigilance

The price of this skyrocketed in the last points update, but it is probably still worth it if you are running some kind of Pyke/Rebel Trooper situation and pairing Han with another commander that also has Vigilance. That’s an expensive proposition, but one that can still be effective and is your only real choice if you don’t like Rebel Vets.
Underworld Connections
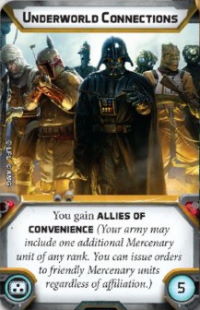
This is a necessary pick if you want to do the Ewok nonsense mentioned above under Reckless Diversion, which makes it my favorite pick for this slot.
Training
This is a crowded slot for Han, though you might end up leaving it empty anyway due to Han’s premium cost.
Endurance
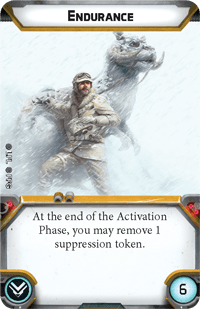
This is a solid pick for Han if you have the points, since he has Courage issues and really needs all his actions.
Up Close and Personal
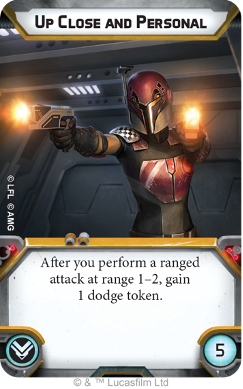
Up Close and Personal seems tailor made for Han, since he gets a dodge from each Gunslinger attack (and Chewie does too via Teamwork!). It’s a shame you can’t pair this with Situational Awareness, because that would be awesome. Curse you single training slot!
Eight points is a lot to ask for a training upgrade, but if you intend for Han to be attacking a lot and aren’t just bringing him for his command cards you will still get a lot of mileage out of this.
Situational Awareness
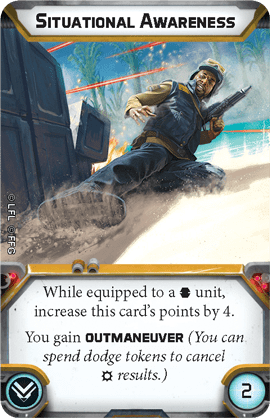
Even without Up Close and Personal, Han can still get quite a few dodges (Teamwork gives you a lot of flexibility there). Make sure you have a plan for that though besides just Chewie taking the dodge action, because that isn’t really a good use of Chewie’s activation, generally. If you have other ways to throw dodges on Chewie or Han (Take Cover, Calculate Odds, command cards such as Last Stand, etc.) then this can be a good choice.
Gear
There are really only two choices here but they’re both helpful for Han getting around, if that is something that is important to you.
Environmental Gear
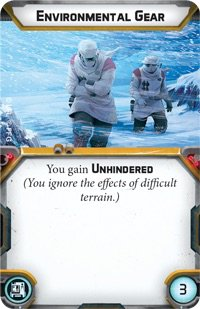
Unhindered took a bit of a hit with some of the more subtle movement changes in the CRB, but it’s still a useful keyword if you and your opponent are classifying enough things as difficult terrain (you should be) and two points isn’t a lot to ask.
Recon Intel
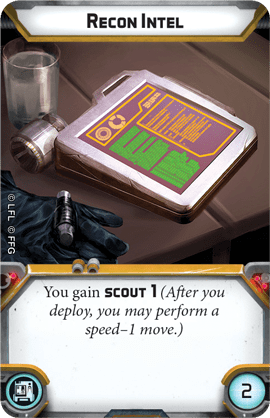
Recon Intel is also useful for getting Han closer to the action, but it does so with less dependence on terrain. The extra free move at the start is also useful for doing things early like grabbing boxes.
List Ideas
Han has been creeping into my consciousness as a clone counter, so each of these lists is going to be designed to support that goal with the rest of the choices as well (and hopefully just be generally well rounded and good).
Cassian Gunline but with Han and Chewie Instead of Ahsoka
Spare me your admonishments about the wisdom of cutting Ahsoka, I wanted to make a list with Han, so here it is.
Anyway, this list has a bit silly quantity of ranged pierce, while also featuring four weapons with High Velocity and Chewie with Protector to keep those weapons alive. Protector is a nice durability stack on top of the Low Profile many of the units in this list have.
I opted for Full Commandos here in some quantity, because High Velocity and Pierce are necessary but Strike Teams are extremely fragile with the new casualty removal rules and criminally bad at getting anything meaningful through cover with their two die pools. There are ways to do this list where you basically swap the full units for strikes and trim some fat elsewhere to fit an FD, which is probably better but not as hip.
This list also has a lot of long ranged critical to hopefully poke while avoiding that Range 3 clone death zone.
The skirmishers are there purely for the Reckless Diversion nonsense, which is probably worth the two point premium (really it’s seven since you also need Underworld Connections) over the MkII that would otherwise be in that slot.
If you want to take Up Close and Personal on Han, you can downgrade the second Vet to a DLT Rebel Trooper unit, which nets you the eight points for that upgrade.
I heard you like Ewoks
You can’t kill all of them (probably)! The bid is likely a bit overkill here, but this is one of the rare lists that really wants its battle cards, as much for the deployments as the objectives. You want the close deployments that go long edge to long edge (Hemmed In, Battle Lines, Danger Close, Disarray) as well as objectives that involve counting units (Breakthrough, Key Positions, Intercept…. I guess you have to take Payload). Limited Visibility is also money to throw in there as a “my opponent definitely has to spend one veto there” card.
Summary
Han’s once reliable pistol might be showing its age a bit, but his command cards are still the best in the game and he can compliment some of the best existing Rebel archetypes while forcing your opponent into places they don’t want to go. Dust him off and give him a shot (or two)!

2 Responses
How much play does Han get with Hunter in the training slot? Nets Chewie an Aim Token too.
How much play does Han get with Hunter in his training slot?