

Total: 796/800
My Opponents List
Total: 796/800
Battle Cards
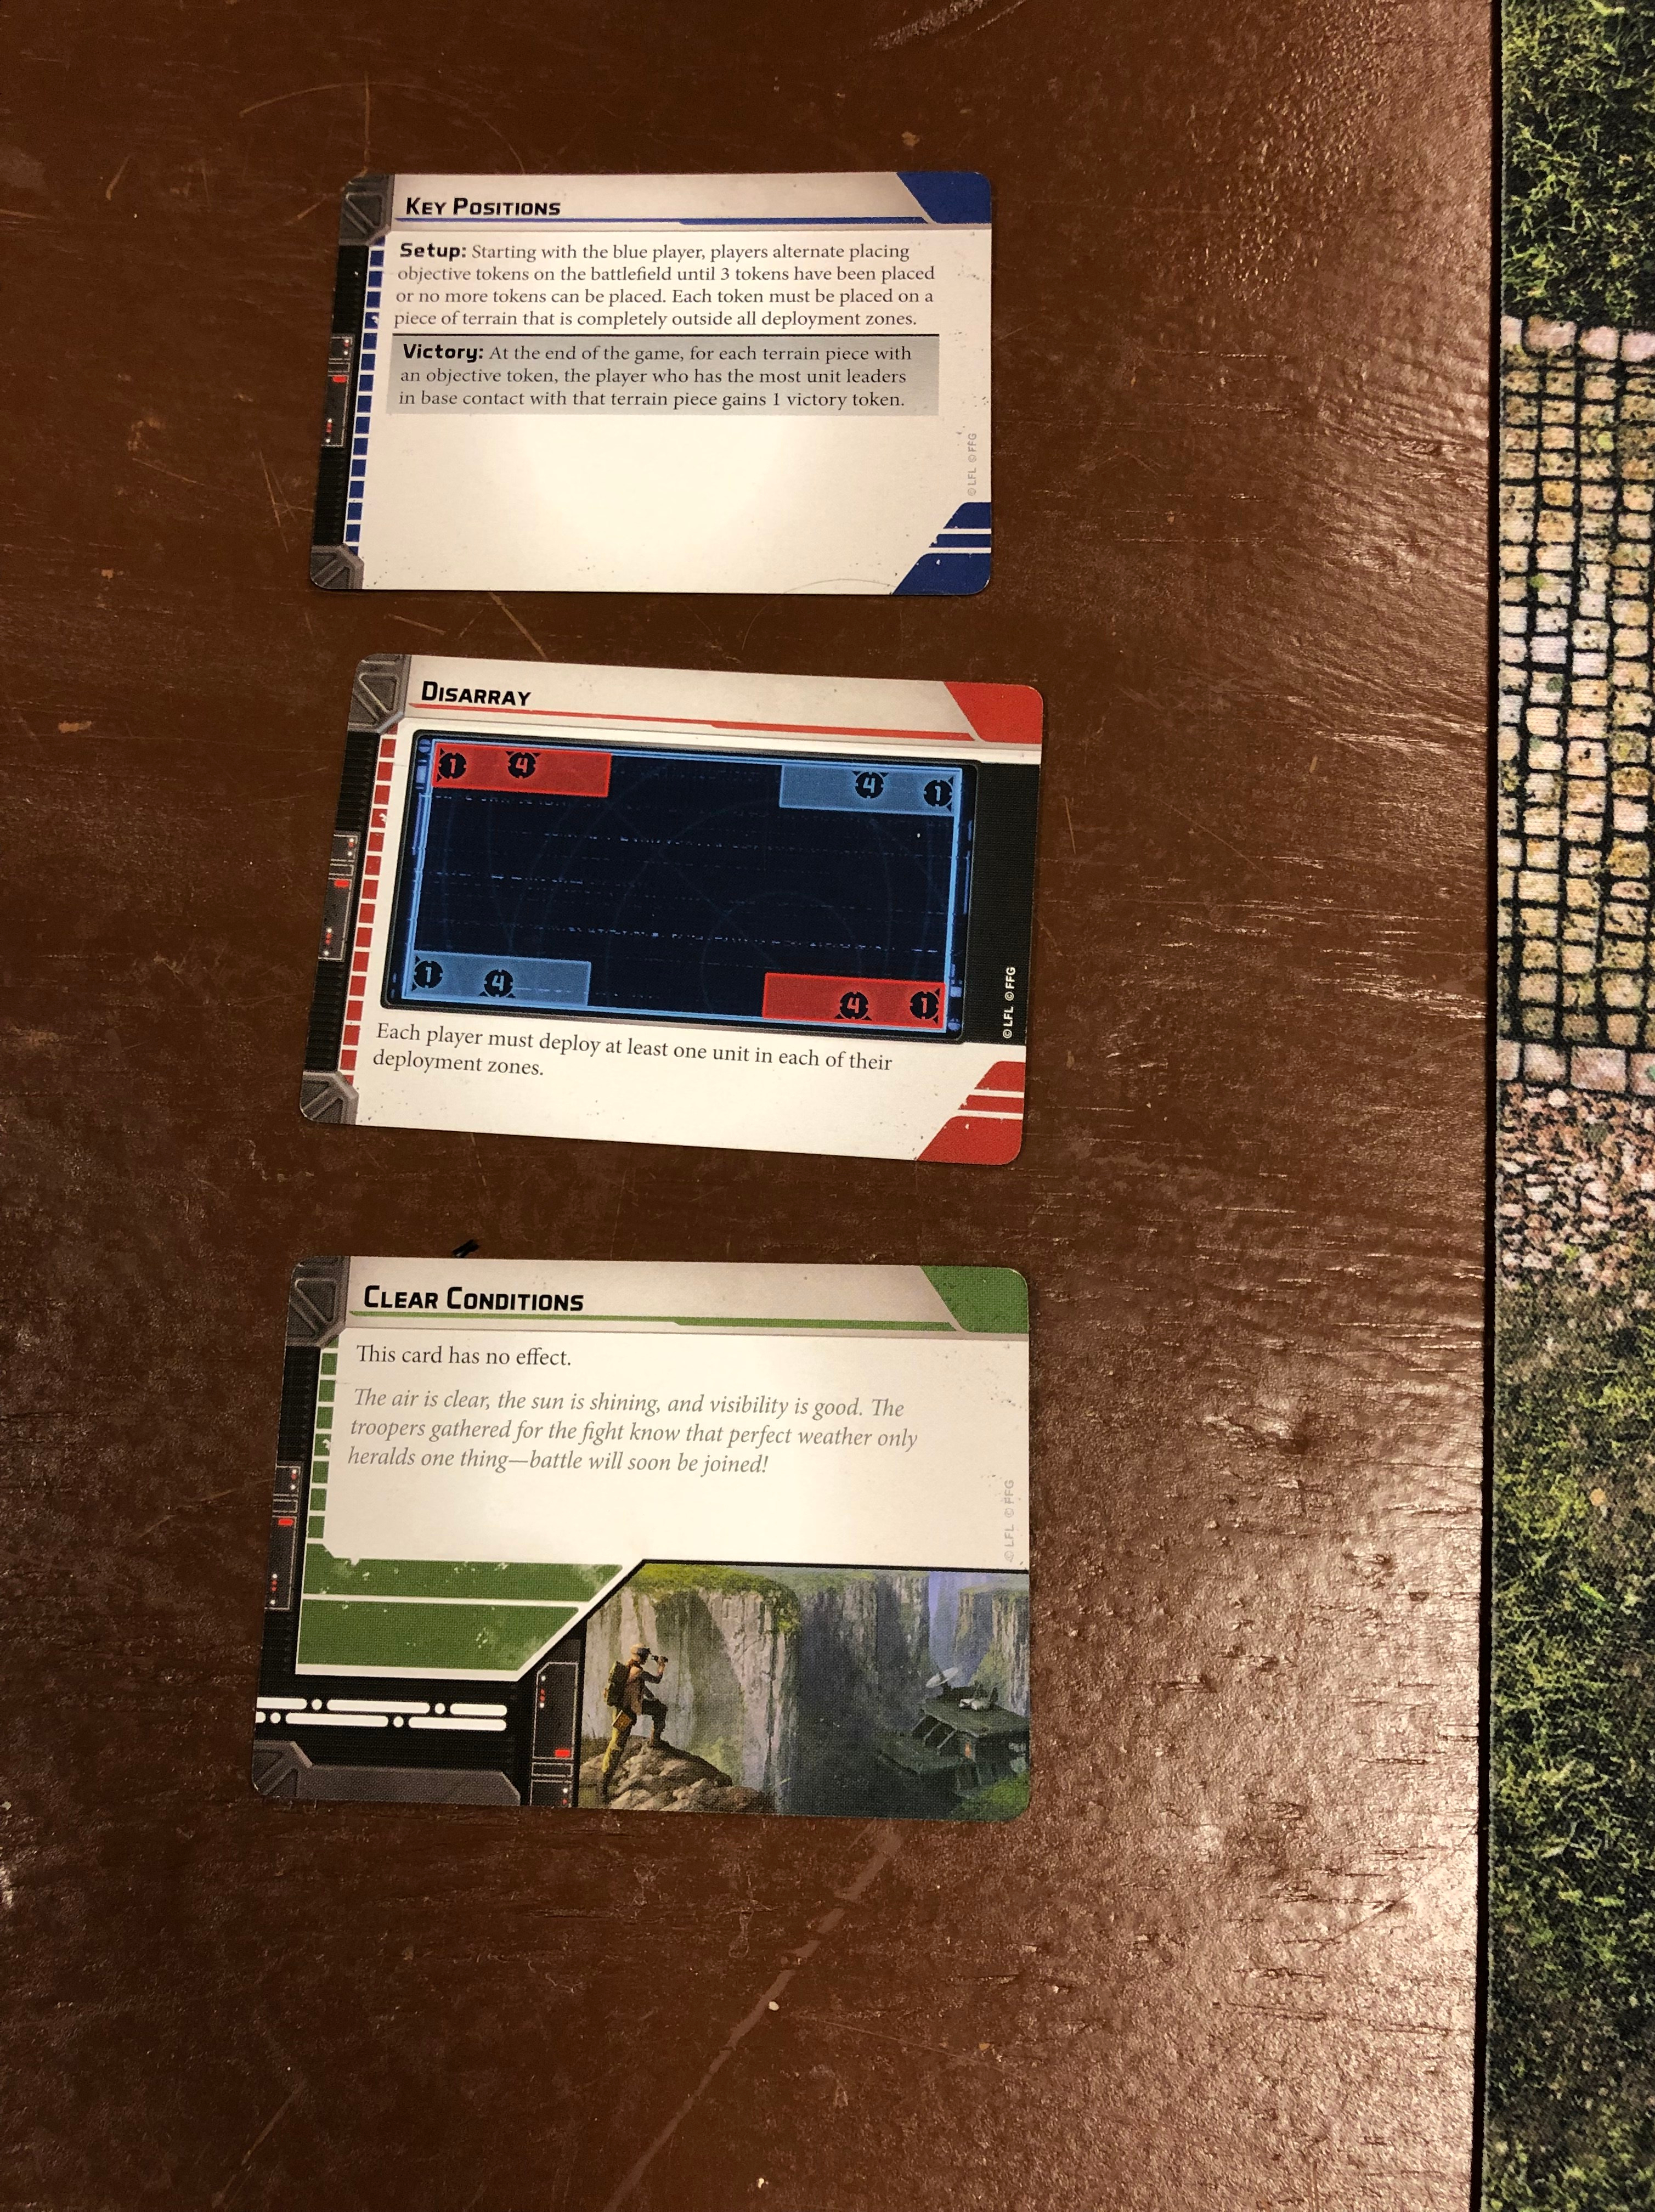
Since we were tied in points, we did a roll off for who was blue player and I happened to win and took blue. I wanted my cards specifically because I don’t want to see Hostile Environment. This was somewhat ideal for me at first glance with Disarray and two commanders, but we’ll get into how this actually ended up being pretty bad for me. Key Positions actually favored me with how we deployed them and I was not a fan of Clear Conditions coming out to play, even with all of my snipers and Leia. I had to try and play around the Deathtroopers.
Table Set Up

The table was pre-set from a prior game, and while it was a little dense and not Star Wars themed we both decided to keep it because it was pretty cool. As a Rebel player, I thoroughly enjoyed all of the line of sight blocking terrain! Three building that will be mentioned will be the building I deployed my snipers on which we wil call Farm Stand, the center building, and the general store. These were the key positions.
Round 1
Command Cards: Coordinated Bombardment vs Coordinated Fire
I decided to split my commanders, mainly due to how some of the line of sights were playing out. Where you can see the snipers above I deployed: two sniper teams, a medic Z6 squad and Leia. On the other side I placed Luke with everything else. Specifically with the fleets, to try and move in unison. Jeff, my opponent, placed Krennic, two Deathtroopers, two DLT Stormtroopers and his Snowtroopers in the side opposite of Leia. On the other side he had a set of Deathtroopers, two DLT stormtroopers, and his lone snipers.
He deployed his snipers out of LOS and on a side that I didn’t think would favor Leia in the first place. In order to get a Coordinated Bomardment out there, I knew I had to leave her behind some cover and outside of range 4. That way my opponent would have to move and shoot her….but this didn’t matter. Sigh. Her bombardment killed two stormtroopers, and the rest was all suppression on the Deathtroopers and another Stormtrooper sqaud.
After the Bombardment, it really turned into all positioning. I started to move a bunch of forces to the General Store and out of line of sight from the snipers and Deathtroopers as best as I could. The Deathtroopers on that side were out of LOS to start the round, I didn’t want to allow him to move up and shoot anything that great. Luke and the Fleets started to cut towards the middle of the board and out of line of sight to ensure they didn’t take any shots along the way. I know I took a few shots at DT’s with my snipers, that did nothing. A DLT potshot took out a sniper, which I brought back to life with the medic, but the reason for mentioning that is the aim they took passed over to the Deathtroopers. And then this was the catalyst of the first round and perhaps the game: His Deathtroopers, with an aim, shot at Leia….landing all 7 hits without(!) the aim. Leia, who was in light cover with a dodge then rolled all blanks and took five wounds. This was not something I was expecting necessarily. I put her in a decent spot and I had a nice hiding hole for the next round for her. However, now that she took these five wounds, I knew she was in trouble.
Round 2
Command Cards: No Time For Sorrow vs Voracious Ambition
I played No Time For Sorrow to try and get Leia into some more cover or out of range four. The issue here is on her right side, in the other Disarray deployment zone, are my enemies snipers with a direct line on her. I have two options: move directly right and stay in range four of the same Deathtrooper squad that just shot her but out of line of sight of the snipers or to move to my right, a little out of range of the Deathtroopers range and force him to pull his snipers. The thought process here is his Deathtroopers can’t recover, move and shoot if I do option two. The issue is Voracious Ambition allows him to have control of his tokens. I had to take this gamble no matter what, though. He declares he’s going to the bag, and all of a sudden I have hope. He doesn’t have Special Forces on the Voracious Ambition. This elation lasts all but ten seconds, as he then pulls special forces out of the bag allowing him to be able to aim and shoot Leia. I’m sure you can deduce from my grim tone that she died a valiant death. Those dang Deathtroopers! It doesn’t get any better for that side either, as I moved a sniper squad out to take a no cover shot on his snipers, and blanked out. He had a flanking Stormtrooper squad move into a good spot to get both models of my sniper team and wipe them out. Now I’m at a huge disadvantage on that side. I’m down to the medbot Rebel trooper squad and the one sniper squad. I had to make ten men fell like one hundred from here on out, basically. What I decide to do is on the other side is continue to move Luke and the fleets towards that building (note the picture above for reference) with the orange store front sign. On the other side of that sign are two Stormtrooper squads, but one is only able to get in range to shoot either Luke or the Fleets if they wanted, so I Jedi Mindtrick them to put them at three suppression to try and keep them from coming towards me. Over on the General Store side of things, his Deathtroopers shot a squad they had shot the round before to put them back up to 3 suppression, and I made a bit of a goof up here. I knew I moved Luke out of range of them to apply pressure on the other side, and I completely forgot about a Rebel Officer led unit on the General Store side and didn’t activate them first to Inspire. Genuine mistake that led to these Rebel Troopers to panic from their location. Luckily, not off the board. At the same time, he moved a DLT squad towards some area where I could thread shots with no cover and I decided to move and shoot them about two to three times and wiped them. Maybe things were going to start to turn around. The other side was mainly all positioning, I allowed no more shots to be taken on my side. I aimed and shot at the DLT squad that came around and wiped a sniper squad out and did some chip damage. He got a set of Deathtroopers perched onto some highground on a roof and started to funnel everything else towards the Key Position I was bunkered down on.
Round 3
Command Cards: Deploy The Garrison vs My Ally is the Force
Once Deploy the Garrison is played and Jeff has stand-by’s and aims out I know he’s worried about Luke, as he should be. Once this happens, I can kind of play the waiting game over there to make sure I don’t walk into a hailstorm of shots. Nothing much continues on the Key Position I have locked down on the Leia side, as I take out the flanking Stormtrooper squads DLT unit and can kind of take a sigh of relief on that side since it’s just the commander, and I’m still in a safe position from the steady moving Deathtroopers, Krennic and Snowtroopers who are now making their way downtown to the Key Position even more. Over at the General Store, I take another Deathtrooper shot which does some damage, but nothing too overwhelming, I do lobby a shot or two back, which doesn’t do much. I also decided to move my sniper into view to try and get some luck against his snipers, because they needed to be dealt with. The shot fails, my snipers were very sub par this game. Some of it might have been positioning, but a good portion of it was dice. At this point, I know I need to move most of my units out of line of sight of those General Store Deathtroopers, and just bunker up against the Key Position. This is going to force them to move towards the open and towards the middle because there’s no way he can contest this Key Position when I have three or four units on it. On the Luke side of things, I decided to just stay put with Luke and not move into shots. I force push a unit with a stand by to knock it off, I recover to then refresh Jedi Mind Trick and Force Push, to then Jedi Mind Trick another stand by off. This was for if I wanted to move up the Fleets for a shot, they could do so undeterred. What I actually do is move them backward a little, but out of range of the perched Deathtroopers, and shoot at a set of Stormtroopers in the open. I do some chip damage, and ultimately allow Jeff no shots this round. It’s a somewhat wasted round with Luke, but it’s better than jumping a building and getting lit up.
Round 4
Command Cards: Covering Fire vs Push
Covering Fire seems like a strange card to play here because now I have no control of when I can activate Luke but there is always a method to the madness. I know he has Annihilation Looms and I need to save Return of the Jedi for when he drops that. If I play Son of Skywalker and activate Luke too soon, I’ll take multiple shots. I need him to activate some units, maybe get unlucky and pull a Corps unit over near Luke and have them activate. Then I can engage them and be safe, to then wreak havoc later on. However, none of that happens. It ends up being a more positional round again, as we know it’s time to start getting to the final position to score in round six. Krennic, Snowtroopers and Deathtroopers all move towards that Key Position. His sniper finishes my last sniper. His General Store Deathtroopers start to jaunt towards the middle, and my Fleets get into some complete line of sight blocking area to start securing the middle. Right now is when I decide what my plan is. I’m going to move Luke up and engage two units with Force Push. This will take away action economy from them and make them withdraw. I know he want’s the perched Deathtroopers to take a shot on Luke, which is fine. I can maybe weather that storm, shed some suppression and then move back towards the middle with Luke and put pressure on the middle objective. This is exactly what I do. I kill three, maybe four Stormtroopers. As I predicted, they both withdraw and Luke takes the DT shot. He suffers two wounds, two suppression, and the round ends. Annihilation is looming.
Round 5
Command Cards: Return of the Jedi vs Annihilation Looms
The most important part to note here is how strong Krennic can be. With his cunning ability, it allows him to activate first. With his Entourage ability, it allows the Deathtroopers in the perch to activate first. These are all things I didn’t want to happen, but there’s nothing I can do about it. I’m just going to trust the dice and hope Luke will rally after he takes this second Deathtrooper shot I know is coming. He recovers and takes his shot. I spend my dodge, and I take two more damage….and two more suppression. Luke is now up to three suppression and I’m at a cross roads. The Fleet Troopers have an officer on them and I could activate them, Inspire one off of Luke, but then the issue is that something else will have the chance to shoot at Luke and what’s the difference. I want to get Luke back towards the middle and relatively safe, so I decide to activate him. He rolls his three rally dice….blanks. I only have one action. I move Luke behind some terrain towards the middle, not in a great spot but it’s all I have to do. I could have recovered, but if I did, I’m open to another Deathtrooper squad. His Snowtroopers finally reach my bunker down Rebel Troopers that are all alone on the farm stand Key Position and hit them with Frag Grenades. The Trooper leader stands tall, but he’s back up to two suppression which is not good. On the other side of the building is Krennic and Deathtroopers. I know I’m going to lose this KP, but I need to make sure he can’t move to the middle if possible. Over at the General Store, I pop out some troopers while still in base contact of the objective to apply another suppression to the Deathtroopers who are now making their way to the middle. I need to limit their activations and stall them. I apply a suppression and hope for the best. That Deathtrooper squad rallies one off, but only gets one action. They remain in range from all my troopers on the General Store KP, though, which is good. His sniper flankers panic backwards and I eventually have a unit fail a rally and panic off the board by the General Store. However, it can’t be understated how important Rebel Officers are in games against suppression builds. I was able to inspire a unit and save them and of course the Officer Squad has a courage value of two. This was huge against the suppression. The Fleets decide to stay put behind the middle building, wipe out the remainder of a Stormtrooper squad and inspire a suppression off of Luke (who was now up to five suppression from DLT shots that did no damage) and bring him down to four. I have Son of Skywalker left, which will guarantee me initiative, and I need to trust the Dice Gods.
Round 6
Command Cards: Son of Skywalker vs Ambush
Luke, sitting on three suppression tokens, needs to rally one off. It’s all he needs to do. If he rallies, I have a plethora of options to take, one being to move to the center KP and get two units on there and hope it holds. Luke rally dice go in the air: blanks. I have one action. He’s so close to being to being able to get back to that central KP…..but he just can’t make it. The only thing I really have to do is shoot the remaining Stormtroopers off the board to take away a potential deterrent and it could mean something when it comes to points, but I already know I’m lacking in that department as I had not killed quite as much as I would have liked. I’m doing some calculations in my head, and I have a few ways I can still win, but it’s an uphill battle. The General Store Deathtroopers activate and they need to rally a suppression off, sitting at two, in order to make it to the central KP….the dice go in the air…one comes off. Essentially, this ends up being the game, unless my Fleets can move up and take out the Deathtroopers on the Farm Stand for points destroyed. The Fleets move up and end up taking out….all but one Deathtrooper. That Deathtrooper moves to engage my Fleets, who I cohered in a way to deny access to the KP, and it moved me off the objective. Ballgame, bad guys.
Final Notes
Although we didn’t play with a clock, this was a great practice game for our upcoming Rallypoint Qualifier. In my area, we have a lot of Imperial players and I really wanted to get a game against a suppression build like Jeff’s list. It was hands down probably the most intense, great game I’ve had so far when playing Legion. I was sweating bullets for the last two rounds. It’s honestly the third game in a row that I’ve played that came down to a result of a rally roll. If those aren’t the best games then what are? I think next time I don’t play as timid against the Deathtroopers and play a little more offensive, but I think I was right to play with some caution. Rebel officers in Trooper squads are going to be stapled in my lists, whether that’s one or two is yet to be seen. The two medbots did their job, they’ll also be finding their way into my lists. Those specialist packs are worth their weight in gold it seems!
Some new things about the blog: I changed the entire layout and hope you enjoy it! I’m in the process of starting up both a Twitter and an Instagram page for the blog to spread out on the social media, follow them and share them if you’d like! Where you’ll find those is that on the bottom of the screen you’ll see a plus button. That will bring you a drop down menu with community links and links to the blog Twitter and Instagram! I also set up an email account where you’ll find at the top of the page at the Feedback button! If you have any questions, critique, want a specific topic to be spoken about let me know! Hope you enjoy the new site!
May the Force be with You!
-GrandAdmiralThrawn

