
Welcome to the first edition of Outer Rim Tactics, where I will go in-depth on specific tech, edge cases, and essential strategy components for Star Wars: Legion. The basics and fundamentals are important and the key to many victories, but sometimes knowing that one extra move, or being able to stay two steps ahead with an obscure ploy can win you that final match or primetime showdown. With that in mind, this guide will focus on melee charge ranges and terrain scoping, two topics that have been around since the beginning but have risen in importance with the release of new units and keywords. Some specific aspects we will cover include exact ranges for a variety of charge speeds, how to position to avoid these attacks, and different tidbits and things to look for when attempting to set up a terrain scope.
Two tidbits to keep in mind as we dive into the information today: we are discussing melee attacks only and we are assuming there is no difficult terrain in-between the opposing units.
Speed-1
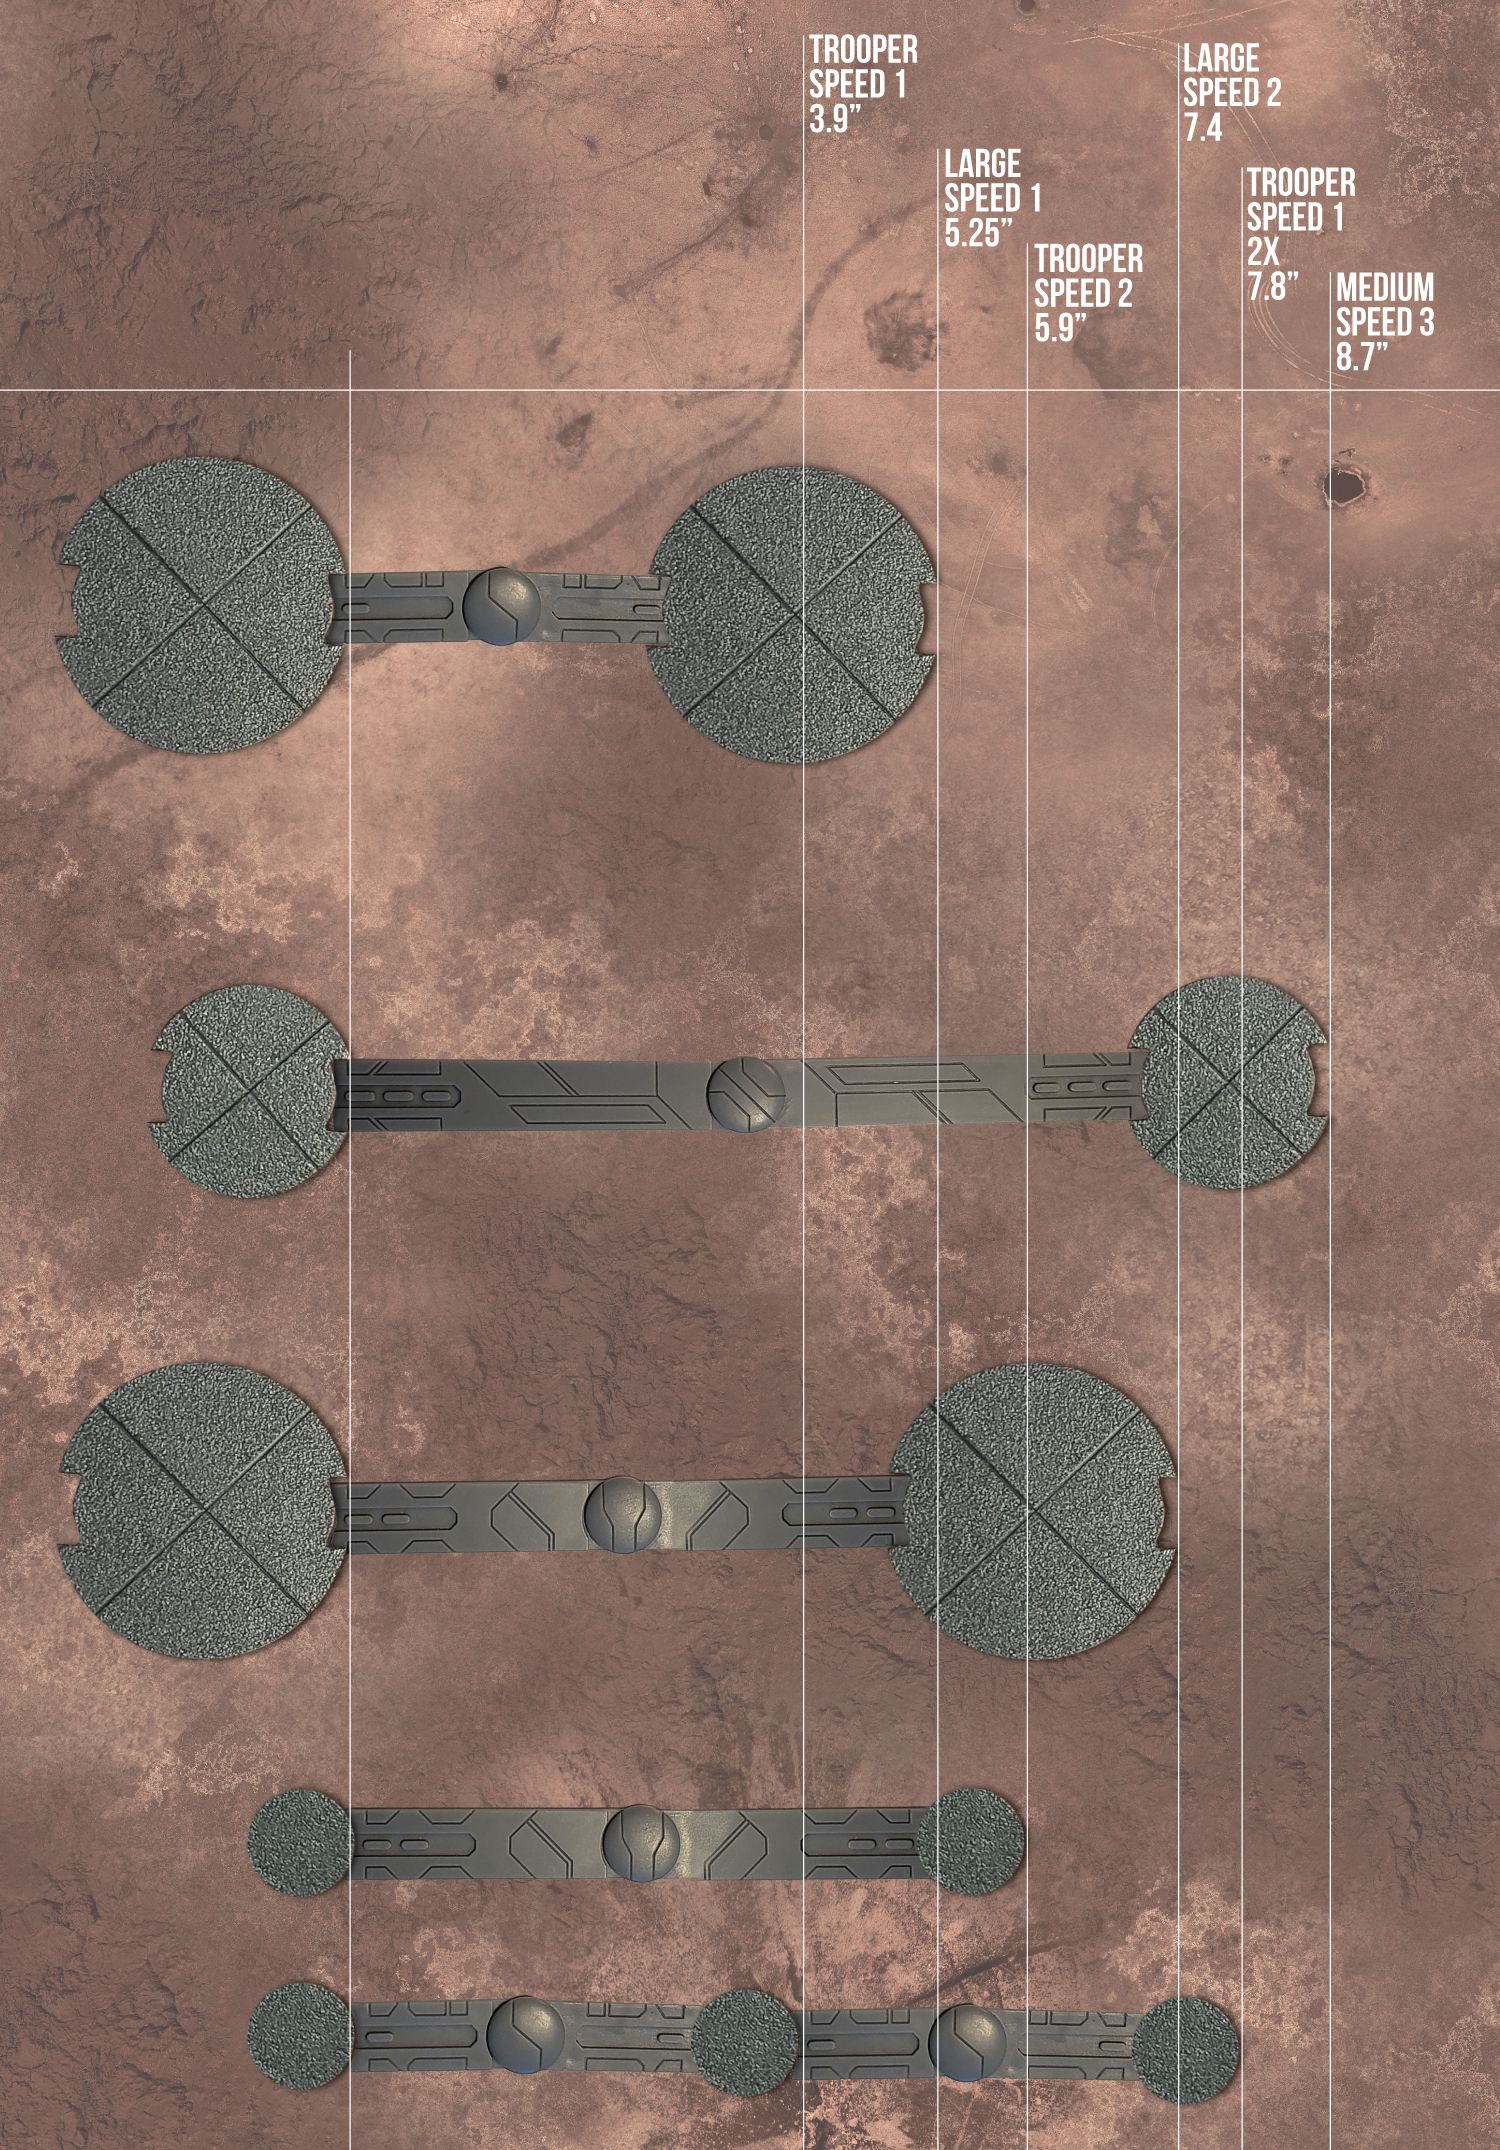 Let’s begin with some cold numbers about speed-1 charges. More specifically, Vader and a Dewback who is not using Spur. Darth Vader moves 3.9 inches per movement, 7.8 inches per double move; while the Dewback moves 5.25 inches per move, and 10.5 inches per double move. Two important aspects to understand here are that a double move Vader is longer than a speed-3 move, and a single move from a Dewback is just shy of range 2.
Why is this important? As we know, range measurement can be performed by any player at any time, so being able to know exactly how far a given unit can move is imperative. Movement, on the other hand, can only be measured during the given unit’s activation. When it comes to shooting those units, knowing how to place your units at a range at which they can shoot but not be hit with a returning melee attack is crucial. Let’s use some Fleet Troopers or a Clone Trooper squad with a DP23, both of which have pierce at range 2, as an example.
If you’re moving in to shoot Darth Vader, how far away do you want to stay? Ideally, the answer is 11.7 inches, because Vader has the ability to move-move and then use Force Push to bring your units in melee with a speed-1 move. Therefore, you know that placing your Fleets at exactly range 2 of Vader (12 inches) ensures that you can fire your full complement of dice without any fear of reprisal from the Dark Lord of the Sith. Useful, right? However, if the Dark Lord has already used his force push, or you are at peace with the idea of being in melee combat with him without being attacked, staying out of his 7.8 inch melee charge range will do the job.
Speed-2
The Dewback is actually rather unique with its range measurements because of its ability to Spur, so lets cover them more in depth with our range 2 units. Time for some more hard facts. Starting with Luke Skywalker, a trooper moves 5.9 inches with a speed-2 move. Crucially, this is JUST short of range 1, something we will touch upon later. A dewback using Spur is able to traverse 7.365 inches, which we are going to round to 7.4 for the purposes of measuring them.
So, remember earlier when we discussed Vader, and mentioned that staying at the limit of range 2 is important? Well, that measurement becomes even more important when dealing with a speed-2 charge unit, because they move 11.9 inches. Once again, this is millimeters short of range 2, which means you’re safe! Force push and its extended range will be discussed in more detail later on.
Jumping back to the Dewbacks, when they trigger Spur twice and double move, they move a fearsome 14.8 inches, nothing to ignore for sure. This is important to realize, as it can cause some problems when shooting them with range 2 units, as you are most likely going to be in charge range at the end of your activation. There are two main exceptions to this: elevation and tight quarters. If you are going to move and take a range 2 shot on a Dewback and do not want to be charged in return, you can either place your troopers on a different height level, forcing a climb action that takes them out of range, or inside a piece of terrain that cannot physically fit the Dewback base. Finally, should the Dewback spur one time and move a speed-1 for the second move, they move 12.65 inches, in other words, just far enough to hit your range two unit.
Speed-3
Finally, we’ve arrived at the inescapable. Tauntauns move a range of 8.7 inches with their speed-3 moves, meaning that they traverse a fearsome 17.4 inches per double move, just shy of range 3. Similar to when approaching Vader or a wookie, when shooting a tauntaun unit, you want to position yourself at the very edge of range 3, so that you can shoot without fear of Ram reprisal. (Last week, David covered the Tauntauns specifically in more detail.)
Player Etiquette and Gamestate
Now, take a quick second to think back to the last tournament you played in. I’m willing to bet at some point, something was bumped on the table and a range shifted, if ever so slightly. For this reason, it is especially important with melee and charge ranges that you announce what you are doing and ensure that your opponent agrees with you. Let’s look at a quick example.
Your Deathtroopers have an opportunity to move and take a range 2 shot at an enemy Luke (portrayed by these battle droids). You move them to exactly range 2 (12 inches) away from the opposing Luke, close enough to shoot the extra dice, but too far away for Luke to charge you. The attack resolves, and Luke goes next. Unfortunately, someone next to you bumps the table and minis shift. Now Luke goes, and suddenly he has double moved and is in base contact with your Deathtroopers. What happened? Well, the game state was altered by the table bump.
What happens next depends on what occurred just before this incident. Proper player etiquette would dictate that you announce your movement in detail prior to making the range 2 shot, and if both players agreed, then Luke would not legally be allowed to charge your minis. However, if you did not announce this, the situation is unfortunately at the mercy of your opponent, and he or she may or may not “give” you the previous measurement.
On a quick tangent, this situation is also a prime example as to why you almost never want to forward cohere your models when moving. Firstly, giving your opponent a free “range boost” is not beneficial, and secondly, for every model that you cohere forward, you must keep track of the range gamestate, because a table bump now opens controversy on multiple model’s range instead of just the leader.
Terrain Scoping
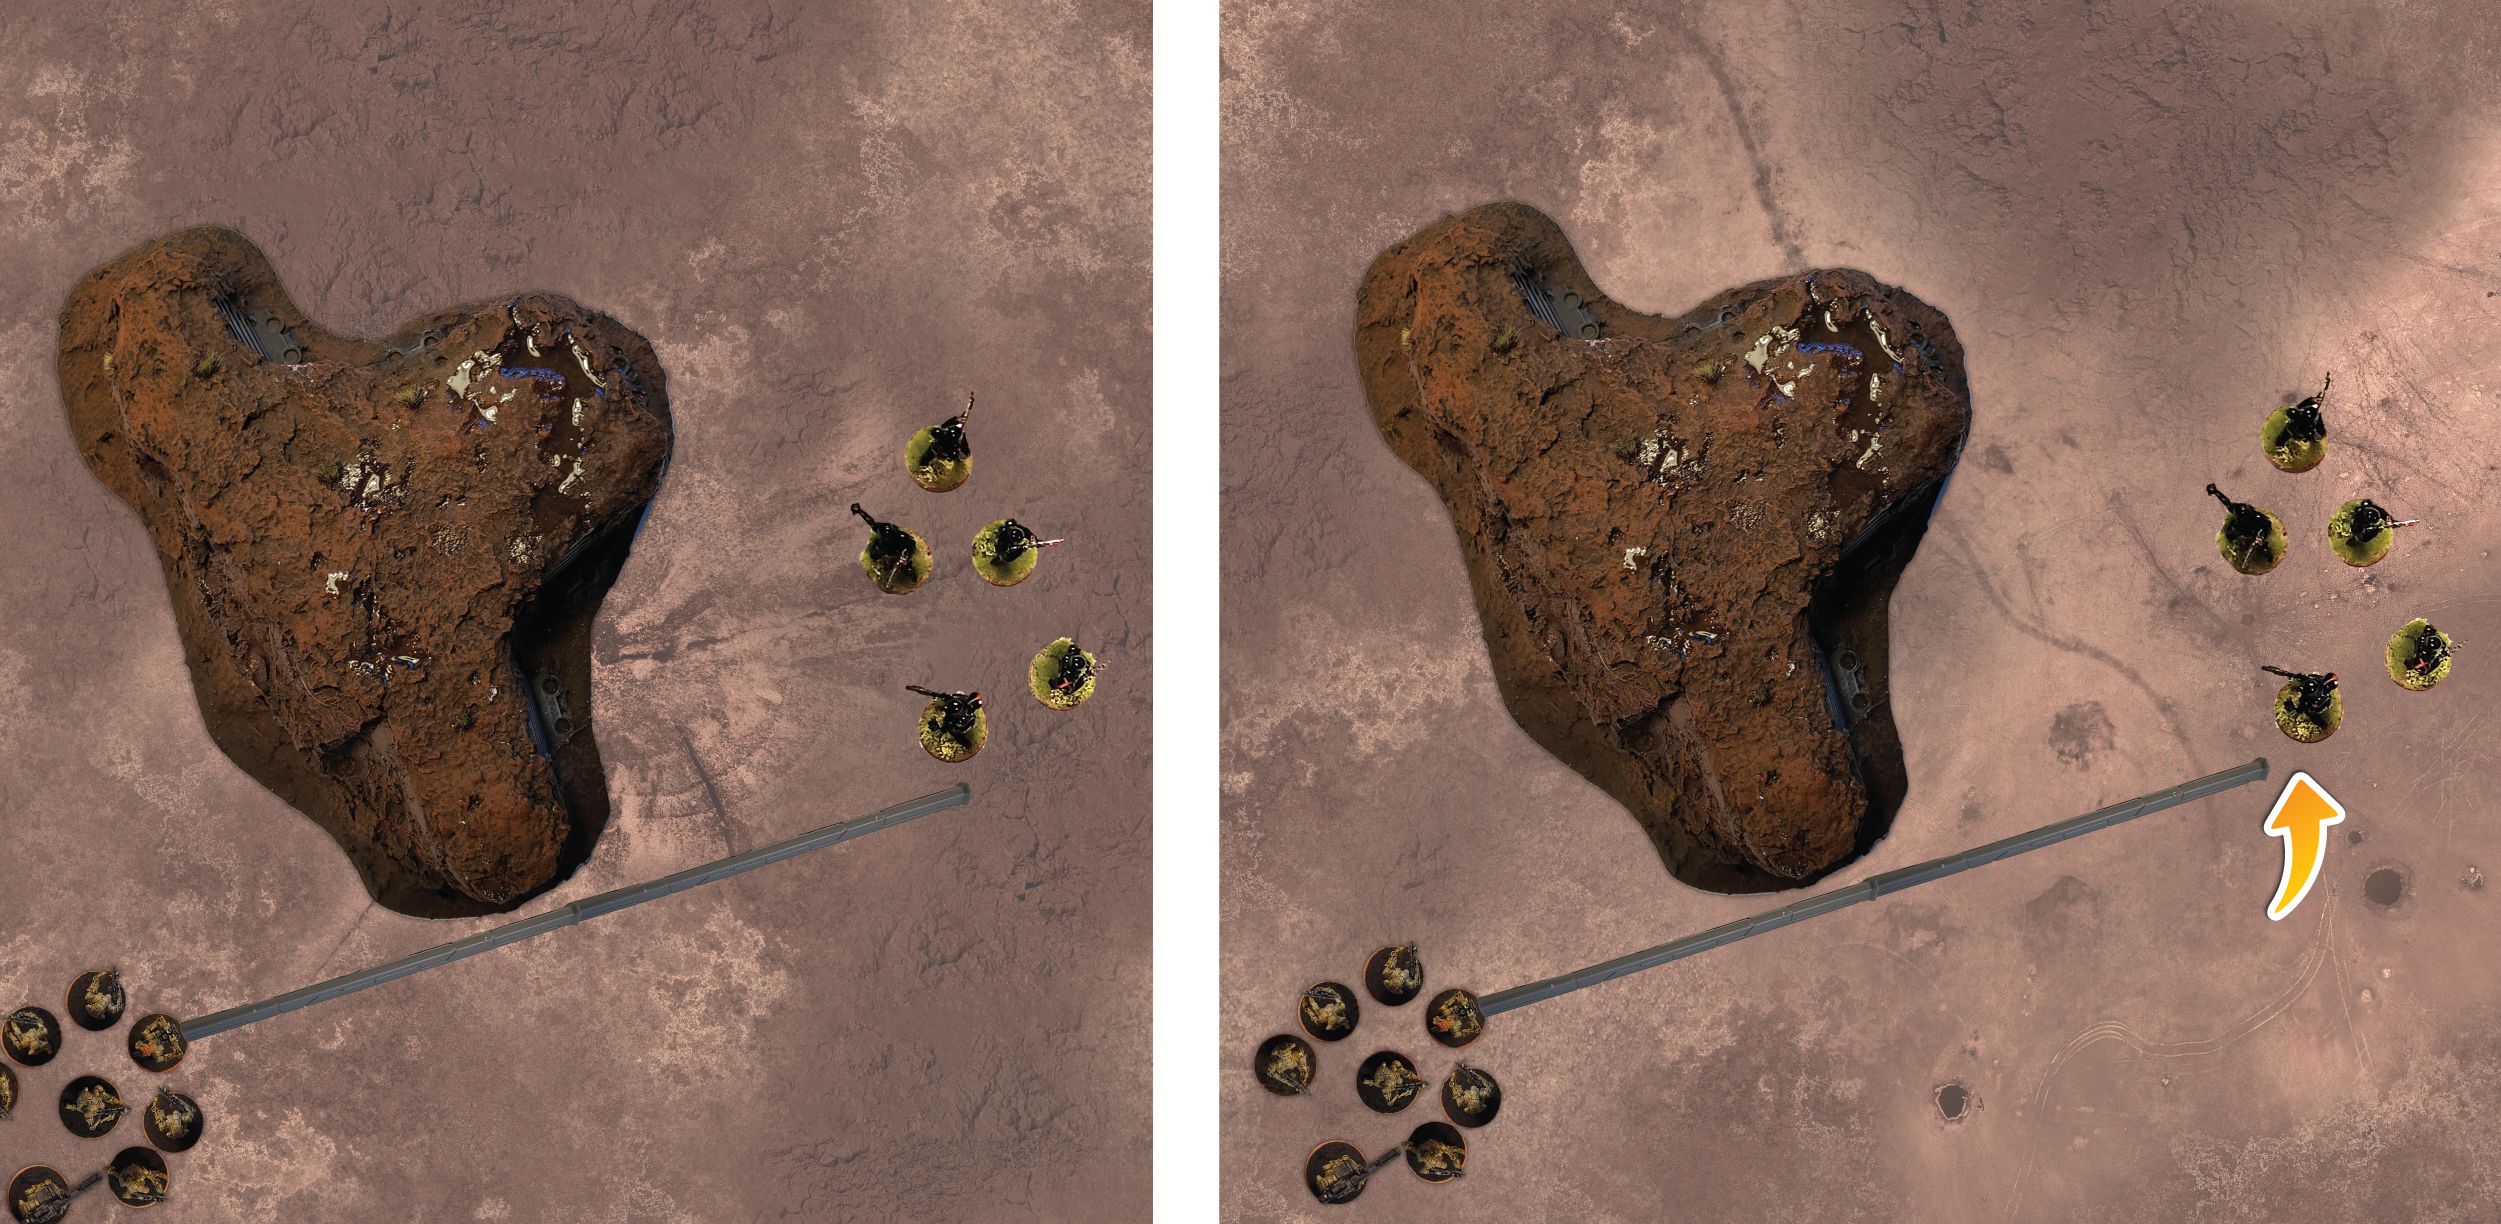
First, let’s go over a quick refresher as to what “terrain scoping” is defined as. Simply put, terrain scoping is positioning and manipulating your units line of sight so that only specific minis are visible when shooting. Page 74 of the Rules Reference Guide (under “Wounds”) states that, “if line of sight to a mini in the defender is blocked from all minis in the attacker, that mini in the defender cannot suffer wounds.” This means that if only your targeted mini can be seen, it is the only mini that can be defeated, even if that mini is a heavy weapon or leader.
Now, what constitutes an opportunity to terrain scope? There are two main “elements” to finding a good scope, the placement of your enemy units and the presence of terrain pieces near the opponent. Using the example of a five man DLT squad, when the opponent coheres the unit, there is usually one unit that hangs off the side or the back. Hopefully for you, this is the heavy weapon! Using this exposed mini in combination with a nearby terrain piece to cut off sight lines to the other minis, you can set up a terrain scope. Unfortunately, this situation is highly dependent on opponent mistakes, and should be looked at as a counterpunch, reactive strategy, and not something to base your game plan around.
This concept is relatively straightforward, but there are a number of situations in which terrain scoping a mini is extremely effective. The first is eliminating heavy weapons. Let’s take a unit of Shoretroopers for an example. The T-21B is one of the most fearsome heavy weapon upgrades available, as it throws nearly as many dice as the rest of the Shoretrooper squad. Unfortunately for its opponents, it is also the second to last mini to be removed in a standard squad. Therefore, when an opportunity arises to eliminate the mini early, it becomes a prime terrain scoping target. We’ll take a closer look at how to set up these opportunities shortly. It should also be noted that removing medics functions the same way as removing heavy weapons via this tactic.
The other specific example I’d like to cover is terrain scoping leaders, specifically in relation to their objective proximity. There’s nothing worse than losing your leader mini when he is about to score an objective or when he’s carrying a box, so knowing how to avoid that situation yourself and how to force that upon your opponent is important. Normally, the unit leader is the final mini to be removed from the unit; however, if you can terrain scope the mini, you can force that specific mini to be moved to another location in the unit, dropping any boxes it is carrying and potentially moving it farther away from the objective it is attempting to score.
This becomes especially important for vaporators and recover the supplies because a leader dropping the box or being moved off of the vaporator requires two actions to score, and if suppression tokens are present, there is a chance that second action could be denied, and the VP lost.
Force Push
 Unfortunately for their opponent’s, Force Push is a thing, and units like Luke and Vader have it stapled to them. With Luke’s boosted range (thanks to your own mini’s movement) he is able to move into a melee with a unit from 15.8 inches away. Vader’s increased range clocks in at 11.7 inches. One important thing to note, for any unit with Force Push, is that if the unit double moves before triggering Force Push, they cannot attack because their movement action has been interrupted. So, while you may now be engaged to a fearsome lightsaber-wielding unit, you are most likely safe for the turn. Still, I hope you brought some Cunning.
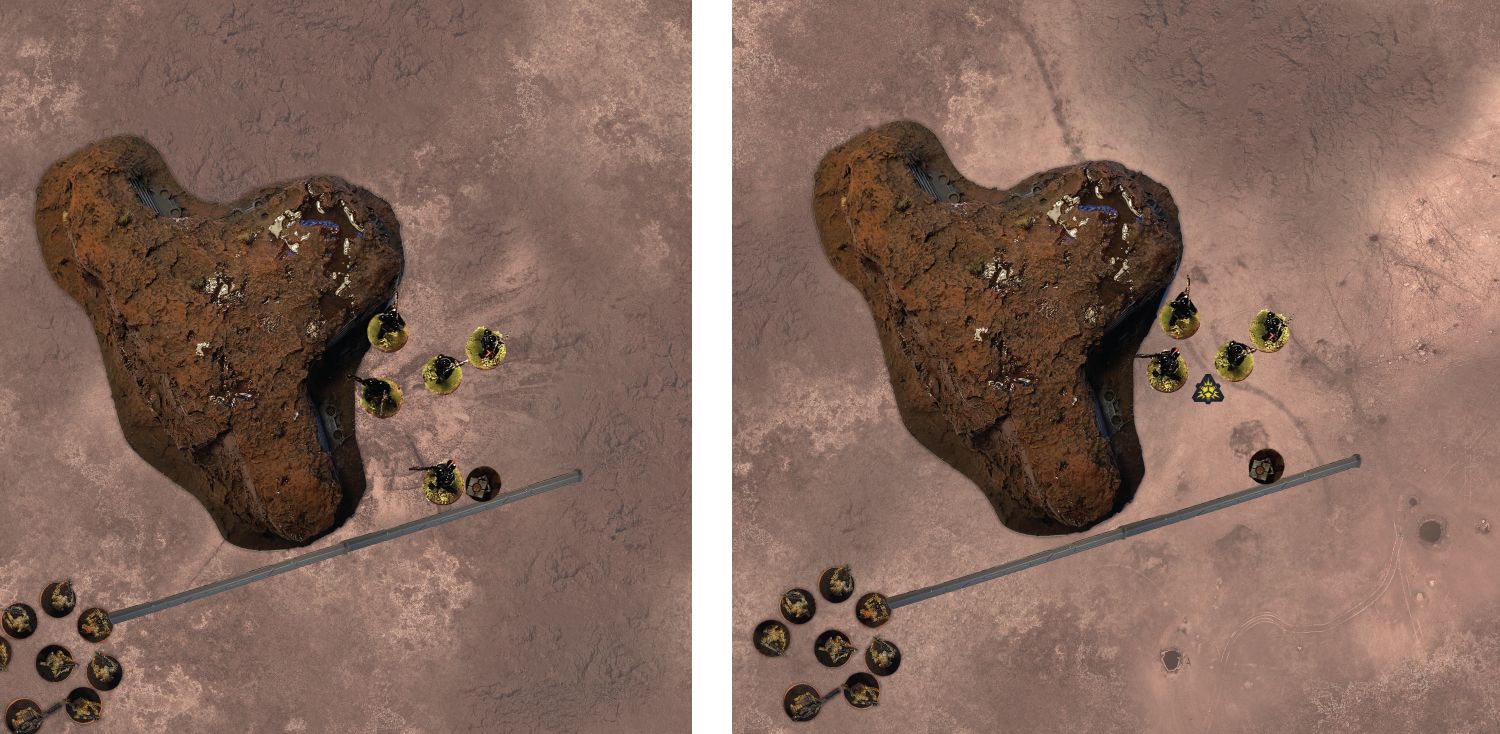
One of Force Push’s most under-appreciated uses is for setting up terrain scoping opportunities. Using the example in the graphic above, Luke is able to get within range 1 of the shoretrooper unit, use Force Push, and perform a move action with the shoretrooper unit leader, then cohering the T21B heavy weapon mini around the corner. As we discussed earlier, because this is the only mini available to be seen, if another unit shoots at the shoretroopers and deals a wound, the T21B would have to be removed from the battlefield. Now, 10 points for Force Push seems like a win right there, right?
Despite the fact that this these topics can be quite dry and number heavy, being able to understand and adapt to unit’s movement’s based on their charge ranges is important and can be the key to survival against another force user or melee threat. Additionally, the attrition war in Legion is crucial, and having the wherewithal to setup an early removal of an opponent’s heavy weapon drastically swings the momentum of the battle. Hopefully this guide was useful for you, feel free to reach out or comment with any questions or further rabbit holes, and we will speak again next month!


1 Response
Great article. I was trying to figure this out and then found this. Really helpful.