
This article is a painting guide for Phase 1 Clone Troopers.
This article was written by Tom Batchelor aka Archer Hobbies.
Intro
Howdy!
My name is Tom AKA Archer Hobbies. I have been painting clone troopers and Legion for almost 4 years now, and as such I often have requests to make a guide for what I paint, specifically the clones. If you have been on r/SWLegion you have undoubtedly seen something I have painted. I have tried to make video guides and streamed a few paint jobs, but I am not adept with editing software and the time investment quickly became too much to tackle on top of everyday life as well as maintaining my paint job tempo. I am, however, adept at writing! So, I thought I would put together this little guide as a test run to see what I can achieve. In the future I would like to have a guide for each major clone legion as well as new/popular legion releases, as I have always preferred text guides myself. We shall see! This article will provide detailed step-by-step instructions on how to paint a clone Shock Trooper variant from S1E1 “Ambush” from the Clone Wars series, because that is simply what I had to paint today. Let’s get painting!
Required materials:
You will need a clone to paint, detail brush (small and fine tipped), general workhorse brush (larger, to hold more paint), model holder/paint stand, painting supplies. Any of these paint selections may be substituted for any similar paint, but this is my exact recipe. I use White Scar primer (GW), Black Templar contrast paint (GW), Vallejo Dead White, Word Bearers Red (GW), Apothecary White (GW), Agrax Earthshade (GW), Nuln Oil (GW), Vallejo Ivory White, Abaddon Black (GW), Storm Vermin Fur (GW), any Gunmetal, and Black Legion contrast (GW). Basing will vary depending on personal preference, but this lad needed an official Legion deluxe base to match his brothers in arms. For that base I used Vallejo Gray, GW Fang, Nuln Oil, Vallejo Neutral Grey and GW Calgar Blue. Lastly, I used AK Ultra Matte to seal it and protect the model.
Step 1: Priming/building
This model is a Phase 1 clone trooper from the expansion of the same name, with a Phase 1 helmet from the specialist kit, but any clone trooper shall do. Before you prime, make sure you have eliminated as many flaws from the model as possible (mold lines, gaps etc.) my model has pretty rough imperfections on the shoulders, and these can be filled with a medium of your liking. I left them as is because I will have to do this for my whole army eventually and may as well make a day of it. Before we prime, ensure you shake the slag out of the rattle can for a few minutes. When priming make sure to get as little paint on the model while still getting as much coverage as possible. It is a tricky balancing act, but the resulting smooth coat is worth it.
Step 2: Black bits
Next, I use Black Legion on all of the bits on the model that need to be black, mostly the body glove and helmet in this case. While being as tidy as you can helps here, a few mistakes are by no means the end of the world. I often have black spill over onto parts of the clone that are not meant to be black, and as such have developed a step specifically to remedy this. I use Black Legion because it has wonderful coverage and the contrast paint lends itself well to future steps, specifically on the gloves and rubber helmet band.
Step 3: Unit markings
For the unit markings I often look to Battlefront 2 or the Clone Wars show for reference material on where and what markings are appropriate for the subject. Here I am using Word Bearers Red, thinned down so it takes two coats but has a smoother finish. Word Bearers Red generally has poor coverage anyway, so forcing two coats is important here. Again, I try to keep it nice and tidy, but mistakes will be removed in the next step.
Step 4: Tidy up
Here I switch out my water cup for a fresh one as we are switching to white. I use Vallejo Dead White (my favorite) to neatly line out any imperfections on the armor markings or to fill in any area not completely covered by the white primer. This tidying up step can take a bit of time as white does not often cover well over black (or dark red in this case) and I have found that a brush on primer such as from Scale 75 can also fulfill this duty well if need be.
Step 5: Apothecary wash
Next up is shading the white armor! A critical step for any clone or storm trooper model to look their best. I mix my Apothecary white 3/2 with contrast medium in order to get real subtle gradients that read as white rather than grey. I am careful to avoid anything that isn’t white, as a mistake such as that would require some more tidying. Be careful to leave the paint alone once it has settled on the armor for a bit, as agitating contrast paint while its drying will result in unsightly tide marks or other imperfections.
Step 6: Markings wash
For the unit markings I have opted for Agrax Earthshade in this case, as the combo of the two is the best color match to the “Ambush” episode. Again, I try to be tidy, but mistakes are never a big deal, it just looks like dirt!
Step 7: Recess shading
This step is arguably the most difficult and simultaneously the most important step in my process. I use Nuln Oil on my small detail brush to shade all of the recesses on the armor, white bit, unit markings or otherwise. Slow and steady wins the race here, as black tide marks are the most noticeable on white armor, but the shading provided really allows the white highlights in the next step to really pop! If you have made any mistakes on the previous three wash steps, have no fear for I have found that hiding these small errors with battle damage (as covered later on) still allows us to have a clean final product. One must simply trust the process.
Step 8: White highlights
It’s time to get some bread! Edge highlighting is probably the second most difficult part of this process, but improvement is as simple as practicing more. I use Vallejo Dead White and my best detail brush (Artis Opus 000) for this step. If you are seeking advice on how to improve your edge highlighting, I highly recommend the Duncan Rhodes painting academy for the basics, or Infernal Brush on YouTube for more advanced ‘Eavy Metal style highlights. My personal tips include good bone structure support, making sure everything from your torso, elbows, forearms and even fingers is braced for the most stability. I sit as relaxed as possible in my painting chair with a thick pillow under my arms to get the model closer to my eyes, more stable and delay muscle fatigue. I am always sure to have at least one finger from my brush hand braced against my other hand holding the model and find that helps drastically.
Step 9: Unit marking highlights
Here we essentially repeat the previous step, but with 50/50 Word Bearers Red and Ivory White paint. If you find yourself without the ideal highlight paint for your model, often times this 50/50 recipe will work perfectly! The tips from the previous step apply here too obviously, and you can come back in with the white again if you go too far on an edge such as the shoulder plate.
Step 10: Weapon and vents and commlink
For the weapon I like to draw on real-world experience with military issue weapons, which are often blacked out and kind of rough looking. To achieve this I simply cover the weapon with a gunmetal metallic paint (any will do) and then once that has dried, I go over that metal with a thinned down coat of Black Templar contrast paint. This allows the metallic from the previous coat to peek through on the edges and leaves us with a fantastic result! Super simple too. Once I figured this out, I have not even been tempted to change the recipe.
The vents on the Phase 1 helmet run along the bottom of the chin piece, below the ear protection. I use my detail brush to put 4 fine black lines here and tidy up with Dead white again if necessary. The vents vary depending on phase and source material, so be sure to check your reference pictures if that matters to you!
The commlink step is completely optional, but I see it as somewhat of a signature of my style. It adds a surprising amount to the model, with a cool little holographic blue square breaking up what is usually a field of white. To that end I apply Nighthaunt Gloom to the commlink square, allowing a touch extra to pool in the middle to deepen the effect. I then mix it 50/50 with white and apply an edge highlight to the bottom two edges of the square. To finish it off, add a little dot of pure white to the opposite 90 degree corner to complete the effect!
Step 11: Battle damage and grey fabric
Thus, we find ourselves nearing the end! Everything after this step is more for personal taste rather than something I always apply with my recipe.
For battle damage I simply use whatever highlight color is applicable to where I want the damage, such as large uninterrupted fields of the same color such as the legs as well as prominent edges that would likely get scuffed. These marks should be slight and intentional, and angular or pock-marked in nature. Then I put some Black Legion (or other black paint, Black Legion is just already at a good consistency) inside of those previous scratches, making sure to keep some of that original highlight color scratch visible to sell the depth effect on the damage. This effect is also furthered by placing your battle damage marks inside or on top of mistakes, lending to the illusion of depth or scorching around the damage.
Lastly, I add easy grey highlights on the black parts that require it, namely the headband and gloves. The contrast paint should have already provided some subtle highlights by its very nature and adding a little grey (Storm Vermin Fur from GW in this case) completes the look.
Step 12: Basing recipe
Basing using deluxe bases is relatively easy. I selected two colors that fit well in-universe for an army based on Coruscant, as well complimenting the mostly warm-toned nature of my army. A neutral color (like grey, tan or brown) combined with a color that contrasts your army (red for blue or similar color theory) will do nicely to complete your model! Regardless of base style (deluxe, texture, tufts etc.) this recipe can be applied to some success, contrary to what you may think. Be careful about basing your army in the same colors that make up the majority of colors on your models, as it may blend together. For example, my 41st Rangers blend in a little too well to their Kashyyyk bases thanks to their camouflage, and thus some detail seems to get lost in translation.
Step 13: Black rim, varnish and final checks
I often don’t feel happy with a miniature until I have put a few thin coats of black paint on the rim of the base, it really completes the look in a visually appealing, clean manner. Simply thin down your black paint of choice (Abadon black from GW for me) and apply a couple coats to the rim of the base. I have also seen good results with a neutral grey or tan like in many Eavy Metal GW works, but this is largely up to personal taste. If a painted miniature is better than an unpainted one, (which it is) then a painted base rim is better than an unpainted one! And voila! Your miniature is completed!
One last optional step is a varnish to protect your miniature. I recently picked up a bottle of AK Ultra Matte varnish and have fallen in love with the result. If you don’t mind some damage on your mini, or it is going to safely spend most of its career in a display case you may skip this step. Either way, before you varnish your model or put it in that case, it is wise to do an in-depth once-over to see if there is anything you missed, or any mistakes you would rather see remedied before calling it good.
Conclusion
Thank you for reading to the end! I genuinely hope that this guide helped you in some way. I hope to aide the community more in the future with further guides and tips, as we can all improve together with some shared knowledge. If you have any questions or suggestions, feel free to reach out to me via Instagram at ArcherHobbies.
I’ll finish off with a quick old school Mando’a lesson from the Republic Commando series. Vode An means “brothers all” and is a unifying battle cry used by the clones, or as a solemn vow in times of need. Vode is a genderless term in this language, relating more to a bond forged from belonging to a clan. If you’ve read this far and want to paint more clones, we are of the same clan, and you are vode to me. Oya Vode! Vode An!
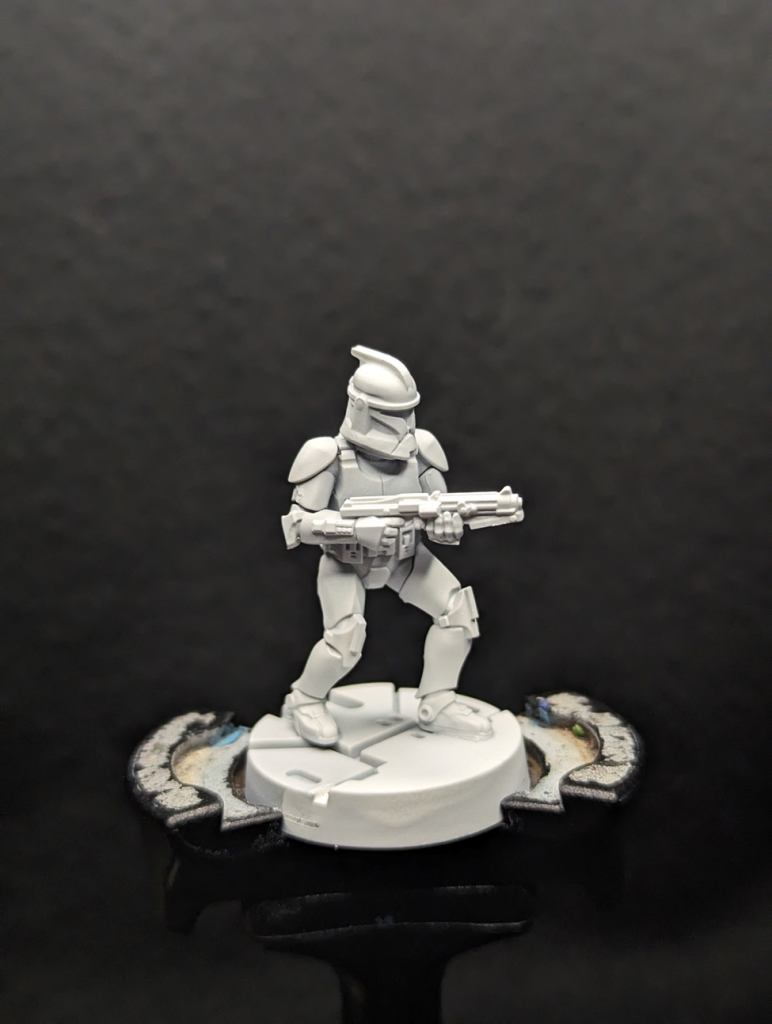
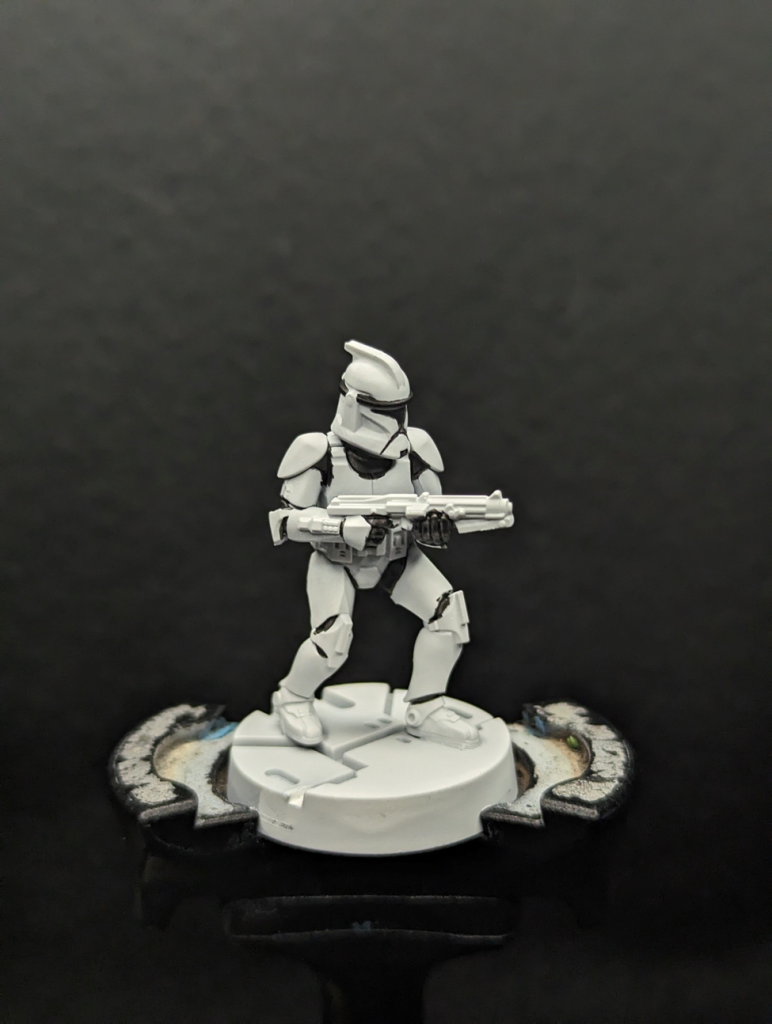
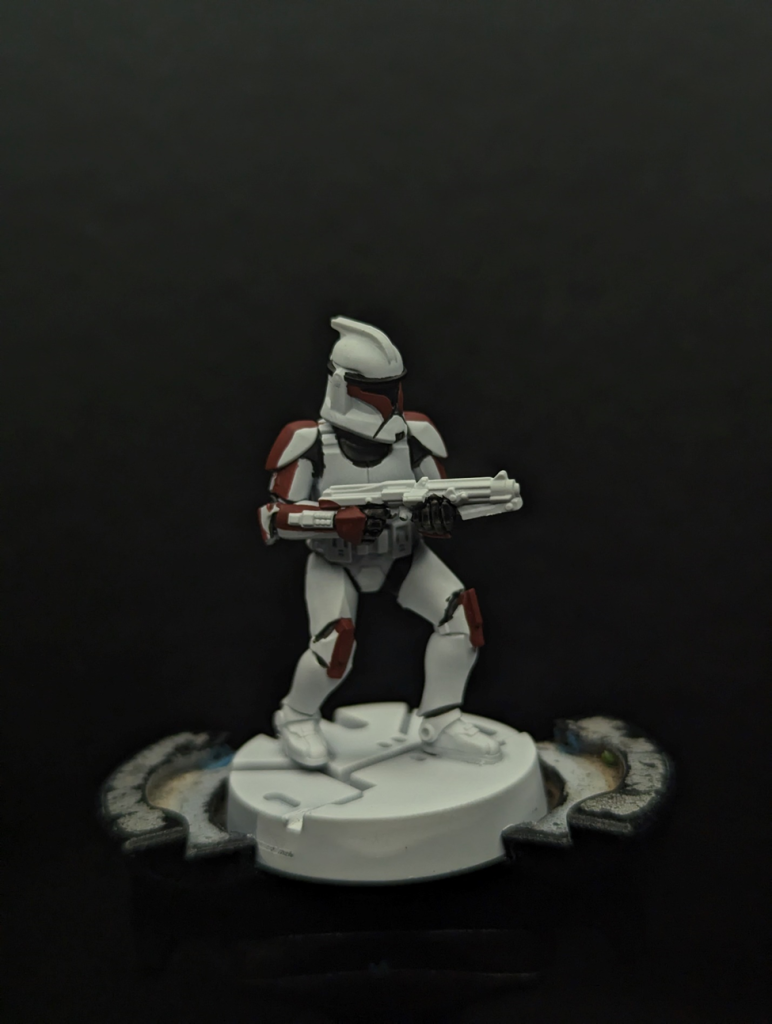
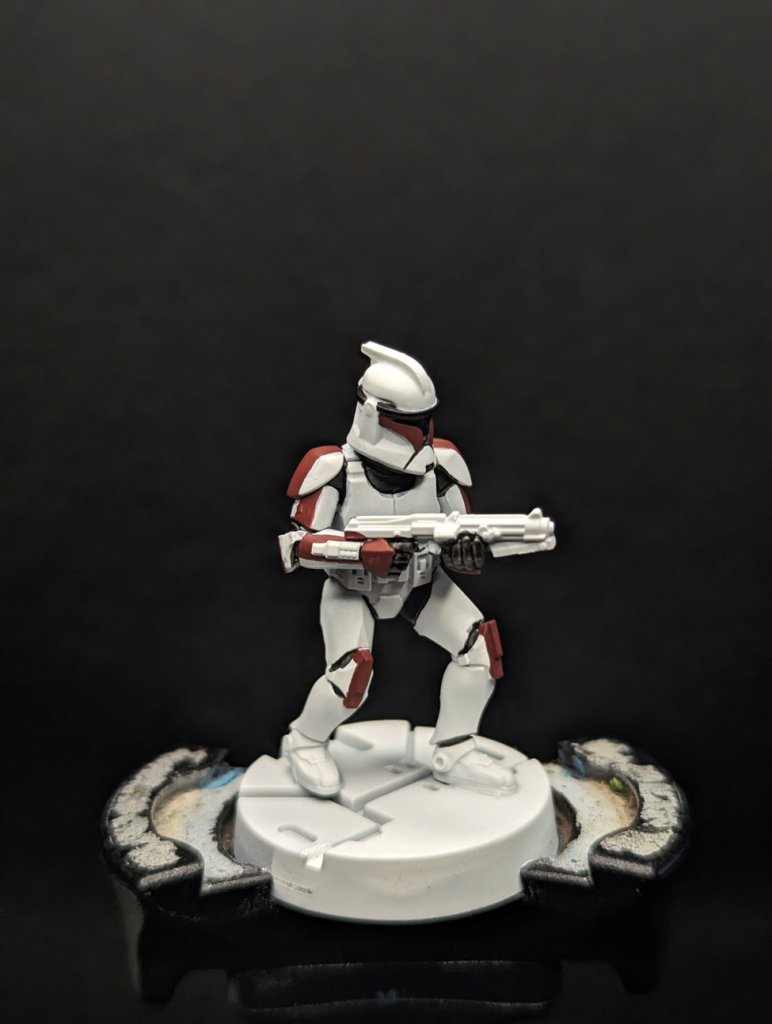
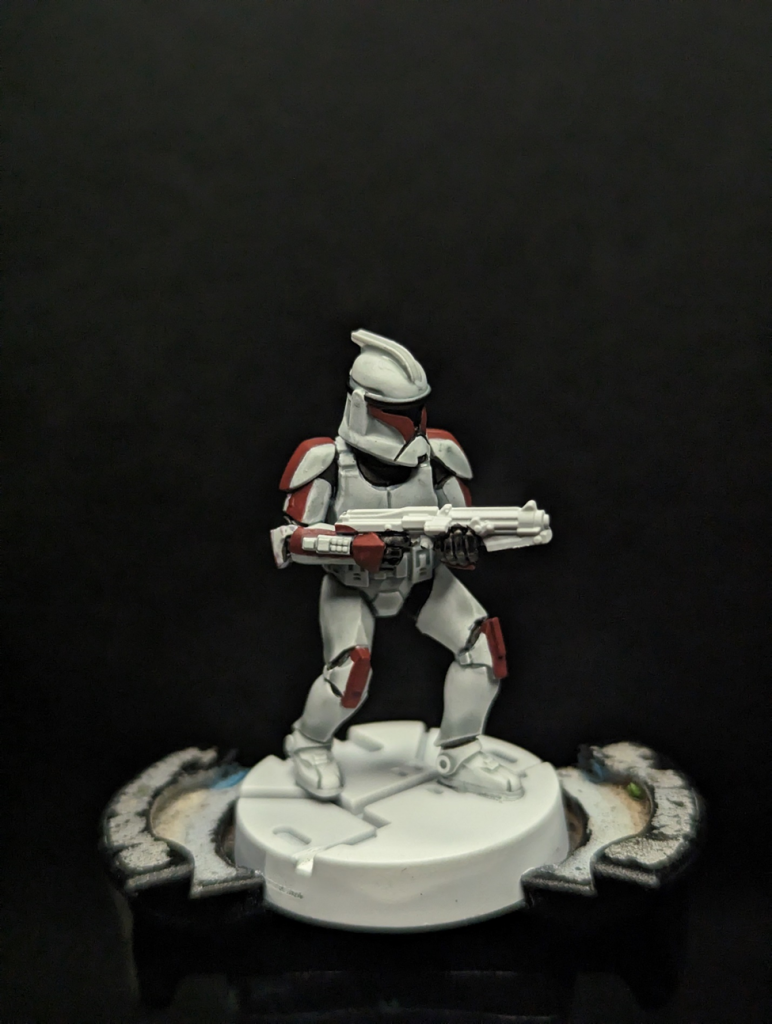
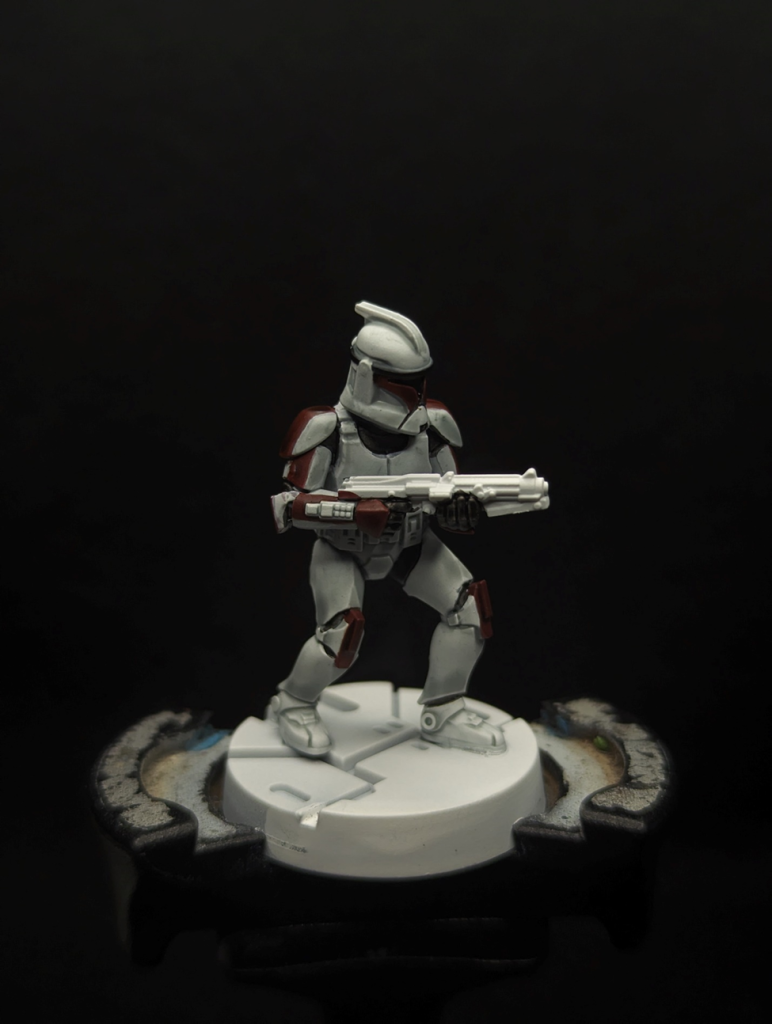
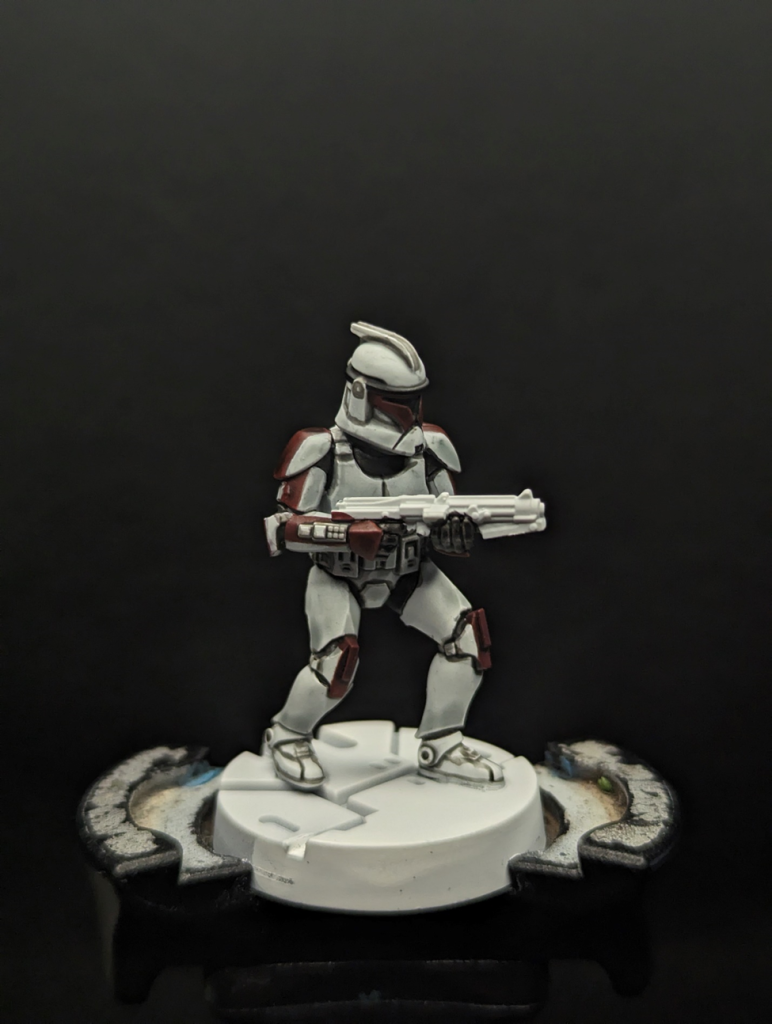
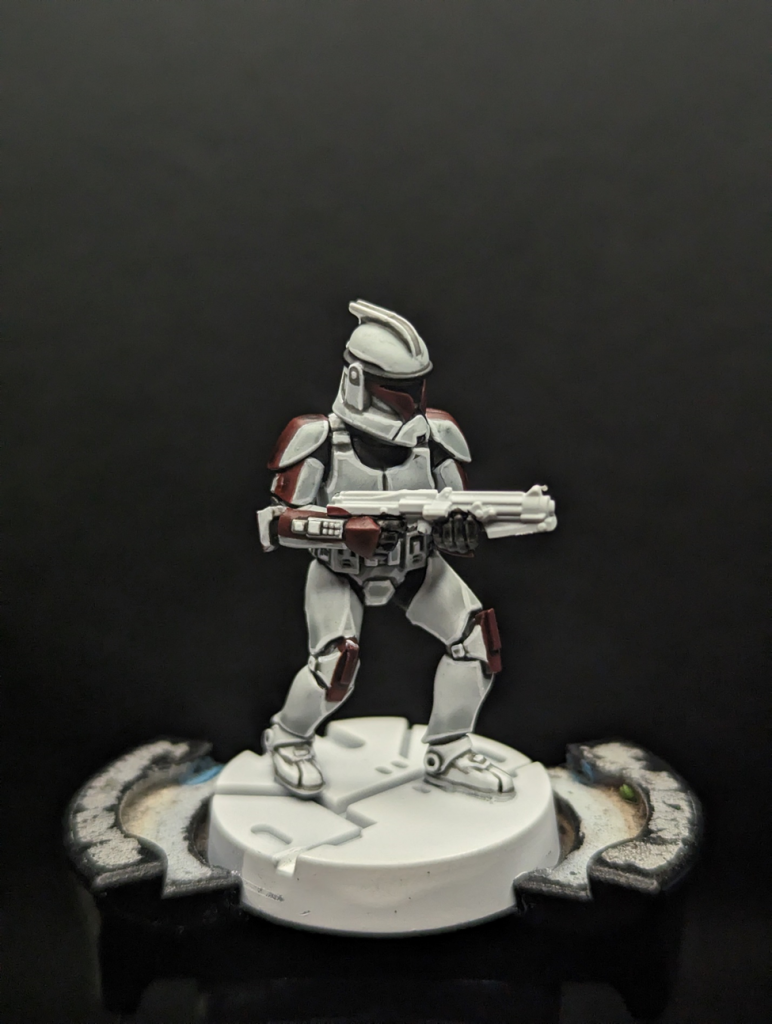
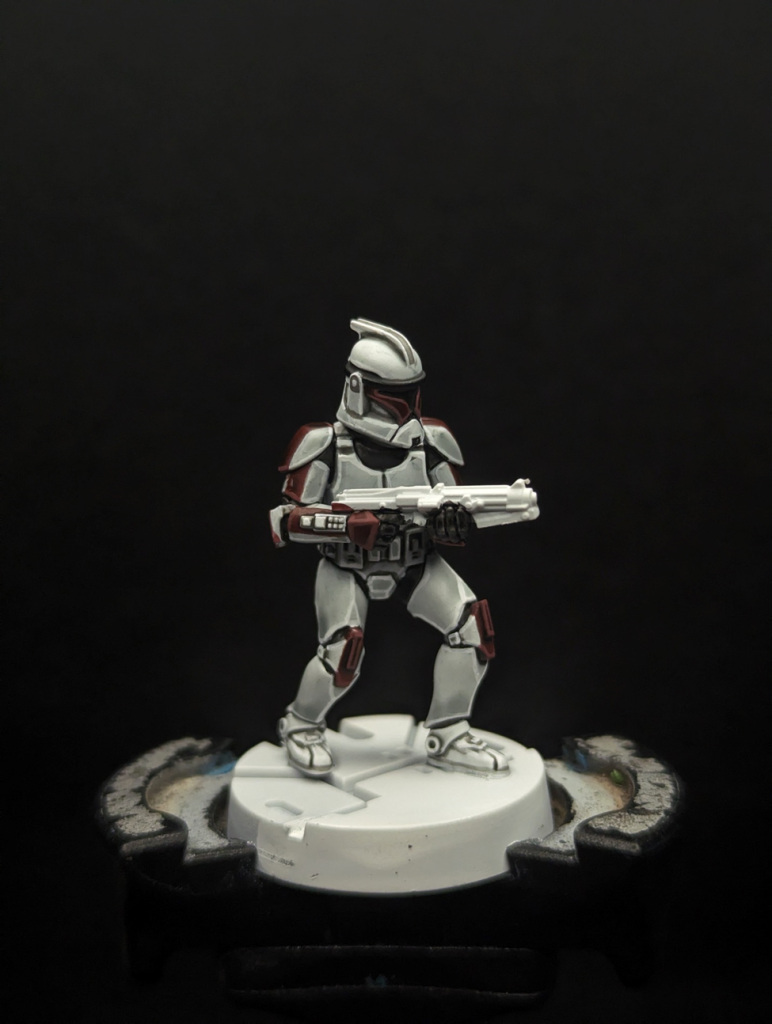
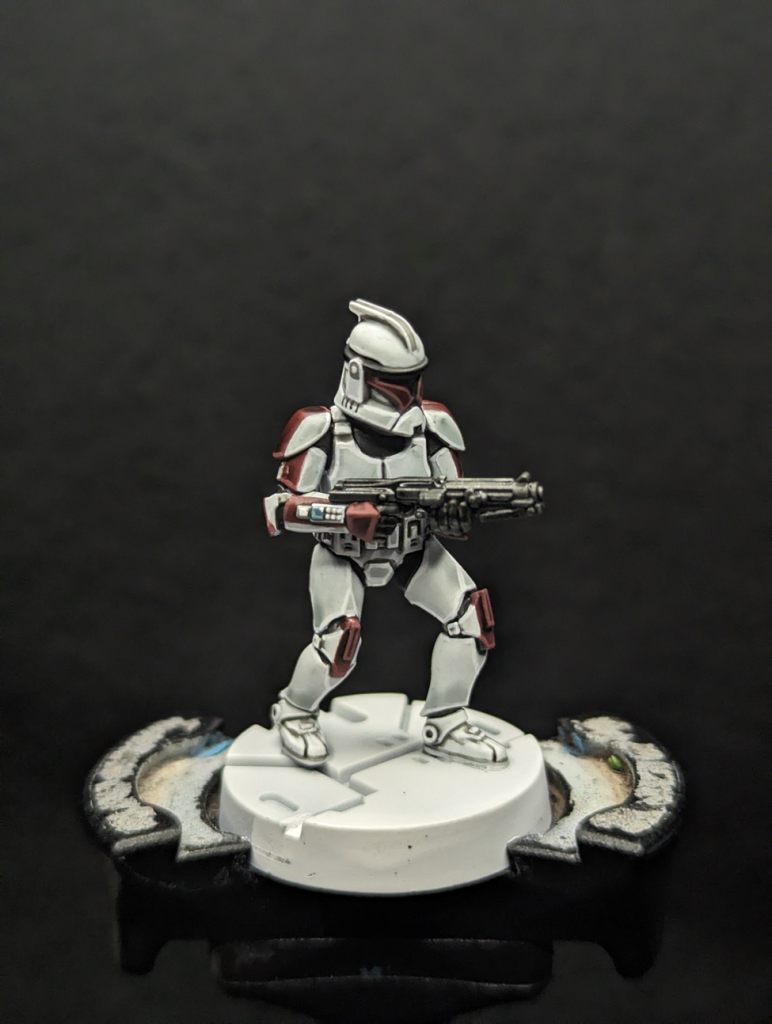
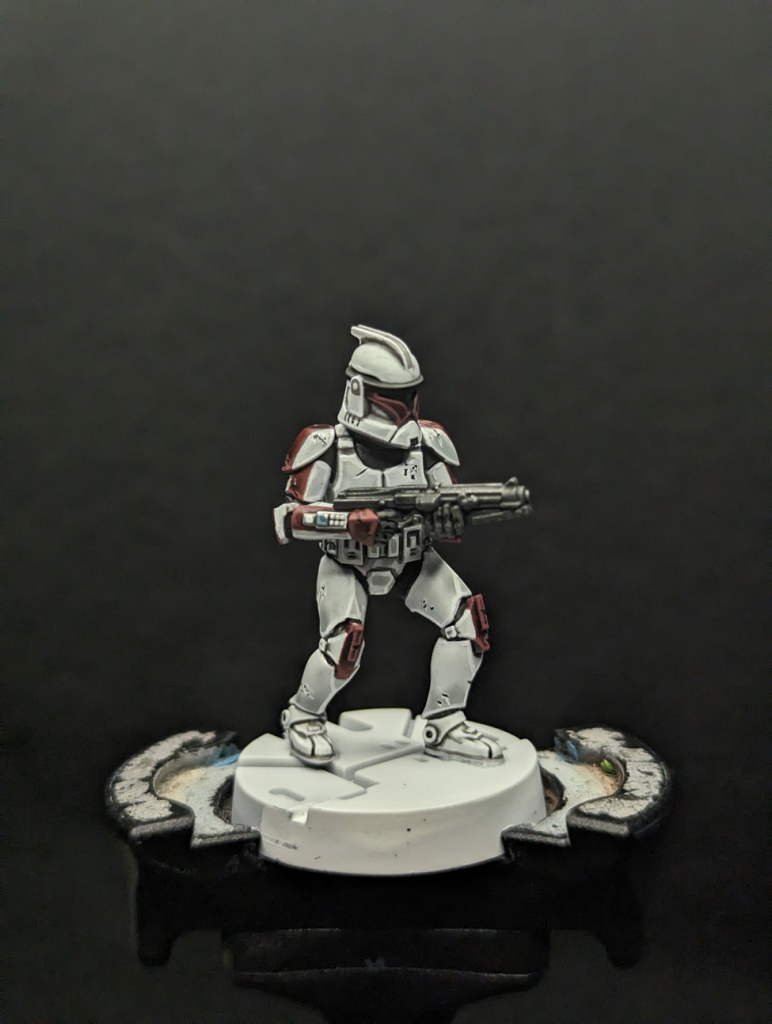
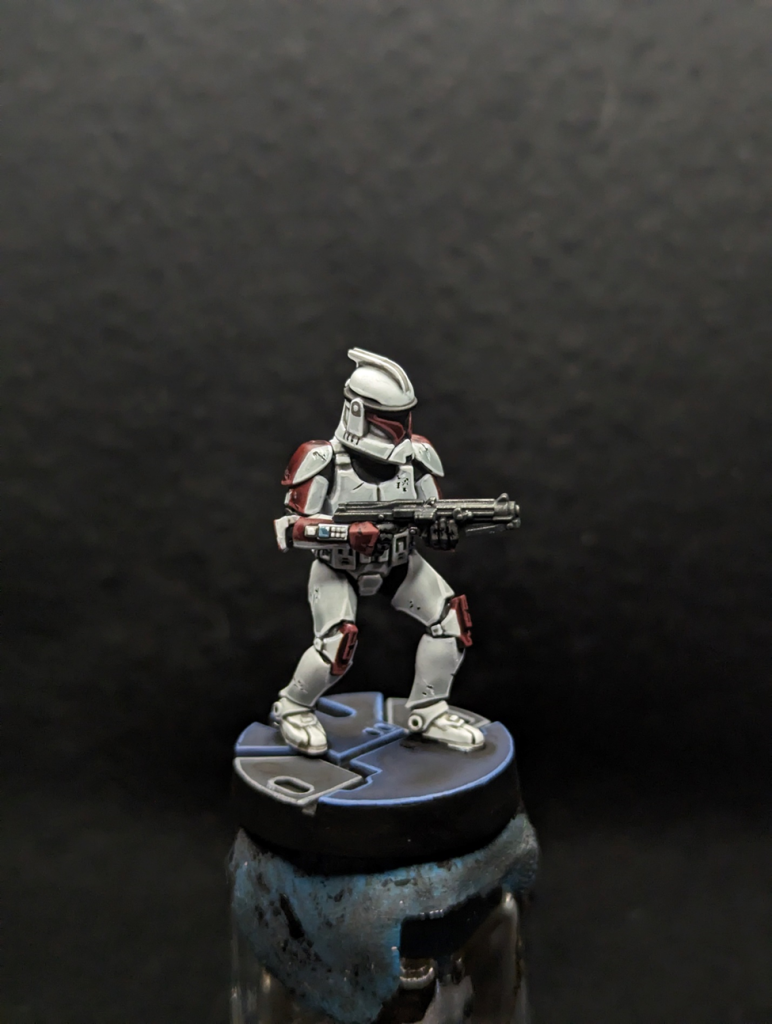
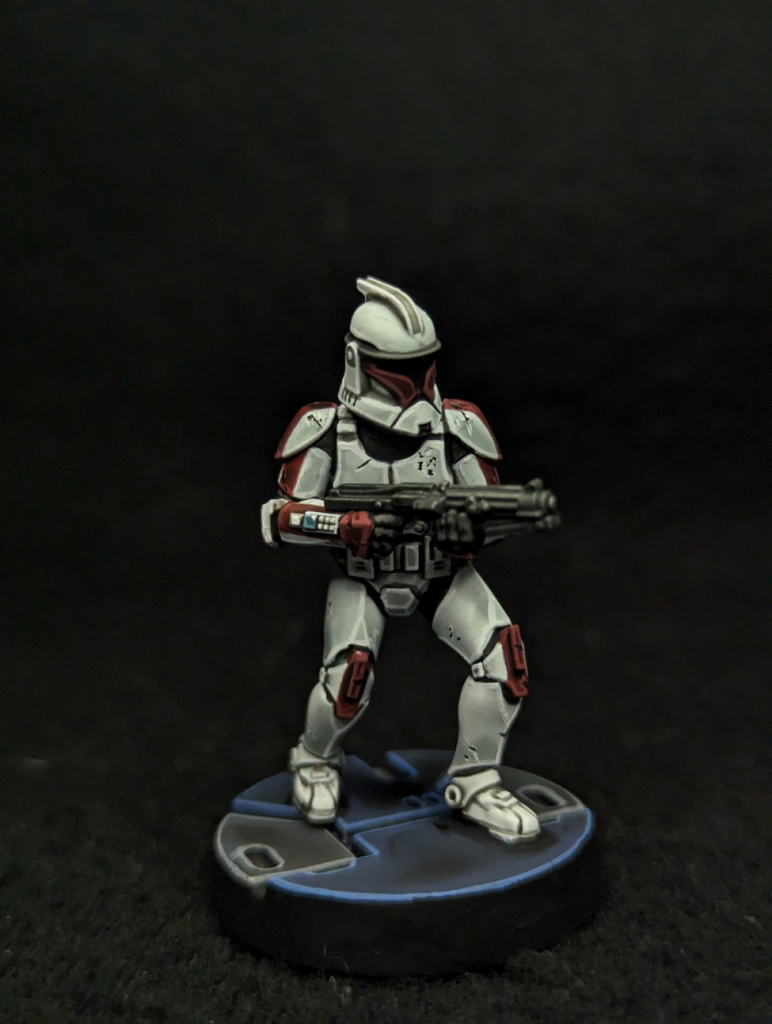
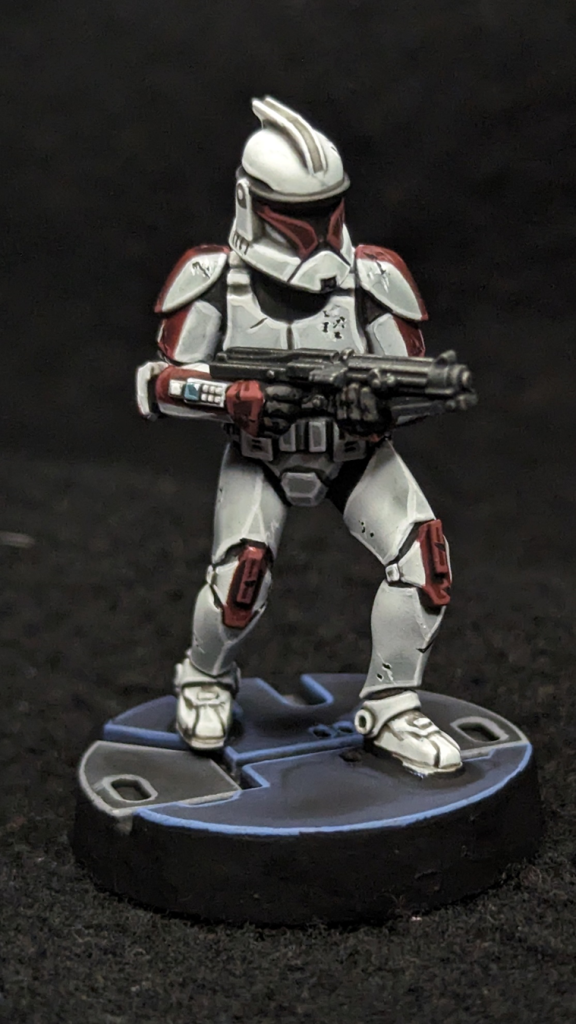
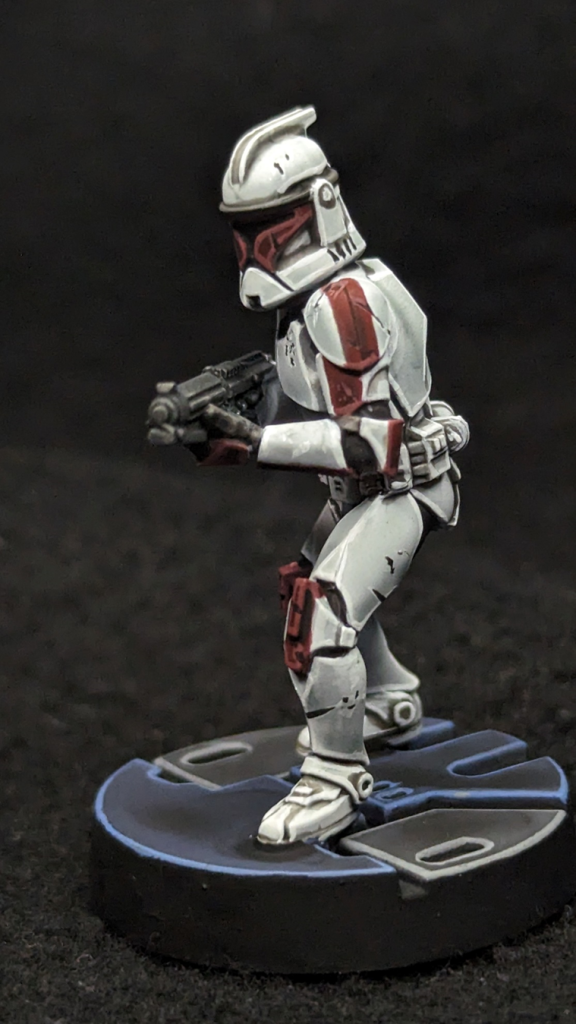
The following are pictures of the final result, in pretty high detail. Almost too high. If you are proofreading this, I appreciate you very much. Cheers <3
Tom
Archer Hobbies


2 Responses
I’ve been following your work on r/SWLegion and I’m a HUUUUUUGE fan. Keep up the good work. Stunning, like always. this kind of stuff inspires me to hobby more
Probably one of the best tutorials how to pain clone armor