

This week we’re going to look at R2-D2 and how to use him in your Rebel Alliance or Grand Army of the Republic lists. R2 is a unique Operative unit that can grant you access to Secret Mission, which can grant you an extra Victory Point to win the game. R2 is neither resilient nor strong, so you will need to demonstrate espionage and cunning to succeed.
Strengths
- Able to score you an extra victory point – which could be all that stands between winning and a tie.
- Crowd control options.
- Able to repair self or vehicles.
- Can buff allies with C3PO.
- With smart positioning, can be made impossible to target
Weaknesses
- Next to no combat ability.
- Extremely delicate – even with healing.
- Very slow, and cannot clear terrain normally.
- Takes up an operative slot for someone who probably won’t contribute to the fight – which may be valuable.
Overview
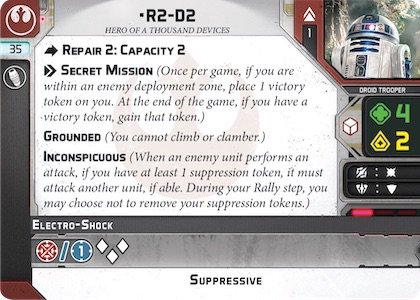
55 Pts: Expensive for his role, and that’s just naked. He used to be 35 points, cheaper than any naked trooper unit which made him basically an auto take. At worst he was the cheapest extra activation you could get. Now you have to ask yourself if he’s really worth almost costing a rebel trooper unit with a Z-6. You’re basically gambling that being down one trooper unit is worth going for the extra VP.
Defense: White, with surge. Not unusual for a rebel hero, probably sticks out more for the GAR players. The really problematic issue is he doesn’t have any defensive abilities like Nimble or Uncanny Lucky to augment. Inconspicuous helps a lot but can be circumvented by a smart player. In short you really do not want him to get hit.
Offense: Electroshock 3 White Dice with Suppressive. The Suppressive is nice, but 3 white dice are rarely going to save your bacon should you have to resort to this. In most cases if you’re using this you already lost.
Courage 2 – Bog standard non-Jedi courage. He doesn’t lose actions to suppression as a droid trooper, and he is much harder to target once he has one suppression, so his panic threshold of 4 is rarely going to come into play.
Repair 2: Capacity 2 Well if you do get clipped, this can keep R2 going a bit longer. It should be something you’re avoiding as it takes an action to do, but since R2 is frequently off on his own its good to have that protection just in case. It’s also a very efficient repair on vehicles if you are running those.
Secret Mission – Oh the big one, the whole reason you’re probably taking this guy. In short, you need to get R2 into your opponent’s deployment. Once you do that, as a free action, you put a victory token on his card and if he survives the game you get a victory point. This is crucial, you want to get a victory token on him ASAP but if you do it too early he could be at risk of being sniped if you don’t hide him well. Given how pokey he is, that’s probably not an issue though.
Grounded – Man this one hurts. R2 can’t climb or clamber which basically means he has to go around things in his way. There is a way to circumvent this, one of his command cards will give him Jump for a turn, but there are other, less obvious problems. Vader can yeet him up onto a height 1 building and he’s stuck there unless you play Blast Off.
Inconspicious – Basically if R2 has suppression, he can’t be targeted unless he’s the only option. During your rally step you can choose to not remove Suppression tokens. You can still roll though, so if you have enough to panic or suppress him, roll anyway and leave one behind. Note this is not quite the same as Danger Sense; R2 still removes suppression at the end of the round (Hostile Environment is a good card to have in your deck to get around this).
C-3PO
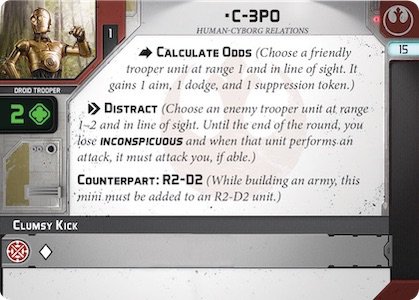
C-3PO is a unique model you can add to R2’s unit for 15 points. Since the entire point of R2 is to get a victory point as fast and cheaply as possible, 3PO can be counter-productive to that goal. 3PO balloons the cost of R2 to 70 points, which is more than many trooper units with an upgrade or two. It does however allow R2 to be more flexible. If you’re worried he may not be able to accomplish his goal getting you a victory point he can hang back and support your men instead.
Health 2 – Basically 2 more ablative wounds, which can help keep the delicate R2 alive. There’s also more fun to be had, due to the Counterpart rule which we’ll discuss below.
Offense – Clumsy Kick 1 white die to add to R2s 3, yeah still don’t wanna get into combat.
Calculate Odds – Probably the best thing C-3PO adds. He can give a unit (including R2) 1 dodge and 1 aim, but they also take a suppression. This is actually good for R2, since it helps him keep Inconspicuous going. On characters, 1 suppression usually isn’t too bad of a cost, and can even be beneficial in granting cover. If you’re playing Rebels you can get this from the far more combat capable K-2 but in Republic this is your only option.
Distract – A very niche ability. Basically allows you to reverse what R2 does and make him the only target your opponent can shoot at, if possible. If you worry a key unit on the point might get blasted, you could use this to draw fire in their direction, but don’t expect them to survive the hit unless you hid R2.
Counterpart – Essentially tells you you need to put C-3PO as part of R2s unit, which we knew. Important rule per the Rules Reference is that Counterparts break the usual rules of assigning wounds – You can put wounds on R2 and C-3PO in any order, as long as R2 is the last one standing. If you take 2 wounds, put one on C-3PO and one on R2, and then heal them both off, extending both of your lives.
Equipment
R2 only gets one Comms equip slot and I would highly recommend not even bothering. Again, the whole point of taking R2 is a cheap an activation as possible and maybe scoring a Victory Point out of the detail. Taking valuable points away from your actual fighting force is counter intuitive to that goal.
On option is Integrated Comms Antenna, so you can get an order from further away if you need to activate early and get him into a safe place, and it only costs 3 points. Comms Relay can also be useful if you want to get a second target out of smoke screen, or put an order on a more important unit on your Blast Off turn.
Command Cards
Like any operative, R2 comes with 3 command cards. They’re mostly defensive in nature and help him get out of a jam if he gets stuck. Some are more useful than others, and they are occupying valuable slots in your command hand so you probably will only take one, two at most. In general try and avoid getting caught in the first place.
Blast Off!
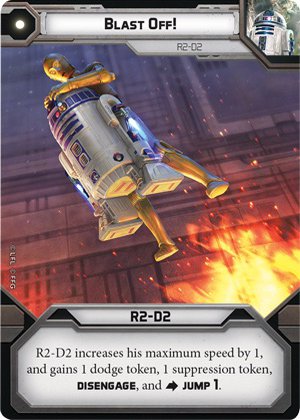
R2’s signature card. If you bring R2, you bring this, full stop. It grants him Speed 2, a Dodge and Suppression Token, Disengage and Jump 1 for the turn.
The number of ways this card can come in handy are incalculable. Most commonly, you’ll use it if there’s a large piece of terrain in the way that would be too burdensome to go around; you can fly right over. Just don’t stop on top of it, or you’ll never get down again.
It also can get you out of numerous jams. If you are forced to drive him into the open and out of cover, the Suppression will proc Inconspicuous while the Dodge token will give him a chance to survive anyone who can target him anyway. If he’s locked in melee, Disengage and run away where they won’t catch him.
Keep this card in your back pocket for when things look bad, you don’t want to be caught without it.
Impromptu Immolation
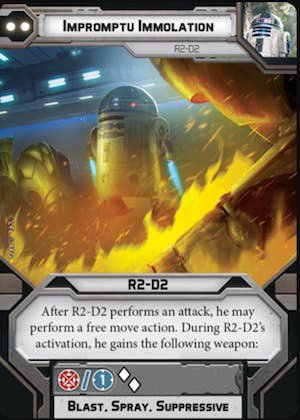
Grants R2 a flamethrower attack, Range 1 (or melee) 2 White Dice, Blast, Spray and Suppressive. It’s honestly not that bad, especially because R2 can make a free speed 1 move after. Since this isn’t a move action, you can disengage from combat with it.
The problem is it requires the opponent to be incredibly close to you, something you hope to avoid. Unlike Blast Off! it lacks the versatility. While you’ll always have a reason to get that Speed 2, Jump and Suppression, you’re only going to use this if an enemy gets into melee with you (or for some reason was silly enough to stop at Range 1). If that happens well, hes likely to be dead anyway. Both GAR and Rebels also have a lot of competition in the two pip slot for command cards.
Smoke Screen
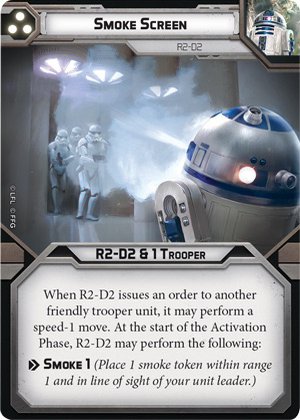
While Blast off is a hard yes and Impromptu is a hard no, Smoke Screen is a “maybe”. There are legitimate uses here. The Smoke effect can offer cover to your troops, but the card also grants a free Speed-1 move to the other unit issued an order from this card. Free moves are always welcome.
The big drawback is despite being a 3 pip card it only assigns orders to 2 units and the field is often very crowded for good 3 pips, making this a hard sell unless you just don’t have anything else to add.
Strategies
R2 is unorthodox in his utter lack of combat ability or support utility. There are characters who exist to buff your forces and aren’t much in a fight, but R2 isn’t that either. He tends to get off on his own and do his thing, and you have to hope he succeeds.
Early on, this was a lot easier to do. He was new to the game and many hadn’t learned to deal with him yet. He was frequently overlooked and people did not factor him into deployment, allowing him to slow coast to victory. Even if your opponent knew what they were doing, R2 was only 35 points and an extra activation, if he died, no harm no foul. As a result he was considered essential to every Rebel list.
Things have changed a lot since then. His point cost has been ratcheted up to 45, and then 55 points. That’s a lot of points to put into something not helping you capture objectives or kill stuff. More operatives have released for the Rebellion, which means slots are more precious in that faction. Most importantly, he’s not really a surprise anymore. People know what his deal is and will deploy appropriately to anticipate him, making your job much harder.
All hope is not lost. That free victory point still matters. In a game where victory points are generally counted in the single digits, one victory point can save you from a tie and having to go to kill points. If you want to help push the scales in your favor there are a few things you can do.
Before the Fight – Choosing your Battlefield and Deployment
If you want to use R2 it’s going to be very important you determine deployment. Ideally you will pack your deck with all the best deployment cards and leave yourself with enough of a buy to get to use your deck, but if that fails there are certain deployments that work best for you.
It’s no secret that R2 is slow. At only speed 1 you’re likely going to spend most of the game making double move actions. So we really want to minimize the time we sit out in the open. In short you want something that lets you move R2 along the short edge of the board to pull off secret mission. Battle Lines, Disarray and even Hemmed In are your bread and butter. Battle Lines especially will help, if you put R2 on the far left or right, your opponent will need to dedicate at least a token force on that side to deal with him. On armies that love to castle like Droids or Republic, that can make them easier pickings.
Barring that, something with close deployment like Advanced Positions or Danger Close also can work, but are a bit riskier as your opponent is also likely to try and deploy on both sides to anticipate your approach. You’re likely going to need to clear a path for R2 before he can really get moving.
Finally, avoid deployments that would require a long path like Long March and Major Offensive. That is a lot of ground to cover and potential for things to go wrong if there’s terrain in the way or no good line of sight blocking terrain.
Once deployment begins, try and hold R2 back as your last deployment if possible. If you have more units than your opponent, this is good. You can put him on the side that has less opposition and hope for the best. Otherwise your opponent will likely try and put enough stuff to block your way at the very least, and kill him at the worst.
R2 works well in lists with other units that also want these deployments, like speeders or high-threat close range units like tauntauns and wookiees.
Inconspicious and Balancing Suppression
Inconspicuous creates an important balancing act, you need 1 suppression on R2 as often as possible. He’s too delicate to do it by getting shot at so you might need to force the issue a bit, because he still loses one at the end of the round.
Some of the easiest ways to do it include:
- Using Blast Off to get a suppression for one turn
- Bringing C-3PO to use Calculate Odds on yourself
- Use a vehicle with Shriv piloting
A smart opponent can manipulate line of sight so they can only see R2, or take the more brute force route and move into melee with him. Even if they have mediocre melee attacks, he becomes the only unit they can attack, and he’s weak enough to be easily taken down.
In short, treat conspicuous as a second line of defense. Your primary means of defense should still be moving from cover to cover, blocking line of sight.
Riding in Style
Hoofing it too dangerous? You have another option. If you bring along in a transport, R2 can ride in style to his destination, and then back to safety. This does run a bit counter to the “minimize cost” statement from earlier in the article but you can always reuse the transport once it’s settled matters.
R2 can repair the vehicle if it takes any fire, which makes him a good companion. He doesn’t even need to get out to succeed on secret mission (if it’s an open transport like the X-34), so drive in, collect your token and then duck back out. This also can free up the need to bring Blast Off!, allowing you to put that 1 pip slot to use with a different card.
This strategy is easier with Rebels, as they have the modestly priced X-34 landspeeder. The A-A5 is a bit too slow and costly to be using on R2. On the republic side, the LAAT might cost a bit too much to be doing this, but its the only choice you have. Since Republic tends to be pressed for points, as their units are more expensive on average, if you’re going to run R2 as Republic maybe stick to hoofing it or just let Padme do it.
Conclusion
R2 offers another route to victory and another layer of strategy for your army. Using R2 requires mastery of the terrain and battlefield to successfully get past the enemies trying to gun for him. If you’re willing to take a gamble to get a crucial extra victory point then take R2 for a spin and complete the mission that might save the Republic or give some hope to the Rebels.


1 Response
Est il possible de réaliser un article sur Cad Bane svp ?