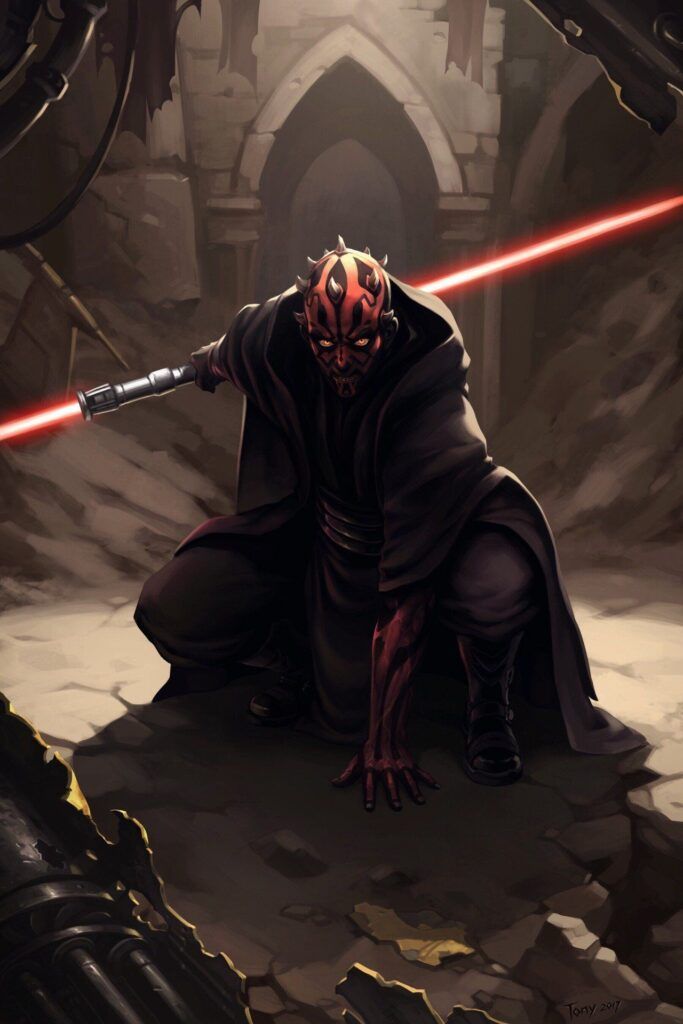

This week we take a look at the newly previewed operative for the Separatist Alliance, Darth Maul.
Let’s get real, Maul is a badass. The horned Zabrak from Dathomir is the first mobile force user available to CIS (sorry Dooku, you’re awesome, but slow). He is somewhat similar to other jumping force users like Luke, Obi-wan, and Anakin, but there are a lot of things that make him unique, and he brings a novel set of tools to the CIS faction.
Strengths
- Access to infiltrate
- Fast and mobile
- Force powers
- Strong melee dice pool
- Juyo mastery provides unique opportunities
- Access to a useful, cheap activation in Sith probe droids
Weaknesses
- No charge or master of the force (Juyo mastery can be one of these things on a given turn but not both)
- Juyo mastery requires a wound to trigger
- Fragile (he effectively has five wounds)
- Situational command cards
- Operative card turns take away from Aggressive Tactics
- Sith probes can muddy your order pool
Overview
Darth Maul
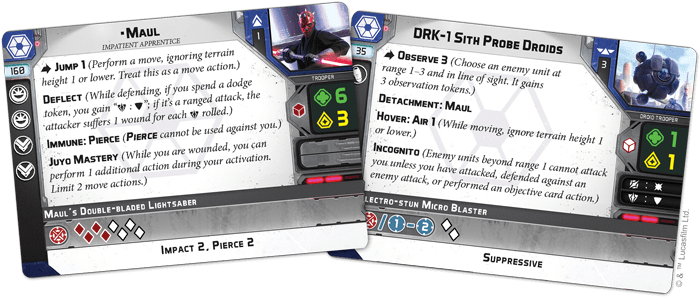
160 points. Maul is the same cost as Anakin and Luke, the other two “cheapest” force users. It’s an investment, but not so much as “Premium” force users like Dooku and Palpatine.
Defense. Red, 6 health. This is basically standard for force users. Like other force users, Maul drops quickly when focused. Use him like a scalpel, not a cudgel.
Offense: Maul’s Lightsaber. 4 Red, 4 white, no surge, Pierce 2, Impact 2. This easily becomes 5 red with tenacity (which should be stapled to him). It hits hard, but no surge and all those white dice means it can be a little swingy, and no surge/crit means his anti-armor damage is surprisingly lacking for a force user. Vader doesn’t surge either, but he has native Impact 3/Pierce 3 so his armor damage is much more reliable. The total for this pool is anywhere from an average of four hits (no tenacity, no surge tokens) to nearly six hits (tenacity, surge tokens), which puts him somewhere between commander Luke and Jedi Luke depending on whether you can get him surges.
Courage 3. Decent. Maul needs all (three, hahah) of his actions. This is a decent courage but you don’t want to let suppression accumulate on him.
Deflect. It would be pretty weird if Maul didn’t have this. Standard for force users. Get him dodges.
Slots. Two force, two training. I think the two force slots should be Force Push and Force Choke most of the time, though you could make a case for Saber Throw. More on that later.
The training slots give you some nice flex. This is mostly going to be Tenacity plus something else.
Juyo Mastery. The money keyword. Three actions when you are wounded. This can be anything from lackluster to absolutely amazing, depending on how you use it. Juyo Mastery defines Maul more than any other character’s mastery defines them, except arguably Obi-Wan with Soresu. More on this in a bit.
Immune: Pierce. Standard for getting to use a lightsaber.
Sith Probe Droids
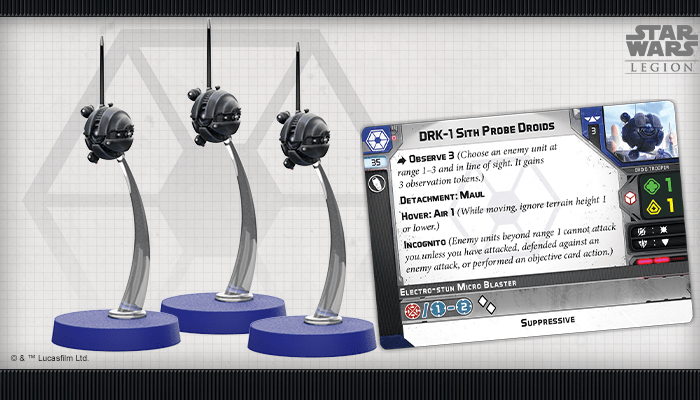
Let’s talk about these bad boys. They come in Maul’s box, and they should be stapled to him in your list, too. You pretty much always want them if you are taking Maul.
35 Points. This is dirt cheap. Tied for R2 for the cheapest unit in the game. 35 points for any unit is solid, for a unit as useful as this one its great.
Defense. White/surge, 1 health per model (total of 3). These guys are made of peanut brittle. You don’t want them being shot.
Offense: Electro-Stun Micro Blaster. Two white dice per model (total of six), range melee/1-2, surge/hit, Suppressive. This is kind of an amazing attack pool for something so cheap. Generally you want to avoid blowing incognito, but if that has already happened, or the probes aren’t in any particular danger, this attack is a great little tag-along to Maul.
Observe 3. This is a new keyword. Select an enemy unit at range 1-3 and in line of sight, they gain 3 observation tokens. Observation tokens on a target can be spent by an attacker to reroll dice (one dice per token). Basically this is like “painting” a target for your dudes to attack. This is what your probes are going to spend most of their time doing.
Detachment: Maul. Same keyword that K2 has with Cassian and Mortars/Mk2s have with Shores/Vets. The probes cannot be taken without Maul and must be deployed at Speed 1 of him. Note this isn’t deployment zone limited; when Maul infiltrates, the probes effectively can as well.
Hover: Air 1. Straightforward, basically these dudes can fly over terrain that is height 1 or lower. Note this is not an action like Jump.
Incognito. K2 also has this keyword. The probes cannot be attacked beyond range 1 until they lose the keyword (which happens when they attack, defend, or perform an objective card action). They also don’t count for scoring objectives until they lose Incognito. Observe does not appear to be something that causes them to lose it.
Overall Tactics
Darth Maul is a speed 2, jumping saber wielder. He plays somewhat similarly to commander Luke. For in depth guidance on how to use a mobile saber wielder, check out our Commander Luke and Jedi Luke unit guides (scroll down to the “Luke Rage” section in the commander Luke guide).
In short, saber wielders are scalpels, not hammers. They are expensive and fragile when focused, but they have good mobility, reliable damage, access to force powers, and a bunch of ways to avoid getting attacked. The most important thing with force users is patience; knowing when to engage, what to engage, and where, so that your opponent can’t gun you down. Don’t get too excited about careening across the table to dice things up in melee as quickly as possible. A saber user’s job is to control an area, not murder your opponent’s entire army (although I’ve seen that happen). This starts before the game in your list building and battle card selection. See our Dooku Unit Guide for some guidance on selecting battle cards for a force user centric CIS list, and also for some tactics on creating a defensive situation that plays into a force user’s strengths. Maul is somewhat uniquely fragile, so be a little extra careful with him; Juyo Mastery needs him to be wounded to work, and Maul needs Juyo Mastery to be working.
Juyo Mastery
Juyo Mastery allows Maul to take an extra action when he is wounded. Extra actions are not a new concept in Legion; there are many keywords that grant them for free, and all force users have at least one of them (Charge, Relentless, Steady, Master of the Force, Tactical, Agile, to name just a few). Juyo Mastery is all of these things, and none of them. More accurately, Juyo Mastery is exactly one of them on a given turn. There are times when Maul is going to be less action efficient than force users like Jedi Luke or Obi-wan, who have multiple “free action” keywords. However, there is immense flexibility embedded in Juyo Mastery, and there are some really unique things that only Maul can do because of it.
One important restriction with Juyo is that it requires Maul to be wounded. Deciding whether to wound Maul voluntarily with At Last (or something like a mine, if you are feeling cheeky) or waiting to make your opponent shoot him and do it is a big decision you will face in every game. More on that later.
Timing
All of those free action abilities listed above have some kind of timing caveat and a trigger. For example, Relentless gives you a free attack action, but only after you’ve done a move action. In Legion, after always means immediately after. This means you cannot do anything in between your move and your free attack, like say… Force Push. Juyo has no such restrictions. Relentless also requires you to actually take a move action to begin with. These are some of the combos that only Maul can do with Juyo:
Move, Move, Force Push, Attack – Maul can move twice, use force push to pull a unit leader into base contact with him, and then attack. This effectively gives him a melee threat range of just shy of 16″ (a speed 2 move with a trooper is 6″ or Range 1, and a speed 1 move is 4″), which is Range 2 on the range ruler plus two thirds of the way to range 3. You should be able to measure this pretty accurately with some experience (if you look closely at your range rulers, the engraved lines are at very helpful increments). If you are close enough (within 10″) you can also move, force push, attack, and then do something else (usually recovering) instead of taking a second move.
Pro tip – You are going to end up using this combo a lot on units that have activated already, to keep Maul safe after he engages. Generally, you don’t want to be fully wiping a unit when you engage in this way, because you want Maul to remain safely in melee. Don’t forget that Pierce is optional. Sometimes you want to leave that last block unpierced to make sure you have at least one model alive to give a warm hug to.
Attack, Move, Move – If Maul is in melee with something (or you have saber throw) at the start of his turn, he can attack and then double move afterwards (or single move and then do something else).
Move, Move, Standby – Standby in melee is really powerful, since it is difficult to strip. Charge or Relentless don’t let you standby after a double move; Juyo Mastery does. If you want to delay Maul’s action until later in the turn after engaging something, Standby is a great choice.
Attack, Dodge, Recover – Or whatever else you want to do besides moving. If Maul is already where he needs to be and doesn’t have to move, the extra action is strictly better than charge. Knowing when to do something like aim vs. dodge when you have one of these opportunities is very situational; generally I prefer dodging, unless Maul is in no danger at all or I really need to kill the thing I’m attacking. If you have your force powers exhausted, recovering can be important and is usually high on the “extra action” priority list. Additionally, if Maul is close enough to his target (within speed 1, but not yet basing it) it is nearly always better to use Force Push to pull them to you, Attack, and Recover, since the Recover action (instead of a move) nets you an extra force power refresh.
Obviously you can also just use Juyo in the same way you would use Relentless or Charge; move, and then attack. If you equip Saber Throw you can do some nice peekabo style ranged attacks (move out from line of sight, attack, move back behind line of sight).
Objectives
There is a critically important action for which no “free action” keyword exists: the objective card action. For all his speed and ferocity, Maul is arguably best and most uniquely good at… repairing vaporators. Grabbing boxes. Grabbing hostages and bombs.
No one else in the game can interact with an objective after double moving, except Darth Maul. There are some really strong combos possible here.
Move, Move, Objective action – This is the most obvious one. Great for a last/first box grab. Obviously you can also Objective Action first, then double move, or move, do the objective, then move again.
Move, Move, Force Push (unit leader with objective), Force Choke, Objective Action – This is the one that you are really going to surprise your opponents with. If your opponent puts a unit leader with an objective within ~16″ of Maul, it is his. Double move, force push the unit leader towards you (making sure to base Maul with the objective), force choke the unit leader, then grab it with Maul. If it is a bomb, you can then immediately drop it (and detonate it at turn end), which is extra hilarious if you are near your opponent’s deployment zone. Don’t forget when you force push you also place the cohered minis and any claimed objective tokens the unit leader has. The threat range of this combo is really closer to ~17″, since the objective token itself has width also, although you won’t be able to get into melee at that distance.
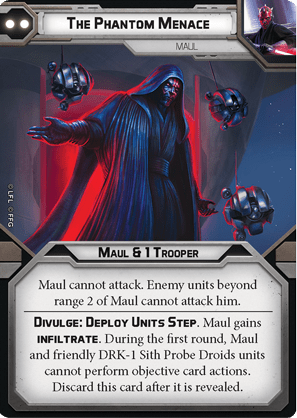
Infiltrate
Maul gains access to Infiltrate from his two pip, Phantom Menace. Infiltrate is an extremely powerful and flexible keyword, but it takes a lot of practice to get the hang of. It is very easy to get aggro and deploy an infiltrator in a risky position, then lose them to a surprise early turn play or a brief but important string of bad saves. Maul is a badass but he (probably) can’t take on your opponent’s army all by himself, and luckily he doesn’t need to.
You can do some crazy things with aggressive deployments if there is a line of sight blocker near your opponent’s deployment zone, but I wouldn’t recommend trying it until you have a lot of experience with Maul, because it is very easy to get him mercced that way.
There are a couple of questions you need to ask yourself when infiltrating Maul.
- Early or late? If there is a clear spot to put Maul that is going to be relatively safe from opposing deployments, go ahead and drop him. However, I usually try and wait as long as possible to see what my opponent does, and to force them to counter-deploy to all the possible threatening locations of Maul. If Maul isn’t somewhere, he is potentially anywhere, and that will limit your opponent’s deployment options. Infiltrate isn’t always about big, splashy plays; it is about forcing your opponent to make sub-optimal deployment choices. One important key difference between Maul and other infiltrators is he doesn’t have a scout move, so he is somewhat more vulnerable to being hedged out.
- What objectives am I playing and where are they? Maul is first and foremost an objective threat. You want to make sure wherever you drop Maul, he is going to be able to contribute to the mission, and control an area around a specific objective. Be careful about dropping Maul directly on the middle box on Recover; this is always extremely tempting to do with infiltrators, but always very risky. Maul can’t grab it on turn one anyway (due to the Phantom Menace restriction).
- How am I going to make sure Maul gets orders? Maul only has two command cards where he can order himself if you infiltrate (since Phantom Menace is a discard) so you will need a plan to get him face up orders. Make sure he isn’t too far from your commander. He doesn’t necessarily need to be range 3; you can use his Sith Probe droids to effectively extend the range at which you can order them, if you give them a comms relay.
- Does my opponent have any scouts or infiltrators? These units can flank line of sight blockers that may be safe from your opponent’s deployment zone, but not from other angles. Beware of dropping Maul in a forward position behind a line of sight blocker if your opponent has these units. It is also worth considering using Maul to hedge out such units, particularly if your opponent has a build that requires deploying multiple infiltrators in a forward spot (like an Iden/ISF tactical strike list).
Also don’t forget that your probes deploy at speed 1 of Maul.
Command Cards
Duel of the Fates
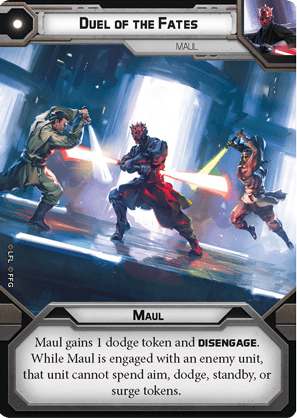
Duel of the Fates is not as splashy as some other force user one pips like Son of Skywalker or And Now, You Will Die; it doesn’t provide any extra attacks or damage. It is more of a dark side mirror to Kenobi’s Hello there; while Hello There provides a pile of tokens, Duel of the Fates prevents them from being spent. That makes it a little more situational; if your opponent doesn’t have tokens to spend, the shutdown ability doesn’t do anything. This is excellent against other saber users, who rely heavily on dodge tokens for defense, but it is going to feel somewhat lacking against a list like a gunline where the unit you are in melee with likely doesn’t have any tokens.
The free dodge token and Disengage are solid and are the most consistent parts of this card. Don’t be afraid to play it just for those, if necessary.
Phantom Menace
This card has two parts, let’s go over both of them.
First, you can just play it like a normal command card, in the command phase, and not divulge it. If you do, Maul cannot attack, but enemy units beyond range 2 of Maul cannot attack him. This is a great option for closing the distance (or getting away, later in the game) and is a little mini limited visibility on Maul. Note this also orders a trooper in addition to Maul, which is unusual for operative cards.
Alternatively, and more commonly, you can divulge it at the start of the deploy units step to give Maul Infiltrate. See above under “Infiltrate” for some considerations here. If you divulge, Maul and his probe droids cannot perform objective card actions during the first round. No box stealing for you on turn one. You also discard Phantom Menace after you divulge it, which is a contrast to other divulge cards and gives you some added flexibility on the first turn. It also potentially allows you to trigger Aggressive Tactics on 4/6 turns instead of 3/6 turns (since one of those turns will have to be standing orders).
At Last
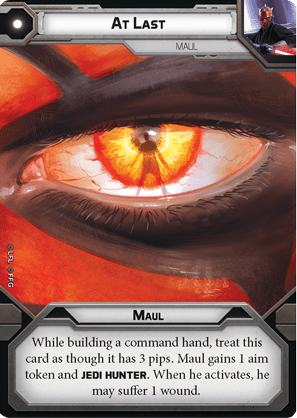
At Last is arguably Maul’s most important command card. Juyo Mastery requires a wound to trigger, and Maul very often doesn’t get wounded by your opponent before you need to start doing Juyo things (nor should you hang him out there on purpose to allow that to happen). If you are playing minefield you could try and clear mines with Maul, which is kind of amusing; but there is a risk there of taking two wounds instead of one (or more, if you get really unlucky and it blows up twice) and that’s generally not worth it.
Generally, you want to play At Last basically as soon as you need to use Juyo, and no sooner than that. If Maul can be useful double moving around the table for the first few turns, wait to play it until you really need it. It is a one pip, which is part of what makes it so awkward; saber users often want to engage by going last, then first, but you are going to want Juyo on your “last” activation to be able to pull off the move, move, force push, attack combo which is the most common way for Maul to get stuck in. It is somewhat appropriate that this counts as a three pip, because you are often going to drop it and wish you could have played a three pip anyway.
The aim token and Jedi Hunter parts of this card are basically bonus. Jedi Hunter is obviously good against other force users, and it goes a long way towards making his saber pool more consistent. You aren’t always going to be facing those, though. The aim token is neat but you should almost never be playing this card just for the aim.
Upgrades
Force Upgrades
There are really only three upgrades in consideration here: Choke, Push, and Saber Throw. We’ll talk about Barrier too since it comes in his kit, but it isn’t a good fit for him.
Force Push
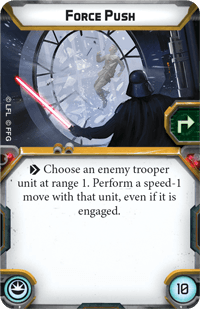
Force push should be stapled to every speed 2 force user, and Maul is no exception. Beyond all the unique things Force Push normally does, it also allows Maul to pull off some of his best Juyo mastery combos.
Some other more boring things you can do with Force Push besides Juyo Mastery shenanigans include:
- Pulling units out of cover*
- Pulling units into melee with Maul
- Pushing units out of melee with Maul
- Pulling units out of melee with your own units
- Pushing units off of objectives
- Pulling targets into range/LOS of your units
- Pulling units around the edge of LOS blockers to engage them safely
*Don’t forget you also place the non-leader units in cohesion after Force Push. Use this to deny cover or set up other advantageous situations.
Take Force Push and don’t think twice about it.
Force Choke
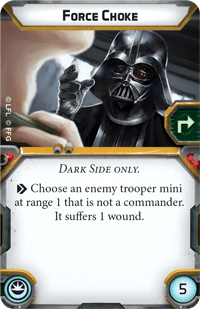
Ah, the hallmark of Dark Side Jedi (and Anakin…). Being able to do free wounds is good. Being able to do free wounds to specific models is great. There are a handful of specific uses of Choke, all of which are very important for Maul’s flexibility and effectiveness:
- Choking a heavy weapon out of a squad (beware if your opponent has medics, this won’t be nearly as effective)
- Choking a medic or other important personnel upgrade
- Choking a unit leader with an objective token or one touching an objective (especially if the rest of the unit isn’t)
- Choking a specific model that is in your way (somewhere Maul or another unit needs to land)
- Killing an important, durable model, even if a heavy is not available to choke (Mandos, ARCs, Phase IIs, etc.)
One thing you can’t use choke for is targeting commanders and operatives. It would be kind of silly if you could do that.
Mostly this is relevant when your opponent is playing Iden or Cassian and they use Covert Ops to promote a Mando or ISF unit (which you then can’t choke).
Personally, I prefer Choke over Saber Throw; it does so many unique things, and it specifically plays into Maul’s primary strength (objective play). Whether or not you equip Choke probably weighs heavily on whether or not you want Recover, Bombing Run, or Hostage in your deck.
Saber Throw
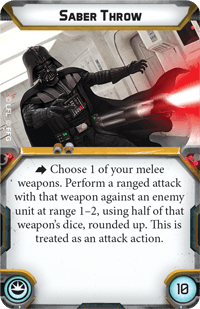
Juyo can essentially be Relentless, if you want it to. Saber Throw is really good for peekabo style attacks where you pop out from behind a line of sight blocker, attack, and then pop back into safety. Basically this is the poking, prodding, thorn in your side version of Maul rather than the objective focused one.
When you cut a pool in half, if that pool has multi colored dice, you choose which dice to use. 4 Red, Pierce 2 is arguably the strongest saber throw attack available (you could argue Jedi Luke’s is stronger in certain circumstances because of surge/crit). Further, unlike Vader who is often going to just be throwing straight into cover, Maul has Jump and speed 2 so you can often get shots in the open. There is a decent chance you just delete four models if you can catch a unit out of cover.
Personally I like Choke for the objective play, but Saber Throw is a very viable alternative.
Force Barrier
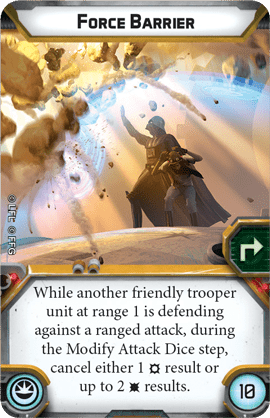
This is a sexy new force upgrade that comes in Maul’s kit, but it really isn’t very good for him. It’s amazing on some other force users, like Palpatine, Dooku, Obi-Wan, or Jedi Luke. But not Maul. Maul doesn’t have the force slot to spare, he usually isn’t next to your dudes, and he doesn’t have Master of the Force.
My colleague Zach is working on an article dedicated to this card, but let’s talk about how good it is real quick (on those other force users). Effects that don’t involve rolling dice to work are always preferable to those that do, and Barrier just blocks two hits or a crit, period. With Master of the Force, you can do this every turn. It is especially great against snipers, in particular, who tend to have small dice pools that ignore defenses (pierce, sharpshooter, high velocity).
In summary… you want to run either Force Push and Choke, or Force Push and Saber Throw. I don’t really see any better build options for Maul.
Training Upgrades
You can actually leave Maul’s training slots blank if you are really pressed for points (the force slots are much more important) but training upgrades are solid. This is basically Tenacity plus something else.
Tenacity
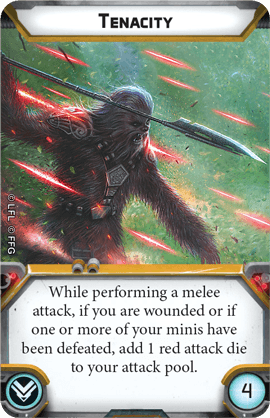
Tenacity only works when you are wounded, and Maul is pretty much always wounded (once he gets involved, anyway). Adding a red dice to your attack pool is huge, and rather necessary for Maul’s lightsaber pool, which is otherwise somewhat unreliable due to all the white dice in it. This should be the first 4 points you spend on Maul after his force upgrades.
Offensive Push
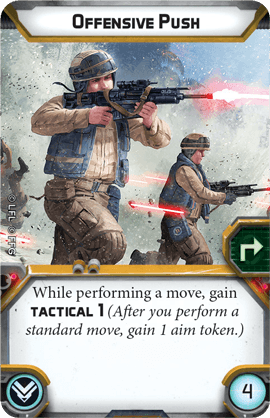
Offense push gives you Tactical when you tap it, which is decent. Maul likes aim tokens as much as the next guy. What makes this a strong competitor is how often Maul tends to recover to get his force powers back. You should be recovering 1-3 times per game, generally, which means you get a lot of value out of this.
Offensive/Defensive Stance
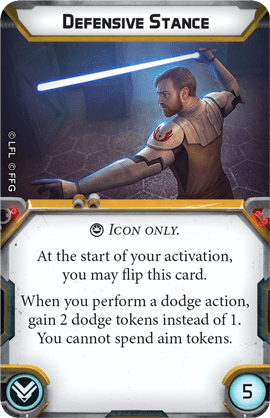
This is another strong contender for Maul’s second training slot. Maul tends to have more actions available to actually dodge or aim than other force users (once he gets stuck in) and Offensive/Defensive stance lets you double up on those. Dodge tokens are also vastly more important to a force user than aim tokens, and this gives you a way to get extra dodges in a way that Offensive Push doesn’t.
Situational Awareness
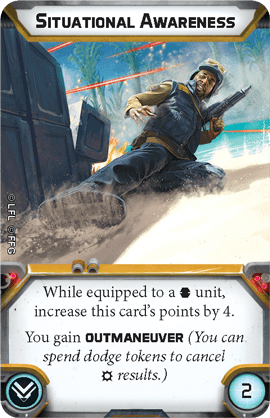
Situational Awareness is only two points, which is probably the largest factor here. Maul doesn’t have a lot of ways to get free dodges, so he doesn’t get as much value out of this as Jedi Luke or Sabine would, but it’s a nice to have if you are tight on points and can’t afford Offensive Push or Offensive/Defensive Stance.
Seize the Initiative
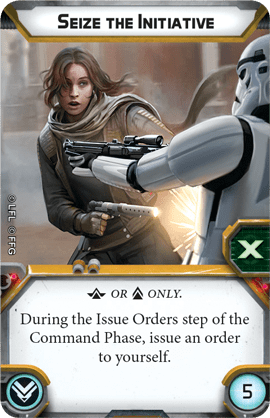
I before e, except after c, Or when sounded as ‘a’ as in ‘neighbor’ and ‘weigh’… nevermind.
Anyway, this is a good upgrade that allows other factions to do sort of a mini-CIS impression with order control on their focus pieces on key turns. Except… you are CIS, so you can just do an actual CIS impression without this card.
I could see some crazy multi-character meme builds where you take this, but generally you can manage between the usual B1 order control shenanigans and comms relay on your probe droids.
List Ideas
One huge caveat here… we don’t know what the T-Series generic commander does, but we do know that he costs 55 points. For that reason alone, he is likely to drastically add to some of these options, simply by allowing you to get to 11-13 activations with Maul (regardless of what he actually does). Once the T-Series is fully previewed we’ll revisit and add to this section. Until then, you are basically looking at Grievous/Maul or Dooku/Maul.
Dooku/Maul (Double the Maul)
This list is jokingly called Double the Maul, after Dooku’s signature line “Double the Fall,” and because “Maul” rhymes with “Fall”. It’s not particularly splashy, but it’s easy to remember, at least. I’ve also heard “Chocobros” (hahah) or just “Double Choke.”
10 activations:
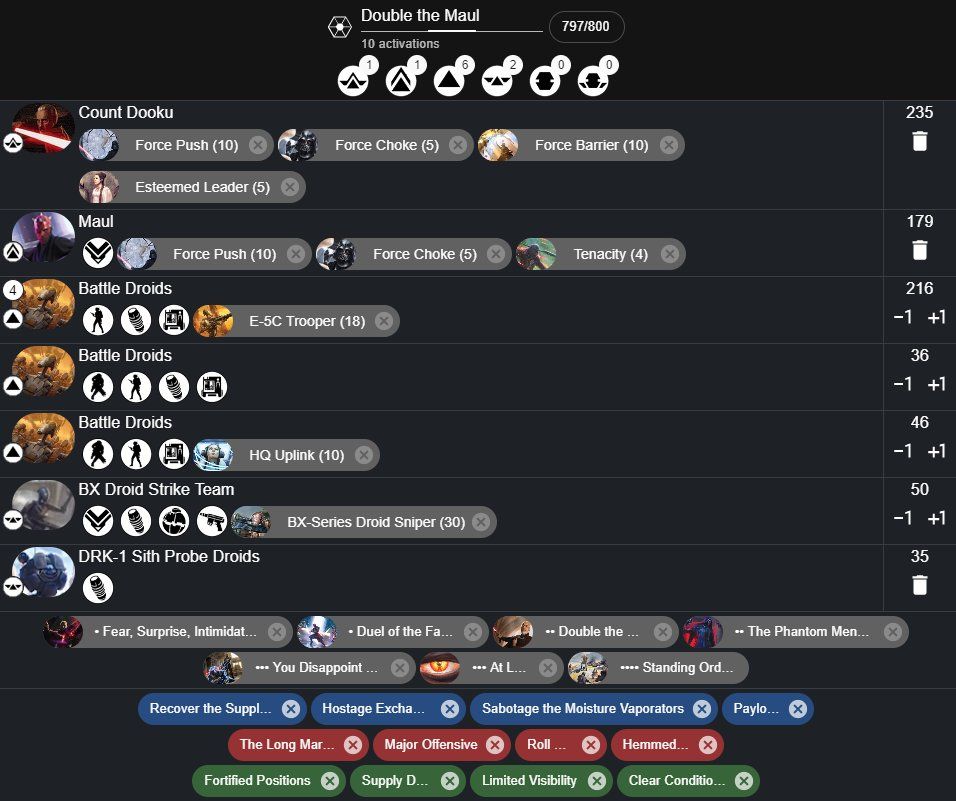
There are quite a few customization options here. This list is similar conceptually to other “double focus piece” lists like Luke/Sabine or Palpatine/Vader, except you can comfortably get to ten activations while also having nearly perfect order control. You are somewhat lacking in long range firepower and might have some trouble stripping standbys in a GAR matchup, but if both Maul and Dooku can get an important area locked down it is going to be game over. The fully naked B1 here is basically just a wound sponge for esteemed leader.
This list relies pretty heavily on utilizing the defensive/area control strengths of your double force users. For that reason I would consider cutting tenacity or even esteemed leader to increase your bid a bit. The battle cards include Recover, Hostage, Sabotage, and Payload, all of which involve controlling a specific area, usually near the center of the table. Recover is in there because both Maul and Dooku are just so darn good at it. You could easily swap one of these for Key Positions to taste.
Dooku/Maul, 9 activations
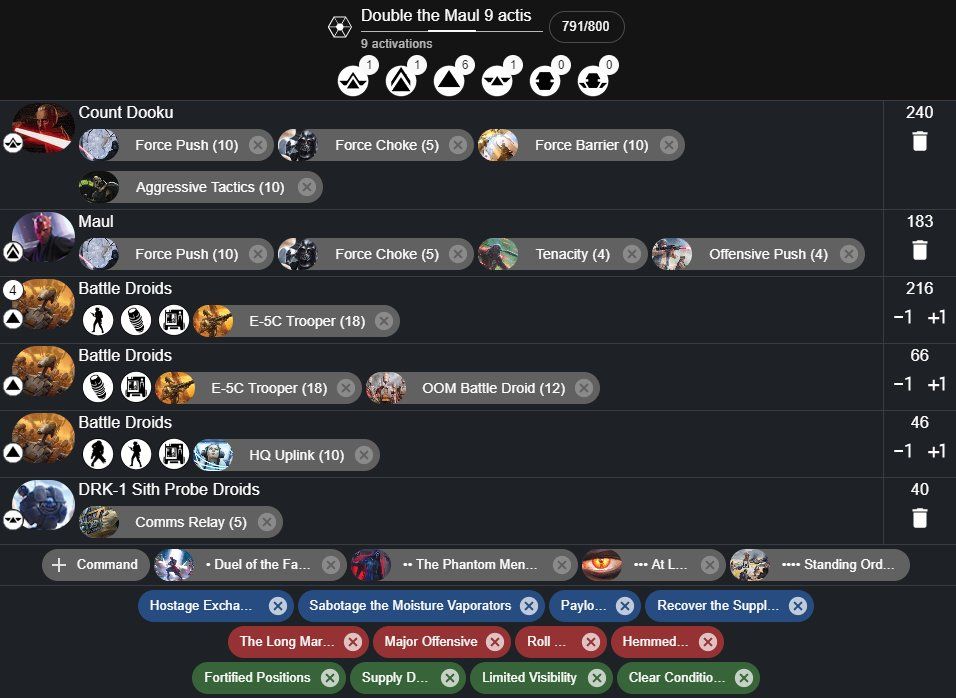
You can also cut the BX sniper to do a 9 activation version of this list with a lot more beef, and then you don’t have to skimp on the upgrades; you can fit six B1 heavies instead of four, and fill both of Maul’s training slots as well as upgrading esteemed leader to aggressive tactics. The 9 activation version also lets you take an OOM-series droid, which lets you bounce the end of your B1 chain to Maul’s probes (which you can then relay to Maul, if necessary).
Control of Maul can get a little sticky on your Fear, Surprise, Intimidation turn. If you are having order control issues with the ten activation version, I would try the 9 activation one.
Grievous Maul
Grievous Maul makes it a little easier to beef up your corps and get the necessary upgrades in there. I personally prefer this to the ten activation Dooku/Maul for that reason, though I don’t think you can go wrong either way.

This isn’t as spicy as Dooku/Maul but quite a bit more forgiving. I swapped Recover for Key Positions here, because while Maul is good at Recover, he isn’t quite so good as Mandos or Iden.
Summary
Maul is a fragile but versatile focus piece that is unlike any other force user. The immense flexibility of Juyo Mastery allows you to do surprising and unique things, and makes Maul a very strong player on objectives. Don’t be reckless; use speed and positioning to pick off isolated targets. Control important areas of the table and make your opponent walk into your threat range.
Hope you enjoyed this Maul guide! Once I get him painted up I’ll add some hobby tips here as well.

3 Responses
What are your thoughts on infiltrating Maul aggressively and positioning 2-3 STAP units to punish anyone trying to go for him? Not put it into a list yet, but something I thought of as I was reviewing the cards…
Yeah, I could absolutely see it. In general STAPs lean into a lot of the objectives Maul is naturally good at (especially bombing run). I think we might need to wait for the T-series for that to fit, though. Dooku and Grievous are too expensive to run alongside Maul and STAPs.
Hey Kyle can you explain the reasons for each of your battle cards you choose for a maul list?