

Before we get started, I wanted to ensure people who enjoy this site take a peek at an important announcement linked here. If, in opening this, you “Did it all for the Dooku,” then please do read on!
Count Dooku is a serious man with an un-serious name, were you aware that in Brazil and Portugal his name had to be changed because in Portuguese “Dooku” is a term that is quite vulgar? These are the sort of facts that truly make us more complete as human beings, so you’re welcome.
I know I know, this level of scatology has got to stop for an article about such a distinguished man. Unless you speak Portuguese, in which case, prepare yourself for a massive amount of scatology. For everyone else though, we’re going to take a deep breath and treat the Lord Count’s unit guide with the opulence that he deserves. So let’s start over.

Achem
Good day Sers and Madams! This article has been updated and largely re-written by myself, Maître d’hôtel Evan “Doc d’Velo” Paul from the wonderful original by Duke Kyle “Orkimedes” of House Dornbos so that is now in line with these times of the Second and Six. The Lord Count welcomes you to his Presence but he is indisposed at the moment. May I suggest, a song perhaps, to play while you read? Ah, this seems a fine choice, Bach’s French Suites. Magnifique!
Let us, if it pleases the guest, cover the forces and faiblesses of his Countship.
Forces (Strengths)
- Only the Count possesses the strength of Will to utilize Direct: Trooper, the single most useful keyword in the entire game of Legion
- The Count is the most efficient “duelist” (single mini v single mini) in the game thanks to Makeshi Mastery and his native surge conversion
- The Count possesses a particular “Cunning” paired with excellent command cards (4 in total thanks to Asajj)
- The count possesses great vigor despite his age, and has native surge to block with 6 health and Immune: Pierce
- The Count is rivalled by few who can force units off points as well as he
“Faiblesses” (“Weaknesses”)
- The Count is a man of high birth, the Count is a man of high cost (only Anakin and Commander Vader are more expensive single-minis)
- The Count does not rush into battle until the right moment, and thus he has no Relentless or Charge (except with his one pip)
- The Count does not leap (except that one time) and thus has neither Jump nor Scale
- The Count is not a brute, and thus his raw damage potential is less than that boorish Darth Vader
Overview

Slots: Force x3, Command x1
165 Points. His Countishness was once 205 points but he has deigned to bestow his grace unto the masses so that more, but not everyone, can benefit from his presence.
Defense: Six surging red dice with Immune: Pierce represents less health than Vader where ranged attacks are concerned but is actually more than Vader’s in melee or against high-velocity attacks. Thereby, up close, he is the tankiest trooper mini in the game.
Offense: Dooku’s Saber. Five red, Impact 2, Pierce 2, surge/crit. This profile would be solid enough on its own, but it is naturally augmented by…
Makashi Mastery: Dooku’s money keyword in force user duels. Dooku is the only unit in the game (apart from his apprentice Asajj, sometimes) that can ignore Immune: Pierce and impervious. Any of us who have ever failed over and over again to get that last point of damage on Sabine can rejoice at this of course.
Offense: Dooku’s Lightning. Six black, Pierce 1, Scatter. This was upgraded from 5 black dice and previously not having Suppressive when Legion 2.6 was released, which is a really significant upgrade.
Courage 3: This is solid but be forewarned: because of his lack of move and attack, a suppressed Dooku is an extremely sad one. Do not make the Count sad.
Slots: Three force, one command. The classic slots of the “mega-masters” (Yoda, Commander Vader, Palpatine), as it should be.
Cunning: The Count is more cunning than you are, but he is a gracious man. He will allow you to activate your units, but you’ll just have to wait your turn if you tied on the number of Pips.
Deflect: The Count has no need of this for surge conversion but those rude enough to target him with a blaster may find themselves hoisted on their own petard.
Immune: Pierce is a keyword that the Count benefits from and yet denies it of others. You may say such a thing is cruel, but the Count would remind you that the lower classes should be happy that they can use the word against lower forms of duelists at least.
Master of the Force 2: There are some “users” of the Force who will now shy away from Force Push due to its cost and their inability to refresh it every turn. The Count is not one of those SWINE! Oh, excuse me…
Command Cards
Fear, Surprise, Intimidation (FSI for short)
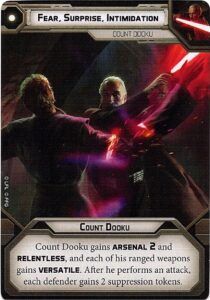
Well this card is certainly intimidating. This is quite the wall of useful text. Dooku gains Relentless, which he sorely needs. He gains Arsenal 2 and his ranged attacks gain Versatile, which basically means he can whack something with his saber in melee and then zap something else with his lightning. If you are running Saber Throw, you can alternatively perform two ranged attacks, (one throw one lightning) against two different targets or the same target. The Saber Throw/Lightning combined pool is three red, six black with Pierce 3, which is going to delete most targets that aren’t Pierce-Immune. Dooku’s attacks also throw down two suppression on his target, which means your ranged attack victims will end up with 4(!) since the lightning is suppressive and your melee ones will end up with 2.
This is, of course, also a one pip with Cunning, which means you are guaranteed to go first unless you are facing Han, whose roguish insolence vexes Dooku greatly indeed. Even if CIS did not have excellent activation control (which is surely does), Direct: Trooper means that Dooku can use this as a nearly-unbeatable “Ambush” to activate just about any unit you want before your opponent, be it Maul or be it Magna.
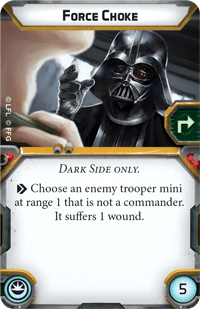
This, like a choice few other force-user command cards such as “You Serve Your Master Well,” is capable of shifting the balance of power on even the most hotly contested POI’s. In one activation Dooku can, theoretically, kill one unit with a melee attack, another with lightning, Force Choke a single-health unit to death, and Force Push a fourth away. Getting all of that done would require a bit of luck on your side, but it demonstrates the flexibility and the raw potential of this excellent card.
Double the Fall
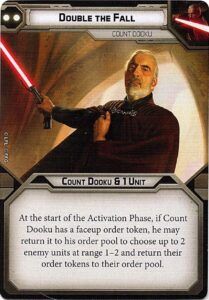
The relatively short range (1-2) on this card is important. Its ideal use is to strand aggressive units on their “dive” turns, leaving them fishing for the right token while you blast them to pieces with the rest of your army. For example, suppose Luke Skywalker is up in your grill, and you expect him to play… well, just about anything. He plays Son of Skywalker or something, and he gets an order. You play Double the Fall, and you kick that order token into a pool with 10 other tokens. While your opponent fishes for his order token, you start blasting them with your shooters. After he pulls that token (if he survives that long) he melees something… and then you go with Dooku, whack him, and if he’s still alive, Force Push him out into the open and blast him some more. Obviously if your target is in range of Dooku and low on health you could just pull Dooku and whack them to begin with.
In other words, this card means that those who “come at the Count” had best not miss.
It should be noted that this card asks more consideration from Dooku players than it used to. Droid order bags are still mostly clean but often not completely so. The advent of Aqua Droids will make this trend even stronger since vehicles perpetuate orders poorly compared to troopers in CIS armies. It’s ideally used if Dooku is already engaged or safely behind some form of cover against most shooters. You may of course also mitigate risk to Dooku by ensuring that either the Count himself or your second commander has Improvised Orders on it.
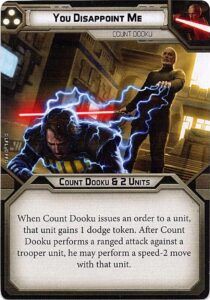
You Disappoint Me
Did you show up to court dressed in white after the first lundi de septembre? Honte à toi, shame on you for disappointing his Glorious Count-acitousness, AND HE WILL DECIDE WHETHER YOU DESERVE EXILE OR EXECUTION!
Ah, excusez-moi, I become so animated at the idea of an insult to the Dook of U.
Free dodges to various units (one of them Dooku) plus a really nice on-attack effect, and this got even better with Dooku’s update because his Direct gives you a fourth dodge. A speed-2 move with your target unit is quite far, particularly given you can also cohere, and subsequently force push them, if you want to. Basically you can move a given unit leader up to 10″ from its starting position (a speed-2 move plus a speed-1 move with force push) and end up with the non-unit leader models 4″ (speed-1) even further from that. This easily brings a target out of position, out of cover, and either into Dooku himself to protect him or away from a POI and out of cover if the Count is already sitting pretty, er, elegantly.
The Sith Will Rule

A late entrant into Dooku’s repertoire, this command card comes included with Asajj Ventress. I’m unsure if this giant wall of text was totally necessary, but it can be summed up as “counts as a 2-pip for your hand, Dooku gets an aim and dodge, and Asajj MUST activate directly after Dooku regardless of where her order is.” As far as I can tell, this is the only “duo” command that often makes sense to include even if the other end of the “duo” isn’t around at all. After all, Dooku does get a couple tokens out of it. Does that make it worth dropping Orbital Bombardment for it? Probably, being able to go second on Round 1 by playing Standing Orders is often more helpful than a 4 dice attack, and unlike Bombardment this card can carry some benefit in the late game. Is it worth dropping The Phantom Menace for it if you have Maul? Almost certainly not.
If you DO have Asajj, then you’re definitely saving this for the right moment. That moment will probably be one where both of them are in a position to lay down some pain. If either of them is in a position where they’re one attack away from death, however, you’re probably better off with FSI or You Disappoint Me if you still have them, because despite Dooku’s cunning this won’t beat anything except another 3-Pip or Standing Orders when it comes to priority.
Upgrades
Force Upgrades
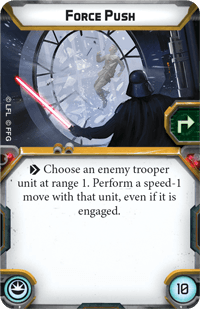
It might be 40 points now but Dooku is one of the relatively few force users where it’s still an auto-include. Long story short, Force Push used to almost always be relevant for combat and often relevant for objectives. In Legion 2.6 it’s still almost always relevant for combat but ALWAYS ALWAYS ALWAYS, if you’ll pardon my boldness of font, relevant to objectives. If you’re looking at a naked B1 unit and comparing its value to Force Push (assuming you have your Corps requirements met) then I promise you should tell the B1’s to go eat cake and take the Push.
That said, if you’re in a true crunch, I think that Saber Throw is the upgrade I would use aside from the two others below to have a “budget” Dooku.

Though he is always respectful of royalty, Count Dooku humbly disagrees with Leia Princess of Alderaan in eternal absentia: she may say that there is “no time for sorrows” but the Count would instead say that “there is no time to hold back from inflicting sorrow upon my enemies.”
Such a wise man the Count! Just as with pretty much every other Force user out there, Burst allows players to ensure their most expensive character is relevant when it needs to be. You should almost certainly be taking this.
Even his Lord Count would admit that this upgrade’s best days are behind it, but inflicting an extra wound per turn is capable of being anything from “a minor help” to “game-winning” but none of the other Force powers out there can really argue that they’re more useful more often.
Command Upgrades
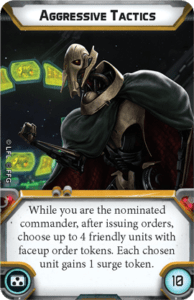
This is, to me, the ideal command card for certain lists, precisely because the Direct: Trooper keyword makes it even more useful than it already was before he earned this keyword (via his effortless Grace of course). The Count would like to remind you that while decadence may be priceless achieving that stature requires a high price indeed. The “fully armed and operational” Dooku is 240 points, but there are some who would say that such a man representing less than a quarter of one’s list is more than a fair bargain.
With regards to the lists where I would avoid this, I would mostly consider doing so if there were 2 or more non-Dooku Commands that you could see yourself running throughout the game. This probably means that you’d leave it behind in a Maul/Dooku or Grievous/Dooku pairing but you can probably take it anywhere else. If you have Asajj, you’ll just divulge her 3-Pip, start the game with Standing Orders, and then maybe play her 1-Pip at some point, the Count can handle the rest. If you have a Super-Tactical Droid, you can get away with using only one of those commands in a given game most of the time, so you’ll still mostly be able to rely on Dooku enabling surges.
I’ll state the obvious lest it remain unsaid: Dooku doesn’t gain any benefit from surge tokens himself. Rather, because he has Direct: Trooper, he can give it to other units in his army, especially so if there is another source of Direct or you have B1’s or Comms Relays that can chain those orders to others.

THE COUNT DOES NOT IMPROVISE, IT MERELY APPEARS SO TO YOUR DULL SENSORIUM. That said though, I would be remiss if I didn’t repeat that CIS token bags are often not completely predictable, so this upgrade could be quite useful and is in my opinion the ideal replacement if your list would likely use multiple commands from other characters or if Aggressive Tactics is just a bit too pricey.

This was a stronger choice before Magnaguards existed, and also before Dooku started naturally surging and it now it will become even less strong when Aqua Droids exist to protect him. But, if you are short on points and don’t have Aquas, this will help protect his Dookuness.
Pairings
When the Count deigns to fight on your side you are expected to know how to treat him in such a way that he deserves. We will begin with a list of subjects, er, associates that he enjoys the presence of. Would you serve a cabernet sauvignon with an anchovy-laden salade césar? Perhaps if your guest was crocodile, vous n’êtes pas sérieux! Here are my suggestions for finer pairings for the Count.

Magnaguards are the classical choice but it remains a safe one. While Dooku is gaining a new strategy to stay alive as of this writing, the Magnaguards can both provide backup to him and sap two additional damage away. If you decide to spend a little extra cash on Protector, your opponent is very very un-incentivized to shoot at him before these guys ever. What’s even better is that as they are droids they can’t be suppressed, plus they of course get the free token as an emblem of his Count’s Grace, “loué soit le Seigneur!” Naturally, B1 Battle Droids can provide backup as well and can chain Dooku’s direct to farther-away units.
When it comes to other heroes, Asajj is the one with the most synergy but Maul should not be discounted either, especially since FSI can double as a “Operative Force User gets an order from Direct and can go first any time you want” card for either of them. I would only really think about General Grievous if you’re A) wanting to run a fun but risky Dooku + Grievous + quadruple Magna list or B) you want to play with even more fire and run the “quadruple saber user” list. If you are skilled enough to run that successfully though (it won a GT in 2024 lest ye cast doubt), you have no need for this guide.

Magnas can soak up damage it’s true but what if you could prevent damage entirely? These fearsome bots are on the cusp of release as of this writing and there’s not a mini I thought of faster as their new benefactor than his Grace the Count. For more details on how this is done, please see my writings on the subject here.
Lists

This list, played by the very aptly named Sidious66 of Germany, got top 4 in a December 2024 GT. Given that this is pre-Aqua release it’s possible that those would replace a couple of those Dekas minus a few Magna upgrades, likely even in all honesty. Sidious used Guidance instead of Saber Throw as the third power for “budget” Dooku which is reasonable, though since Dooku so often wants to go last there’s a risk of wasted surge tokens.

This is the list I’m hoping to try out once Aquas and Crabs release. If you ever need to split your army you can send Kalani, the Crab, and Magnas on one side and Dooku, B1’s and Aquas to the other while the Dekas can flex as needed. This list is missing a bit in terms of pure order control but at the very least 2/3 of the Corps, Dooku, one of the Magnas, and the heavy Aqua should have face-ups no matter what which should make the bag manageable with Improvised Orders.
Summary
You are fortunate indeed to bask in the blessed Grace of his Lordship, but he has pressing business to attend to, so we will dispense with the usual closing pleasantries.

Now begone with you!

2 Responses
I really like this blog post, I have used so much from this to plan how i play my clankers.
Thanks.
Really loving this post! haven’t had too much of a chance to play the new edition and this is very helpful. Any chance of a Grievous guide in the near future? Potentially with some ideas as to how to run this fabled ‘Grievous, Dooku, 4 magnaguard’ list? He’s my favourite boi and I can never seem to figure him out!