I’m back with another Dual of the Fates battle report. This time I’m bringing in a guest writer, he’s a doctor mind you, Josh Devera aka Peregrine on the Discord. Josh is a great friend of mine from down in Houston….so we know he had droids in his dugout hitting trash cans to avoid Clone standby tokens.
Before I show you both lists there are some things to discuss beforehand. Josh and I are playing in the same division in what is called the Legion Premier League (LPL). Now before you go ahead thinking that I am Jay “The Heel” Shelanskey with some Premier or “prestige” discussion I should go ahead and clarify that….. Legion Premier League is called such because the creator of the system, Brandon Copeland aka Copes (on the Discord) aka Copesie (if you’re familiar with his Canadian heritage), is a massive English soccer fan.
All LPL really is is a league of 14 friends with a friendly, yet competitive, system in place to play Legion in a coordinated fashion. Think of it as an online league that is just like what your local league would be like…..but with like six different time zones and friends across the world.
The most important piece of information, without diving into the rule set too much (the rules are going to be attached somewhere in here) is the league allows you to have three “wild cards”. These wild cards let you wild card into any list, any faction at any time over the course of your 12 game season. Once you wild card you are stuck with that list/faction, unless you wild card out of it. The most fun part about it is you can wild card at any moment, you don’t need to notify Copes (Tournament Organizer) or your opponent until it’s time to play. Which is what I did last night.
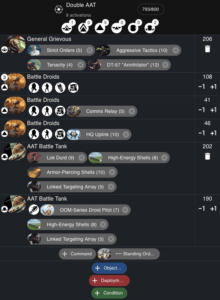
Josh has been running a Double AAT list (so has Syrylo) in this league to great success so far. I’ve played against Double AAT in a lot of games (a lot of my locals and my discord friends love this list and play it often). Not to toot my own horn too much here, but I find myself to be a pretty decent player at Legion. I’ve yet to find a way to crack the Double AAT. I’ve come close several times, but I’d like to say I’ve played against it six or seven, maybe even eight, times and I have zero wins against it. (Spoiler alert)
Josh’s Double AAT List

I know this is somewhat of a crazy statement but I’m confident in saying that this list is one of the best lists in the game. I think people are “sleeping” on it because it’s only 8 activations, doesn’t have snipers, etc. However, it is so difficult to have an answer for this list if you’re bringing a “well rounded” list….granted right now the only “well rounded” list I can truly think of is the ARC-Star build. (Man we really need to come up with better list names than this!)
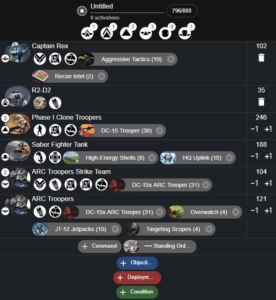
Zach’s List
I decided to wild card into this list as a hard counter to Josh’s list. I have critical basically across the entire list and went into the game knowing that this is most likely a one and done for this list. Having already played against Josh in the league, I felt like I needed to counter his list and take the second game from him as he beat me in the first of the doubleheader. I know Josh was a bit taken back by me not wild carding into ARC-Star but truth be told I am someone that needs to have a centerpiece in an army. Whether that’s Luke Skywalker, Obi-Wan Kenobi, or the Saber Tank; it better suits my play style to have one of them in my list. I understand that the centerpiece of the ARC-Star is the double full ARCs and they’re like….really stinkin’ good. I just understand myself as a player enough to know that list is not something I want to run, no matter how good it may be.
Zach’s Perspective
Battle Cards
Payload/Major Offensive/Supply Drop
Deployment
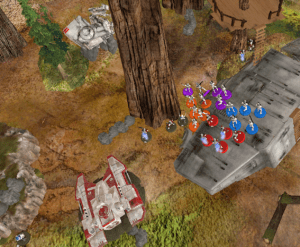
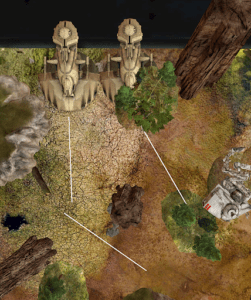
Quick anecdote: I decided to go for Major Offensive because I love taking my Clone ball to the “L” part of the deployment and making a semi-circle. (Shown in the picture) Another reason was that I was cognizant of the fact his tanks might struggle on this map with the Major Offensive deployment area. In retrospect I might have been better off going for Long March, despite Josh having two tanks in his list that can shoot into oblivion at range 4, but we’ll go over why this is my afterthought as we discuss the game.
I am using Phase I’s in this list, as opposed to the Phase II’s I have gotten used to, so I decided to deploy similar to how I did when I first started playing Clones. I would refer to it as the “revolving door”. What I mean by that is that I set up my Clones in a position to take a shot, swing back, and then the next unit can move up and shoot while also having the back units feeding them aim tokens if they need them. Having all of these critical weapons, I set up a plan to kill the Lok Durd tank as quickly as possible, and then potentially get my full ARCs into a spot to deny the area to Grievous. As for R2, I had him against this rock, which is jump-able with Blast Off, in a position to stay back and heal the tank or to move in for Secret Mission if the opportunity arose.
Also of note I ended up forcing 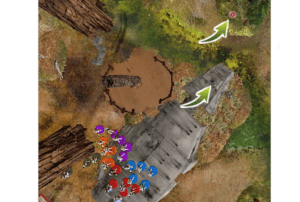
Round 1
Standing Orders vs Standing Orders
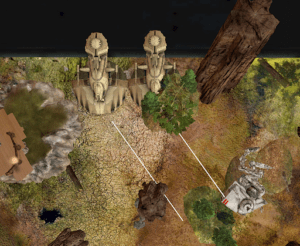
Josh won the roll off and got the dreaded “I have to go first, I guess” as both of us really wanted to lose the roll off. This was extra poor for him due to how he was forced to deploy: he couldn’t do what his list wanted to do the most: stall for the tanks to get in a premium spot. Josh ended up activating the Lok Durd tank early and move/shot my Saber tank, because he could not get an ideal shot on my Clones near the tree, and it resulted in no wounds. I was able to position myself for several shots and put four wounds on the Lok Durd tank round one. However, Josh picked up an Arc Welder in the supply deck to bring that down to three wounds. Grievous doubled moved behind the down AT-ST which was a great position for him. I knew at this point I needed to kill Lok as soon as possible and retreat. One thing of note, shown in the two pictures below, is I expected both of his tanks to sort of “strafe” towards the middle of the map. If he takes the first picture, the route I expected, I have some safe areas to get R2 in on a blast off play and go for Secret Mission quite easily. Instead, Josh chose the route in the second picture which caused a bit of a conundrum for me later on.
Round 2
Take That Clankers vs Assault
I played TTC because I had my full ARC squad at Range 3 of the Lok Durd tank and I wanted to get as many dice in the pool as possible. I gave my second order to a DC-15 squad at range 4 to set up a Fire Support with the ARC pool for Critical 2. I also HQ Uplinked my Saber Tank to go first. The thought process here was to go with my ARCs first but I ended up going with my Saber tank first. I ended up putting Lok Durd on six wounds and Josh ended up rolling a damage token which left his Lok Durd tank stuck where he was. This was not the ideal position for his Lok Durd tank because he wanted to move up and shoot my tank at range 3. Instead, he was forced to shoot at a lone ARC sniper model, which he removed. I then cleaned up the tank with the Fire Supported ARC shot I was referencing.
I’m now in the driver’s seat, somewhat. The main concern of Grievous getting into me is becoming quite real, though, as I can see his approach vector into my army is mostly protected. I started to take some stand by tokens to try and mitigate Grievous’ approach. That said, Josh is a really smart player and made the best of his first move with GG towards the tree I was positioned behind. I was only able to see Grievous with one ARC model. I decided to use one stand by to move my ARCs back towards a different angle on Grievous. If he wanted to move towards his intended target, I wanted to make him pay for it. Josh settled for a second move, not triggering the stand by behind the tree, and shot R2 dealing three wounds.
Round 3
Blast Off vs Crush Them
This round was where things started to cascade for me in a lot of ways. First of all: being inexperienced with this list, and used to playing with surges all over the place with Phase II’s, I really wanted to play Rex’s 3 Pip here. However, with R2 at 3 wounds and exposed; I decided to play Blast Off for a few reasons. Inconspicuous was one of the biggest parts, of course, and the other two involved attempting to discover a way to tarpit Grievous. I figured this: If I can get two units into Grievous, and they survive (this is the key here), I can stop Grievous from Disengaging and causing a bad Trained In Your Jedi Arts turn (which I know has to be next). I went to the bag, naturally, hoping to pull a Special Forces. My full ARC squad was exposed to the OOM tank and I really wanted to move them out of where they were. Instead, I pulled a corps token, and went for a move/standby after I realized I couldn’t get a shot on Grievous that seemed worth it. The standby was intended to pass over to the only overwatch unit, my full ARCs, to force his hand with the tank to shoot first rather than recover (which he needed to do so for HE Shells) or aim first. With that said, Josh still went with the tank and took the open shot on my full ARCs dealing three wounds. (Had I had surge tokens around me I would have only taken one) This was a big, big deal. I was able to move them off the stand by out of LOS from the tank but losing the three models really changed the dichotomy of what I needed that squad to do: Zone out Grievous.
I ended up engaging Grievous with R2 and then eventually with Rex. I decided to stick with my “tie up Grievous and he can’t get a good TIJYA off” plan. Josh needed to one shot Rex with Grievous, which is not a crazy thought, but it’s also not as easy as you’d think because Grievous only surges against force users. However, Grievous was able to get the thing done and I continued to lose any advantage I had. I was now on my back foot trying to plan any possible way out.
Round 4
Push vs Trained in Your Jedi Arts
The only “positive” I can say about this is that I started to spread out my Clone ball in round 3 to try and mitigate the damage from TIJYA if I was not able to keep Grievous planted in his spot. However, I was not able to stop the bleeding. Grievous was able to engage a Phase I squad, then killed my nominated ARC model, leaving me susceptible to panic with other units. I decided to disengage Grievous as the only way I thought I could win the game was via killing Grievous. The issue here was I needed to do this while also moving my payload. I knew I could shoot this round but if I didn’t kill Grievous here, he could move and stop me from moving my payload round 5, which was a huge deal. Unfortunately I had one unit panic, which was a full DC-15 squad, and I was unable to do sufficient damage.
Round 5
Assault vs Ambush
Grievous, continuing his complete assault on my Clone army, activated first to move and kill my last remaining ARC sniper, while also being in a prime position to stop me from moving my Payload. We decided to call it here because I would need to shoot Grievous and kill him, and I had no way of getting another unit at range of my Payload to continue to move it. Josh proved to be the winner.
Afterthoughts
I made several mistakes at times, some of them being command card selection. That said I was playing a list strictly skewed to try and kill these damn AATs that have been wreaking havoc on me physically (on my models) and mentally (they live in a space in my brain at this point). I ultimately think the game comes down to the Rex decision and the rolls. Had Rex survived I am fairly certain I would have won the game. I know that’s a bit of a bold statement, but I think it’s fair to say it. I would have slowed Grievous down from getting into my back lines, I would have been able to still get the three pip played, and I would have been able to retreat as much as possible to ensure my payload kept moving. It was arguably one of the closest games I’ve had in a while. Even when Josh started to swing things his direction, we both kept saying we had no idea who would really come out on top. It was a great game with a great friend and I look forward to exacting my revenge on him in the near future. I owe him that much.
Josh’s Perspective
No heavy weapons? No force users? No strike teams? It’s probably a bad list…right? It’s non traditional in the fact that it has none of the aforementioned items and it’s only eight activations. It is not a list of my own creation, all credit goes to my friend Richard Butler (UrzaMagus). I have spent the better half of this year brutalized by it and am currently winless against it. The core concept is heavy offensive firepower at range forces opponents to take more care in hiding their units, which gives Grievous an opportunity to engage and slow your opponent’s ability score. The tanks and the numerous B1s also serve as bodies to block/tarpit your opponent from scoring objectives.
This match is actually a very important matchup for me. Both Zach Barry and Mike Syrylo have been an integral part of my Legion journey and are both great friends of mine now. I don’t get to play Mike often, but Zach in particular has spent this past year beating my lists into the ground. It’s been a learning experience. The Legion Premier League is our first event we’ve played in together and I was able to squeak out a victory with these double tanks against their infamous Rexnobi list. It was important for both pride and points that I take this match too.
Turn Zero – Korobeiniki
Sometimes it’s better to be lucky than it is to be smart. A lot of things went wrong for me here. Zach wildcarded (blasphemy!) into a list to counter mine before the game and he was allowed to choose the map. The new Endor is great for Grievous but absolutely terrible for my tanks. I choose blue player and the battle deck was:
Vaps – Payload – Bombing Run
Major Offensive – Long March – Danger Close
War Weary – Supply Drop – Minefield
I did not like the draw, mostly because of the map. I passed on my first turn because I wanted to see what Zach was doing. Zach removed vaporators, I removed war weary, and Zach passed on his turn. In retrospect, I should have removed war weary to begin with (and possibly from my list completely) but there was no way I was going to eliminate Vaps or MO because Zach’s list was better at both Bombing Run and Danger Close.
The deployment for MO was atrocious. I was forced to deploy the tank on the X-axis or along the Y axis due to the position of impassable terrain. I decided to cram them into the corner on the far left of the deployment zone which created problems. My tanks were angled 45 degrees towards Zach’s deployment zone and my B1s trapped behind the tanks. 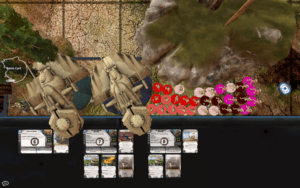
Turn 1 – Unforeseen Consequences
I played: Standing Orders
I thought Zach would play: Standing Orders
Zach actually played: Standing Orders
I won the roll off here, which I desperately need to lose because I was forced to activate Lok early and could only delay it for two activations (I was grid-lok-ed). My first two activations were dodge/stand-bys from B1s. Now I had to activate Lok next because my tank was trapped; otherwise many of my units would be trapped as well. What happened next was key to the entire match. My intention was to move both tanks toward Zach’s corner and into base contact with the downed AT-ST near the center. However I could not find a good angle on any of his units other than a single arc mini and single P1 mini. So I chose instead to move directly towards his board edge on the x-axis and shot the tank. In doing so, this forced my OOM to move away from and around the center and not take any shots. Wasted activations hurt for the OOM-AAT, but this has importance later on. Lok took a net 3 wounds this turn (1 removed by an Arc Wielder) and he dealt no damage in return. Both of our payloads move towards the objective.
Turn 2 – Out of the Frying Pan and Into the Fire
I played: Assault
I thought Zach would play: Take That Clankers or Standing Orders
Zach actually played: Take That Clankers
Well, turn 1 was wasteful. It probably couldn’t get much worse…I started off this turn in semi panic mode. I had perfect activation control and rushed a B1 to a supply drop; searching for a repair. Camouflage and field scanner. Useless. The saber activates next and puts 3 wounds onto Lok. After the threshold roll, Lok is now damaged and essentially stuck in place. I activate Lok and deal 1 damage to an arc mini. Lok is then obliterated by phase Is and the full arcs. Ouch.
Now the positioning of the OOM becomes important here. It continues to swing around towards my opponents deployment zoom and happens to position itself to wipe out an arc strike team. With Lok and the AP shells gone, there was no point in attempting to kill the Saber. Good, equal activation damage, but I’m way behind on points. What this also did was block Zach’s intended vector of approach for R2. This was an unintended consequence. Zach was forced to move R2 in a different direction towards the center of the map or keep him still for the remainder of the game. I grabbed a precision scope with Grievous and put 3 wounds into R2, carefully placing him between LOS blocking terrain of his troops but visible in heavy cover from his tank. I did this because I was less afraid of the damage from the tank than the barrage of dice that comes from a fire support led full arc squad.
Grievous’ movement set off a standby from the overwatch full arcs. However, I positioned Grievous in a way that only 1 mini could see him, so Zach used the standby to move the full arcs in a pincer move around the tree. The general wasn’t in the open, but an easy move-shoot from Zach’s army would put him out of cover. This was a difficult turn to swallow, and I considered conceding. But in order for Zach to remove Lok, he had exposed most of his army. Grievous was now within striking distance and the OOM AAT had eyes on a clone army out of cover. Both payloads move closer to their objective but neither within range 2.
Turn 3 – Down 28-3
I played: Crush Them
I though Zach would play: We’re Not Programmed or Ambush
Zach played: Blast Off
Picking a card here was difficult as I put myself in a poor position. My B1s were not in position for Supreme Commander. Grevious was in range to play “Trained in Your Jedi Arts” and kill Rex, but I anticipated Rex’s 3-pip and Grievous diving would have been suicide. Even worse, if he plays ambush and wins the roll off, Rex can just retreat and his units continue to kite Grievous. I decided to play “Crush Them”, (a severely underrated card, contrary to what a certain podcast might tell you. More on this later). Blast off was a surprise. After talking to Zach, I understood what he was doing. R2 had been cut off and was on 3 wounds. He was not scoring secret mission, but he could at least tie down Grievous while his clones retreated. It’s not what I would have chosen, but I am speaking retrospectively and from the other side.
Zach pulled a corp token from his bag and took a standby. The standby was an interesting play because my Tank was at range 3 and in LOS of the full overwatch ARC squad. My HE shells were down and I could not recover and shoot because of the standby. I fired the main gun into the open arcs for four hits. The ARCs rolled Block-Surge-Surge-Blank. No surges to spend. Excellent. Grievous took a shot from a phase 1 squad and used a surge to save.
R2 and Rex made their way into base contact with Grievous, which caught me off guard. I figured R2 was going for the lockdown, but I hadn’t considered Rex diving. Because of “blast off”, R2 was inconspicuous and I had to swing everything at Rex. Rex had no surges, but even with pierce 2, I wasn’t confident of getting the kill here. If Rex lives, I won’t be able to disengage next round without burning an action to kill either r2 or Rex. It would be another round with a poor Grievous 1 pip AND he still had Rex’s 3 pip. So I aimed and swung with a result of 7 hits and one surge after reroll (remember that extra surge from Crush Them). Rex was unable to make the saves to stay alive. I’m starting to feel back in the game. Both payloads moved with mine making it into range 2 of the objective. 1-0 me.
Turn 4 – Here Comes the General
I Played: Trained in Your Jedi Arts
I thought Zach would play: Ambush
Zach Played: Push
I’m guessing at this point Zach has Call Me Captain instead of Ambush, but I’m not sure yet. Grievous was engaged with R2 which meant he was out of range of the rest of Zach’s army. I moved towards Zach’s phase I squad in the open, grabbed a Holoprojector, and engaged with the Phase 1 squad. I decided to only swing one saber at the clones and shoot R2 (versatile is so good!). R2 popped and the phase 1 squad lost 3 minis. Grievous spun his sabers mostly dealing suppression to the other units but removed 1 more mini from the phase 1 squad. Zach disengaged with the phase 1 squad and I was able to remove the newly promoted full arc squad. This caused one of the other phase 1 squads to panic and the clone line started to break. Meanwhile, Grievous took 3 wounds from various sources. Both of our payloads moved, his into range 2 and mine into range 1. 2-1 me.
Turn 5 – Edge Guarding
I played: Ambush
I thought Zach would play: Ambush
Zach Played: Assault
My strategy remained the same for Grievous during this turn: remove as many activations as possible and stop his payload from moving. As long as I could move my payload this turn, I would reach the designated terrain piece. Zach would not make it until Turn 6. Ambush allowed me to remove the final arc strike team near the payload and added another suppression to the panicking phase 1 unit. Zach made one last push to kill Grievous with his tank, but was unable to finish the job. With that, he would be unable to move the payload into base contact with the designated terrain and the match was called.
Looking Back:
This was a roller coaster of a game. A lot of things went poorly for me in the beginning and success seemed out of reach. But Grievous was able to take advantage of the terrain. It, while served ill to the AATs, was befitted for him. I think the game was decided on a very pivotal turn 3. Even though Rex died, the match was not mine for the taking. It was pretty even which made it both fun to play and write about. If I was to change anything, I might reconsider some of the cards in my battle deck. I definitely eliminate war weary instead of passing and maybe I also pick the other side of the board. Most importantly, I don’t box my AATs in. If I had been able to freely move the OOM-AAT, I could have easily delayed Lok’s activation; therefore saving him. But, at the end of the day a little bit of luck helped me through,
Speaking of Turn Zero, I recently started a round table discussion called “turn zero” in the Legion Discord. Each week, we take two lists and walk through turn zero together on a sample map. It’s been quite informative so far and has helped to expand my gameplay by absorbing other players’ thoughts. Even if you don’t contribute, it’s worth taking a look at. Thanks for reading!
Joshua Devera, O.D. – Peregrine

