

The Road to Worlds – Part VIII – Icarus
Welcome back to the Road to Worlds!
In my last article we went over my list for Invader league Single Eliminations – the ARCstar. Today we’re going to talk about how Single Eliminations went (Spoilers: It went well) and break down the finals match between myself and Luke Cook from my perspective as a player. I’m writing this the day after it happened so my decision trees are still pretty fresh.
Single Elimination Summary
To start – we made the finals with ARCstar and we had to fight through some very good players to get there. Let’s take a quick look at the list again:
The ARCstar
795/800 (10 activations)
Commanders:
– Captain Rex (90): Aggressive Tactics (10), Recon Intel (2) = 102
Operatives:
– R2-D2 (35) + C-3PO (15): = 50
Corps:
– 3× Phase II Clone Troopers (60): Z-6 Trooper (27), Overwatch (4) = 273
– 2× Phase I Clone Troopers (52) = 104
Special Forces:
– 2× ARC Troopers (72): DC-15x ARC Trooper (31), Overwatch (4) = 214
– ARC Troopers Strike Team (21): DC-15x ARC Trooper (31) = 52
My match ups throughout single eliminations were not exactly super diverse but were very competitive:
- Round 1 – Neferidian(Republic) – Playing Kenobi Padme Gunline
- Round 2 – Xiconia(Rebel) – Playing Leia Chewie Triple Tauns
- Round 3 – Stevens(Republic) – Playing Rexstar
- Round 4 – Floorf The Dwarf(Rebel) – Playing Cassian K2 Triple Tauns
- Round 5 – Kingsley(Republic) – Playing ARCstar variant
- Round 6 – Luke Cook(Republic) – Playing Rexstar
At the end of this – I feel pretty confident in stating that standby sharing has killed Taun Taun lists pretty well, at least without Cassian involved. I think there might be something there with a Leia Cassian build where you focus heavily on ranged firepower outside the Taun Tauns and give up some activations to do so. However I think it’s likely still a disadvantaged matchup in the current meta. My matchup vs Xiconia ended up being pretty close due to the fact that I made some missteps with how I deployed (I deployed to table him instead of focusing on the objective) and I almost paid dearly for it. My game vs Xiconia was probably the closest game I had all season outside of the finals.
You can watch it on Endless’ twitch.tv/Yavinbase
My round 1,3-5 games did not go beyond turn 4. ARCstar can be devastating – once it starts winning it’s very hard for your opponent to come back from it.
Why is that?
ARCstar does something fundamentally different than Rexstar – It often funnels its standbys through significantly more powerful units that ignore cover and have pierce. This makes your shots even more consistent than Standby shots off Z6s. Additionally it allows you to project additional standby bubbles.
So Mike, which is better? I’m going to be up front with you before we get into the matchup between myself and Luke Cook – I still don’t know. I think they have different strengths and operate quite differently once you get into the intricacies of either list. Let’s get into it:
Luke Cook vs Mike Barry
Streamed on TurnSixCrits hosted by Tai and Cohosted by Endless. Darqueling also contributed significantly to stream preparation. http://twitch.tv/turnsixcrits
The Board – Mustafar (Constructed by Ellis)
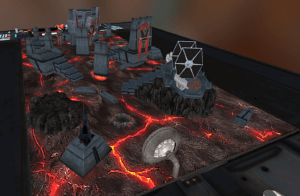
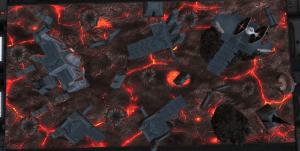
The board was basically all heavy cover with the exception of the blast craters placed sporadically around the map.
Turn Zero
I chose Blue player as I had the bid. I chose the north table side as it had more deployment zones that could utilize the large line of sight blocker on the western side of the table (The large wall statue with a Sith Lord’s face on it). My deployment strategy was to get a deployment that would allow me to use it well.
The battle cards fell as follows:
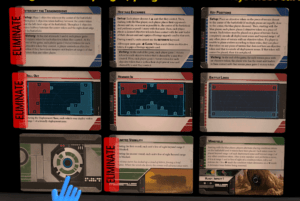
The card face down here is Fortified Positions.
Minor Aside: I don’t think my Battle deck was optimized, I would make some changes to it based on how Invader League went next time – but we can talk about that another time.
My thought process seeing the cards before bans: I thought Roll out was good for me because it actively allowed me to use the LOS block I referred to earlier. I also wanted Limited Visibility to shut down Luke’s Snipers (my snipers do less Sniping at high ranges). I made a significant miscalculation here however when it came to objectives – I looked at them and thought “Ok, I’m happy with any of these”. The fact is though that KP and Intercept both favored Luke based on the proximity to deployment. My optimal setup should have been Hostage Exchange, Roll Out, Limited Visibility. However at the outset I decided that it was Any Objective, Roll Out, Limited Visibility.
This is how it played out:
Blue: Pass (I believe this was a mistake, and it likely should have been a ban of Intercept)
Red: Pass
Blue: Ban Fortified Positions – this forces Luke to Choose between Rollout (Which gives me my LOS block instead of giving it to him with Hemmed In) and Limited Visibility which I believe is also bad for him.
Red: Ban Limited Visibility
We ended up with Intercept, Roll Out, Minefield. I think Minefield ended up being mostly better for me – He detonated 3 of 4 mines and the fourth mine never detonated and didnt come into significant play. But it was mostly just a nuisance to Luke. The combination of Intercept and Roll Out ended up being much worse than I had expected it to be – my lane/ approach vector was poor. I realized this midway through deployment and chose to take an aggressive Standby Strategy to leverage the fact that I was going to have to be moving in the open.
Overall – I think Turn Zero ended up being a bit of a train wreck for me – I misjudged what the actual battlefield condition was going to be. To Luke’s credit he definitely identified the proper sequence to put him in a good position in the ban phase. I actually think this is likely Luke’s greatest strength in playing – he is a bit of a wizard at making sure Turn Zero goes well for him.
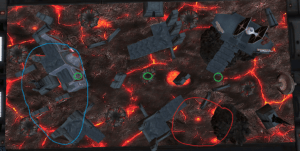
Our deployment zone basically looked like this. (My deployment is Blue, Luke’s red, Green are the approximate intercept points)

The crux of my “aggressive” strategy was to stick a phase II out and project a range 3 zone that Luke would stay away from while my Arcs softened up his overwatch squads. This involved a move standby from a phase I squad as one of my first activations followed by a double move from a Phase II. This looked a bit like this:
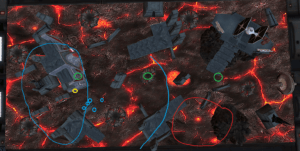
They yellow circle here is approximately where one of my phase I models was standing with a standby, while the blue circles were my phase II squad. The forward blue line that is arcing is their approximate standby range. This allowed me to hedge Luke out of moving up aggressively outside of a Take that Clankers shot and forced him into taking some awkwardly positioned shots. I was able to leverage this in scoping two of his z6s out of his standby squads with my Full Arc units. The first four turns were basically us fighting back and forth over this position, with neither player scoring the middle objective on turns 2 or 4. I had hoped I would be able to put enough hurt on him that he’d be in a poor position to contest the middle point. However I definitely was losing the attrition battle and at the start of turn 5 I had lost all of my Phase IIs trying to hold this position. It’s possible that I should have been trying to hold it with a Full ARC, however Luke was playing smart enough that I don’t think this would have been terribly effective.
In the middle of turn 4 I came to the conclusion that I was just going to have to take my shot and aggressively push without thought of the consequences. I was down 2-3 activations and I had to put more pressure on him then I was. So I started aggressively pushing with my remaining ARC squads (A full strike team, a squad of 3 and a squad of 4) and both my phase I units. For the Phase Is, double moving was the order of the day, I couldnt chance them getting suppressed and not making the zone on turn 6, so I made sure they were as close as possible to the zone. At the end of turn 5 I had 6 units that could contest the zone and most could also shoot. (R2 was going to hold my back point)
I was able to open with a few move shoots here that definitely got put me in a place where I certainly had a chance of winning. My defense dice were not cooperating though and Luke was able to pile on a few shared dodge tokens. The last activation of the game was my Rex moving up and then shooting – he had to kill 2 of Luke’s units by himself – which was certainly possible, but not super probable. His targets were both 2 man teams in heavy cover plus dodges so I had to push 4 crits through minimum, 2 on each squad – I had 2 aim tokens available but it didn’t fit the bill, I ended up only rolling 1 crit on 10 dice. The middle went 5-4 unit leaders in Lukes favor.
I definitely made a few mistakes (mostly in turn zero – there was also a point where I didnt reroll some dice into a dodge token that I wasnt thinking about – but I think it was unlikely to have mattered)
He got me at LVO and he got me in Invader, maybe the third time is the charm?
Sometimes you just fly too close to the Son. What have you done to us Chris Cook!
That’s going to be it for me until next time – I hope you’ve enjoyed this brief breakdown of what I was thinking during the match and how I approached it.
Until next time –
May the Dark Side be with you, Always
Icarus (Mike Barry/Dashz)

