
In this article we’ll take a high level look at each of the Objectives for Star Wars: Legion. We’ll examine what units or builds are strong choices for each objective and which are weak, and how to approach each objective with the units you have.
We’ll also (briefly) take a look at the previewed new panic timing rule and speculate a bit on how it will change how you should handle objectives.
Overview
Games of Star Wars: Legion are quite literally won or lost on objectives. The player that scores the most victory points wins; and the objectives tell you how those points are scored. Of course if you tie it goes to kill points, but you have to actually force the tie first to get there. Objectives therefore dictate game flow (we’ll talk about that in a minute). There’s always the option to win by tabling your opponent as well… but that tends to be very rare and difficult in competitive games (and usually results from a game state that would have led the tabled player to lose on objectives anyway).
Game Flow
There are lots of terms for this concept, but I think of it as who is in the driver’s seat. At any given time in the game, the status quo is more acceptable to one player than the other; if things proceed more or less as you expect them to, one player is going to be more likely to win than the other. It is generally on one player to make something happen and change that status quo, and on the other to preserve it. This difference could be extremely subtle (and usually is) but is nonetheless meaningful.
Even at the very start of the game, when no one has scored any points, this dynamic is likely to be present. Perhaps one player has speeder units and the other doesn’t, and you are playing Bombing Run. Perhaps you are playing Sabotage the Moisture Vaporators and blue player has a very defensive focused build with lots of long range firepower. This is a huge reason why turn zero (pre-game card vetoes) is so important. This process of jostling for small advantages via battle card selection is one of my favorite parts about Legion and the best way to select objectives of any miniatures game I’ve played.
Activations
Activations score objectives. Sometimes this is true in the most literal sense, with objectives that count units leaders in a specific spot; Breakthrough (deployment zone), Intercept (near objectives), Key Positions (touching objectives), Payload (near the Payloads). Other times it requires unit leaders to do specific things (Sabotage, Recover, Hostage). The latter are generally referred to as objectives that require “thumbs,” or trooper units that can perform objective actions (excludes creature troopers and emplacement troopers). Objectives that require thumbs are generally more favorable to lower activation lists than those that are straight counting objectives.
This doesn’t mean you should just spam as many activations as possible; there is a reason 14 and 15 activation lists aren’t good, even though they technically fit into 800 points. You need good units. What it does mean is that you need to assess in a given game how your activation differential (if there is one) affects your win chance. It also means you should probably have a certain number of activations (10 is my personal threshold) if you are running a lot of “counting” objectives in your deck. The new pass rule helps lower activation lists a bit with activation timing, though it doesn’t change the fact that you still need unit leaders present for the “counting” objectives.
Extra VPs
Two keywords allow you to score victory points outside the normal objective card structure: Bounty and Secret Mission. As it is very common for victory points from objective cards to tie in competitive games, you’ll need to assess how these keywords affect the status quo if you or your opponent has them.
A note on Panic
Don’t panic. Or do. AMG previewed some big changes to the suppression rules in December, which will be in the new core rulebook (CRB) released on January 16th. Check out Evan’s article on the subject for the full preview and reaction.
For the purposes of objectives, the relevant bits are these. First, if a unit is in “panicked” state, it effectively does not exist for objectives. It doesn’t count as a unit leader for “counting objectives” like Breakthrough, Key Positions, and Intercept, and any objectives it is holding (like a box or hostage) are worthless (note this does not necessarily make them eligible to be picked up by another unit!). Secondly, the “panicked” state is checked constantly and no longer linked to a unit’s rally step, meaning any time a unit has suppression tokens equal to double its courage it counts as panicked for objective purposes. Though you (hopefully) still get to use your commander’s courage and you probably also still get to remove one suppression at the end of the round, this makes units potentially very vulnerable to getting rendered worthless for objective purposes in between that window when they have activated and the end of a scoring turn. The bar for panicking a unit during this window is much lower than doing so normally, since they won’t get to rally or use abilities like Indomitable to remove this suppression. Effectively, it becomes a math problem (if you have a Courage 2 unit/commander, the number is five, for example, unless you also have Inspire). Suppression was always effective in objective play (limiting actions to prevent moves, panicking units and forcing them to run away from scoring zones or drop objectives). It’s hard to say exactly how this will play out, but it introduces a bit of an additional suppression mini-game on scoring turns, where you have to be careful about activating important scoring units early least they open themselves up to your opponent solving that math problem after they’ve gone and don’t have a chance to clear their suppression.
There are a couple of objectives that are not affected at all by this change: Bombing Run (since holding an objective has no inherent value anyway and a unit panicking after its rally step would always drop them) and Sabotage the Moisture Vaporators, since a unit interacts with the objective during its activation. The jury is out on Payload, which technically doesn’t seem affected by the wording of the new rule, but it seems like it would be in the spirit of it for panicked units to not be eligible to push the payload, either.
I won’t hit the panic changes in detail for each objective below, simply because the change is still merely previewed and we won’t know exactly how it’s going to effect each in terms of overall strategy until we get our hands on it.
Objective Cards
Lets dive straight in. For each objective card we’ll look at which units are strong and which are weak, as well as deployments you should be selecting if you want to run a given objective. We’ll also briefly discuss how you should approach each objective.
Deployments
You’ll notice certain groups of deployments tend to go together. Basically you have long edge to long edge deployments, where you deploy along the longer 6′ edge of the table (Battle Lines, Danger Close, Disarray, Hemmed In). You also have short edge to short edge deployments (Long March, Roll Out) and diagonal deployments (Major Offensive, Advanced Positions). Generally, objectives that require movement (and therefore lists that are good at moving) want long edge to long edge deployments, while objectives that involve controlling an area (and therefore lists that want to try and do the same) favor short edge to short edge or diagonal deployments.
Hemmed In deserves special mention here; Blue Player starts almost on top of the middle of the table, which is going to give them an advantage on a lot of objectives. However, many tables are not set up to give the area occupied by blue player useful terrain for line of sight blocking and cover (as terrain layouts tend to bias towards the diagonals or short edges). Even though Hemmed In is listed as a good blue player deployment for most objectives, make sure you take a careful look at the map to see where you’ll actually end up relative to cover and blockers. I sometimes exclude Hemmed In if I have some apprehension about what the tables are going to look like at a given tournament.
Core Set
These objectives come in the Core Set (both Galactic Civil War and Clone Wars) as well as the Essentials Kit.
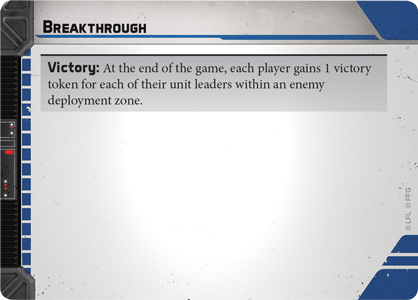
Breakthrough
Strong units: Speeders, Creature Troopers, Vehicles, Mobile trooper units (like Mandalorians)
Weak units: Most small-base trooper units (most “normal” trooper units that lack mobility keywords like Jump or Scale and/or aren’t speed 3)
Good deployments: Hemmed In (as blue), Battle Lines, Danger Close, Advanced Positions
Bad Deployments: Long March, Roll Out
Breakthrough is a counting objective and therefore tends to favor lists that run higher activation counts. It also is a mobility objective, in that it requires moving units to a specific spot, one that tends to be quite far from where they start (your opponent’s deployment zone). Lastly, it is an objective that doesn’t require any “thumbs” and that vehicles can score.
The first thing you need to look at with Breakthrough is your activation differential and the deployment. You need to assess how difficult it is going to be to score, and how difficult it will be for your opponent to score. Generally speaking, if your list is not mobile (a trooper list) you need to get moving as quickly as possible. If you have things like speeders or creature troopers, you can usually afford to hang back a bit and poke at your opponent’s activations, since your fast units can “dive” into the end zone at the last minute if necessary to score. An alternative approach for a static/defensive list is simply to defend your end zone and hope to win a 0-0 VP tie on kill points, but this can be very risky (as 1-0 means you lose, even if you kill most of your opponent’s units) and tends to generally only work on the short edge to short edge deployments where your zone is smaller and harder to flank.
On some deployments (particularly Disarray, but also Battle Lines and Danger Close) Breakthrough can lead to a “toilet bowl” situation where both players’ units sort of just pass each other on opposite sides of the table in an attempt to move to the end zone. You’ll need to assess how many activations you have and whether you are red or blue (if you have equal activations this situation is going to favor blue) to see if a “toilet bowl” situation is going to be in your interest or not.
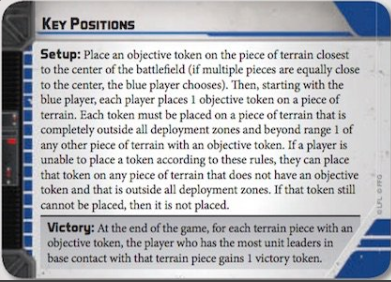
Key Positions
Strong Units: Force users, Vehicles
Weak Units: None, really. Everything is at least decently useful at KP.
Good Deployments: Hemmed In (as blue)
Bad Deployments: None
Key Positions might be the most “neutral” objective in the game, in that nothing is particularly bad at it. It does require unit leaders to get to a specific spot, but unlike Breakthrough, the most important objective (generally) is the middle, which is much closer and more accessible to slower units than your opponent’s deployment zone. Slower/more fragile units can also be used to score your “home” objective, which is going to be the one closest to your zone (somebody has to do that after all). Disarray and Battle Lines are a bit unique here in that there sometimes is no “home” objective for either player, though terrain tends to cause players to focus on one table half or another on those deployments and you end up getting one anyway.
Force users and vehicles are both slightly better than normal units at Key Positions; it is an area control objective, and force users excel at controlling a specific area. Vehicles can be used to displace units off the objective or block them from approaching it. Be mindful of your ability to score if you have these units.
Besides being a “counting” objective, Key Positions is also an end game scoring objective. In practice this means you need to assess whether you need to try and poke at activations before turn six to even the odds; it also means you need to position yourself to score in a way that doesn’t risk your units too early, but also doesn’t leave you too far that you can’t score with enough of them. Bear in mind that it is generally better on turn six to be able to just move once (or not at all) to score instead of twice with a given unit; this gives you more options in case your units get suppressed and also provides the opportunity to move and attack instead of having to double move, which can make a big difference on the final turn. Often this leads to a bit of a cat and mouse game around the center objective where players vie for position while trying to weaken their opponent’s units until the last minute when both players push.
Intercept the Transmissions

Strong Units: Long Range units, Creature Troopers
Weak Units: None
Good Deployments: Hemmed In (as blue), Major Offensive, Advanced Positions
Bad Deployments: None
Intercept the Transmissions is also a fairly neutral objective in that nearly all types of units are useful in some capacity. Even vehicles tend to either be good at zoning from long range (heavies) or threatening your opponent’s home objective (speeders).
Unlike Key Positions, Intercept scores throughout the game and therefore is technically not an end game scoring objective. Units need to get to the zone and stay there to score (at least on specific turns) which makes units that can zone with long range firepower particularly useful. If your opponent tries to score the middle objective early, you want to be able to punish them for it.
Note that I said Intercept is technically not an end game scoring objective. However, on the final turn, each objective is worth two points instead of one. Lets assume each player scores their home objective each time throughout the game (on Battle Lines and Disarray, as with Key Positions, you might not have a home objective). If one player scores the middle objective on turns two and four, and the other player scores the middle on turn six, the final score will be tied at 6-6, with the result going to kill points. Often I have seen players try and flood the middle with units to score on the early turns, only to have those units die and their opponent occupy the objective on turn six, with the latter winning on kill points. Generally this means two things: 1) don’t sacrifice positioning or activations just to score the middle, and 2) be mindful of extra VP keywords (Bounty and Secret Mission) as Intercept can actually tie a lot more often than you think.
Recover the Supplies

Strong Units: Fast trooper units with thumbs, Infiltrators, Darth Maul (yeah I’m listing him separately)
Weak Units: Vehicles, slow trooper units
Good Deployments: Long March (if you have infiltrators), Hemmed In, Advanced Positions, Major Offensive, Battle Lines, Danger Close
Bad Deployments: Long March (if you don’t have infiltrators)
Recover the Supplies is all about the boxes, and more specifically often all about the center box. This can be deployment dependent (you can often threaten your opponent’s “safe” boxes with the right deployment or units). Units that can get in quickly, grab a box, and get out are going to be the stars here. Mandalorians and Force Users are both exceptional at Recover, as they tend to have mobility keywords like Jump and higher speed (whether that’s native Speed 3 or Burst of Speed) while being generally more durable than most trooper units. If you include this in your deck and you have a Mandalorian, make sure you give them Recon Intel as this allows you to threaten the center box on Turn 1 on most deployments.
Let’s talk about Darth Maul. Juyo Mastery allows him to double move and then grab the box, or grab the box and then double move afterwards. Shadow Collective’s version of Maul also can have Cunning, which is extra silly on Recover as it allows you to almost guarantee that combo with a last/first (going last on one turn to grab the box and then first on the next to escape). If your opponent has Maul and you don’t, you want to very seriously consider whether you should be playing Recover or not, even if you have Boba Fett or another unit that is notionally good on it. They aren’t as good as Maul.
Priority Supplies
This objective card comes in the Priority Supplies expansion. It also comes in the Essentials Kit, though you won’t get the plastic objective markers (the boxes, vaps, and intercept points) if that is something you care about. Technically you can just use objective tokens for both of them.
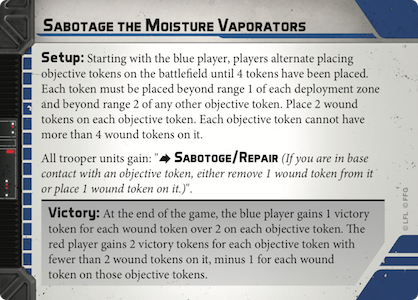
Sabotage the Moisture Vaporators
Strong Units: Long Range units, defensive units, Infiltrators, Force Users
Weak Units: Aggressive units without thumbs (Speeder bikes and creature troopers specifically)
Good Deployments: Roll Out, Major Offensive, Advanced Positions, Hemmed In (as red)
Bad Deployments: Battle Lines, Disarray, Hemmed In (as blue, yes really)
Sabotage is generally a defensive objective for blue player and an offensive one for red player. This is because it is often possible to place your Vaps in relatively safe locations where they can be fully Sabotaged (or Repaired). This would result in a 4-4 tie at the end of the game if both players did this, with Blue Player winning the kill point tiebreak (if nothing died). This means red player at minimum has to pick off an activation to swing the status quo in their favor, which puts the onus on them to do something. This is one reason speeder bikes and creature troopers tend to be bad at Vaps; while they are good at picking off weak activations, they often die in the process and that’s not going to be a favorable trade for you.
Of course, you might not always have safe locations to put your Vaps. This happens all the time on Hemmed In as blue; blue player starts essentially in the middle of the map, and red player is going to be able to zone and threaten your vaps from the word go. I usually exclude Hemmed In if I have Sabotage in my deck. This can also happen with Long March sometimes, where the thick zones tend to push your vap placements towards the center of the map. Obviously in the latter case it is very map dependent (sometimes there are useful line of sight blockers that are just beyond Range 1 of your zone that you can place Vaps behind).
Force Users and Infiltrators can often throw the kill points part of this dance out the window and directly threaten your opponent’s Vaporators.
Vital Assets
These objective cards come in the Vital Assets expansion. I don’t care what people say, I love the Vital Assets objectives. I see you Zach.
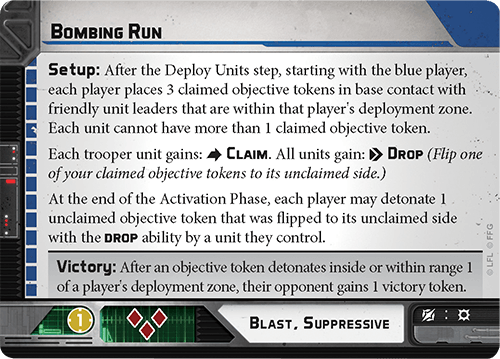
Bombing Run
Strong units: Speeders, Creature Troopers, Vehicles, Mobile trooper units (like Mandalorians)
Weak units: Most small-base trooper units (most “normal” trooper units that lack mobility keywords like Jump or Scale and/or aren’t speed 3)
Good deployments: Hemmed In (as blue), Battle Lines, Danger Close, Advanced Positions
Bad Deployments: Long March, Roll Out
I’m not going to lie, I straight up copied the above section from the Breakthrough entry.
Bombing Run, as you might expect, plays very similar to Breakthrough. It requires delivering objective tokens to your opponent’s deployment zone (or close enough). Of course, they aren’t ordinary objective tokens. They explode. Rather spectacularly.
The other primary difference from Breakthrough is Bombing Run is not a “counting objective” (you get three bombs no matter your activation count) and it isn’t an end game scoring objective. That latter part is especially relevant, because you can only detonate one bomb per turn.
The advantages speeders have on Breakthrough are even more emphasized on Bombing Run. Because of how far they move (usually more than Range 4 with a triple move) they can often score a bomb on the last activation of a turn and blow a bunch of units up in the process. There is one nuance here to be aware of: you cannot drop a bomb after an end-of-turn compulsory move (since the bomb drop is an action, albeit a free one, your window to do actions would be passed after an end-of-turn compulsory move). Also relevant; you cannot displace units with repulsors except on their compulsory move. Basically this means if you want to triple move and drop a bomb with a speeder, you have to make sure your path is clear on the last move.
If you have a trooper based list and you are somehow forced to play Bombing Run, you need to get moving as quickly as possible, because you need to drop your first bomb by Turn 4 at the latest.
Also note that a unit must start the game completely within your deployment zone to be eligible to start with a bomb. I have seen this trip people up on Advanced Positions or Roll Out where players move their units out with scout moves or deploy them out of the zone when they want them to be carrying bombs.
Hostage Exchange

Strong Units: Force Users, Beefy corps units (if you have one to use as a hostage)
Weak Units: None
Good Deployments: Hemmed In (as Blue), Major Offensive, Advanced Positions, Battle Lines, Danger Close
Bad Deployments: Long March
Hostage Exchange is all about the force users. Force users can relocate opposing units via various means (Force Push, command cards) and Dark Side force users can use Force Choke to cause single wound trooper models to drop the hostage. Generally you want to avoid this objective unless you have a force user.
Command cards and abilities that allow extra moves (No Time for Sorrows, Smoke Screen, Guidance, Pull the Strings) can also be very useful on Hostage to get your Hostage away more quickly.
Though your Hostage unit can technically shoot, it is best not to get greedy and take unnecessary shots with them. Generally they need to be double moving to safety as often as possible.
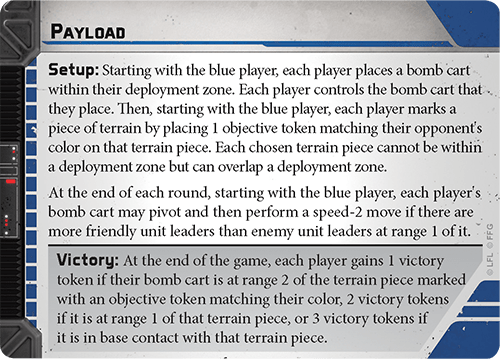
Payload
Strong Units: Force Users, Vehicles
Weak Units: Units that don’t like to move
Good Deployments: Hemmed In (as blue)
Bad Deployments: Hemmed In (as red)
Hemmed In gets special mention here, because it’s absolutely brutal for Red, given all the open space that Blue has to choose from opposite Red’s payload location and the fact that Blue’s payload starts in the middle of the map. If you are red player you should basically never play Payload on Hemmed In (and you have the last veto so that should be entirely avoidable).
Payload is basically a hybrid of a mobile and control objective. It’s an area control objective, but the area moves over time (albeit slowly). Generally you want to focus on freezing your opponent’s payload when it’s practical to do so; if you can freeze it even once that is often enough to make the difference. Vehicles are useful here as they can score it and sometimes also block your opponent’s units from trying to reach a payload.
Closing
Objectives are literally the key to Star Wars: Legion. Understanding their nuances and how your list handles certain objectives is critical to formulating your game plan and ultimately how you are going to win a given game.


7 Responses
Great article! New players surely will enjoy it! I think another useful article will be the objective/condition article.
Great read! Your section on Game Flow reminds me of a well known Magic: The Gathering theory article called “Who’s The Beatdown”. It’s essentially the same concept of one player needing to take action in order to avoid the other player’s inevitability, and how identifying which role you are at each point in the game should inform how much risk you need to take at that moment.
Hah exactly… I actually remember writing about this. It’s in the Count Dooku article under “Getting Dooku Involved.” We also did a podcast episode on it awhile ago.
For bombing run you mention speeders being able to deliver a bomb. Since only troopers can “claim” the bomb, but friendly unit leaders can start with the bomb at the beginning of the game, does this mean the only way for a speeder (repulsor vehicle) to deliver the bomb is to have started the game with the bomb in its possession?
Yep, for vehicles to deliver bombs they have to start the game with them.
Awesome, thanks.
This is a fantastic article, maybe my favorite that I’ve read on the site. This is so so soooo helpful!!!