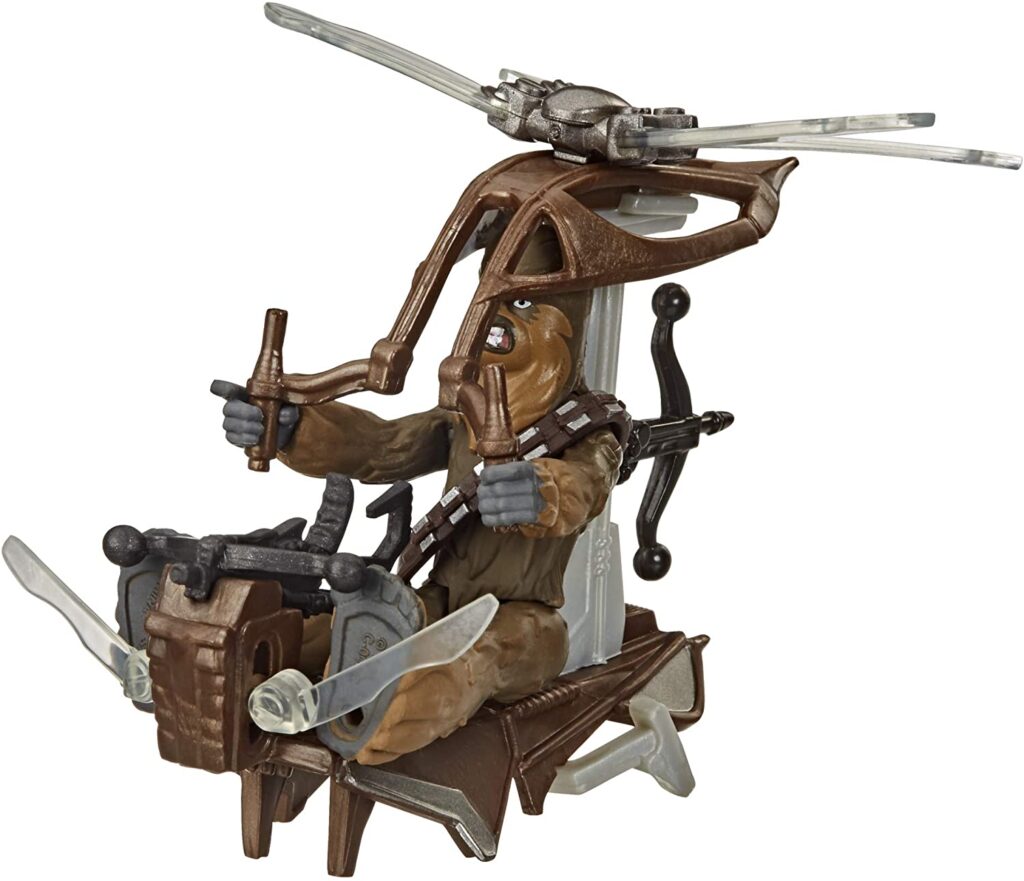

“What if a helicopter shot out of its butt?”
This is where I imagined the sales pitch usually started for Appazanna Engineering Works™ when trying to land a sale of the Raddaugh Gnasp Fluttercraft to a small-town (tree) Chieftain known as Graysharwaroo. I picture the sales rep as a late-middle-aged but handsome Wookiee, a retired Army officer who has a way with words (growls?) wearing aviators and a formal suit (sash). He normally speaks a more erudite form of Shyriiwook but he chooses now to use a more local accent while speaking to the local leader, who has the final say on the tree’s budget allocation. “You can use this bad boy to patrol the streets (branches) from the safety of the air and the pilot ain’t even got to spend any time aimin’! Just fly past ’em and let yer best shooters take care of business. Heck G-Wook, I heard about how well you can shoot if it was you up there I’d bet you’d only need one ‘and, well…then I’d be in trouble HEH HEH HEH!” Everyone laughed as the waiter brought another round of drinks, and Graysharwaroo was quite pleased with the compliment. He bought 20 units that night, to patrol a tree of only 500 Wookiees.
The Fluttercraft is quite simply a nuanced but powerful vehicle that benefits from practice and carefully executed tactics. It had its strengths on its own, but two shifts in the game (the introduction of the Wookiee Defenders battle force and the rules change of Legion 2.6) have made it even better. As a bonus, the model itself is amazing and allows you to get a lot of basing in just like the T-47. Readers with young children could even build it with them, and then let them play with it like a regular toy. When it inevitably breaks after 30 seconds it will bestow upon them an important life lesson about the fragility of the things we love.
A quick note about modeling!
The number one complaint I hear about this thing is its fragility. On podcasts and around town I hear the same thing. “Gosh they’re so spindly!!! I can’t take them to a tournament!”
WRONG! JUST MAGNETIZE! HERE’S WHAT TO DO!
- Buy magnets
- After the propellers have been assembled, CUT OFF the little nubbin on the bottom that’s supposed to fit into the slot on top of the body. ADD A MAGNET
- After the body is constructed, ADD A MAGNET TO THE TOP, then, you guessed it, ADD A MAGNET TO THE BOTTOM WHERE THE BODY FITS ONTO THE PLASTIC STAND
- Glue the plastic stand to the base, then…PUT A MAGNET ON IT.
Check out my store champs winning army below. All three of those bad boys are double magnetized (propellers-body and stand-body) and they got around fine, it also allowed me do sweet rotations with em during the game. It takes five minutes, I’m tellin ya…DO IT!
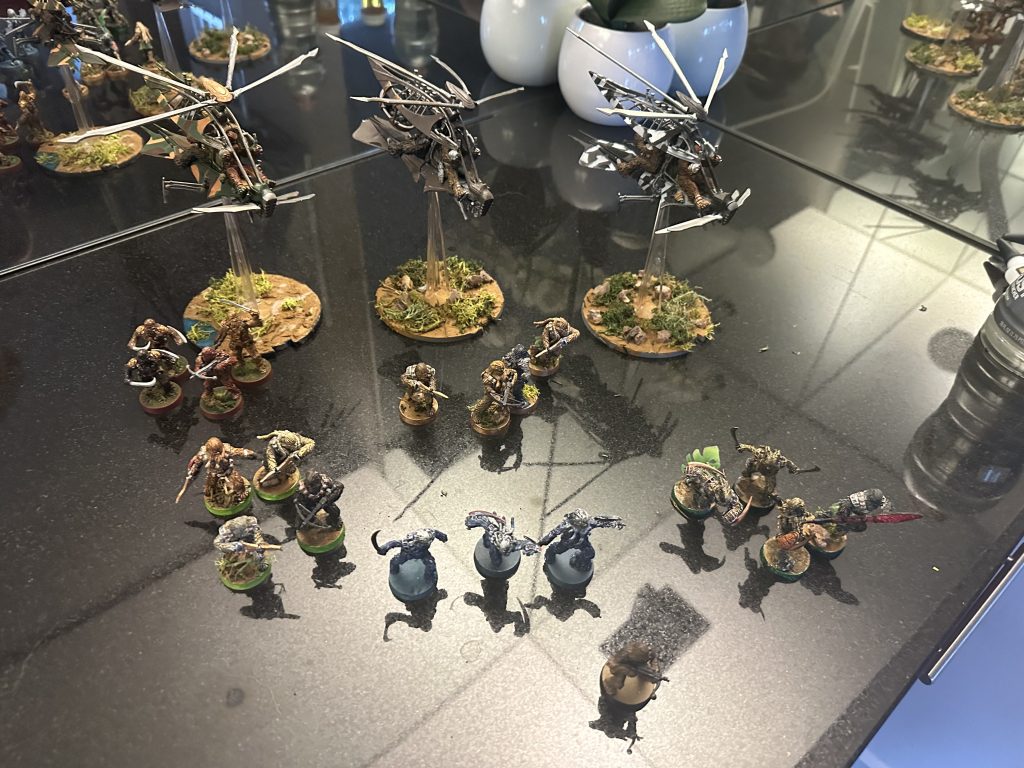
My boys, and their Wookiee friends. Yes the blue ones are ghosts, I painted them on Halloween leave me alone.
Overview
Strengths:
- With Reposition, a large base, and Speeder 2, can get from point A to point B with ease
- Is tall enough to see just about everyone
- Both variants are a reliable way to kill units that are separated from the rest, and the Gunner is the best fire support platform under 100 points
- Ain’t exactly competing with rock stars in the GAR support slot
- It’s the only vehicle in the game that will ever have heavy cover again aside speeders with a Rebel pilot (Outer Rim Speed Jockey) that never sees play
Weaknesses:
- 6 wounds with Rebel (yuck) saves and a resilience of 3
- Is tall enough to be seen by just about everyone AND their mama
- The Bowcaster has to show its Forest Moon to shoot AND the Bomber can be difficult to line up the right attacks
- Both really want face-ups, which for vehicles are in short supply in this faction
Let’s get one thing straight: I’m not going to pretend that there’s a real use for a naked or jammer-only Fluttercraft when the BARC is the same cost. We’re going to cover the Crew upgrades (the “Gunner” and the “Bomber” for short) as if they were two different vehicles because they are in every respect except for two things. The first is HOW they move. Pretty much everyone by now is familiar with the speed (unmatched) and relative freedom of the T-47 but the Fluttercraft is nearly as fast and FAR more maneuverable. The addition of 90 degrees of rotation to the beginning or end of every move is a literal game-changer. If you wanna be “there” the Gnasp can nearly always get you there. Whether or not you’re still there the next turn…well, that gets to the other thing they share.
Only as fast as an X-34, but it clearing height 2 and reposition go a long way. Also, the battle force version IS as fast as the T-47 but much more maneuverable.
In Legion 2.6 this speed is even more meaningful since vehicles always count for Primary Objective scoring. This means that in maps that lead to deployments that are more spread out (like Recover the Research or Shifting Priorities) these bad boys can close distance fast and cause significant shifts in VP-scoring for a round at the drop of a hat.
While it’s speedy and does get Cover 2, it can still die in a hurry with its 6 health behind white surging saves. For this reason, the placement and general staging area for your Fluttercraft should usually be your opponent’s weak flank so you can shoot at the stragglers without being shot back. As we get into the separate Crew slots, we’ll need to keep their shared fragility in mind; the Gunner needs to work hard to make attacks that don’t expose it more than necessary and the Bomber needs to pick its moment to dive in carefully. Both also depend quite a bit on order control, an unfortunate consequence with only a few answers.
Wookie Defender Battle Force’s “Attack Craft”
If you’re running the Wookiee Battle Force then there’s zero reason to take the “normal” Fluttercraft, this one has Attack Run which lets it slow down to speed 1 or, more importantly, speed up to 3! This additional option really made the argument to consider buying this unit a lot stronger.
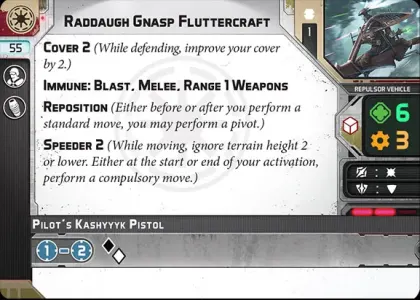
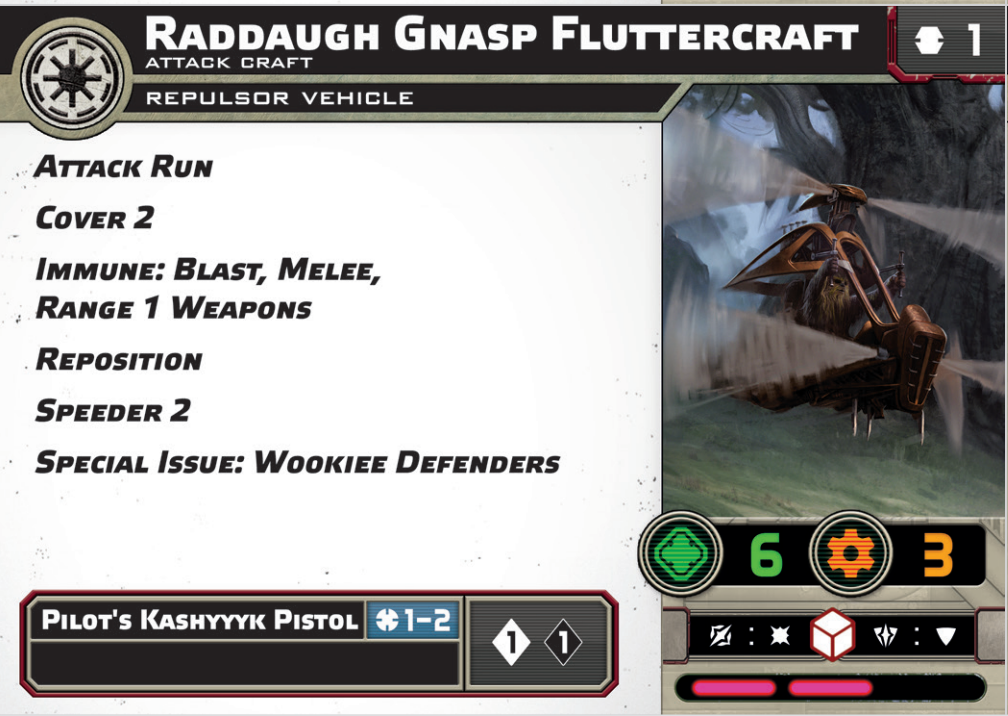
The Gunner
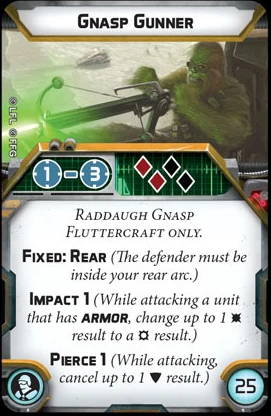
Welp, the dice pool is pretty good and those last two keywords are great! But there’s that one thing…
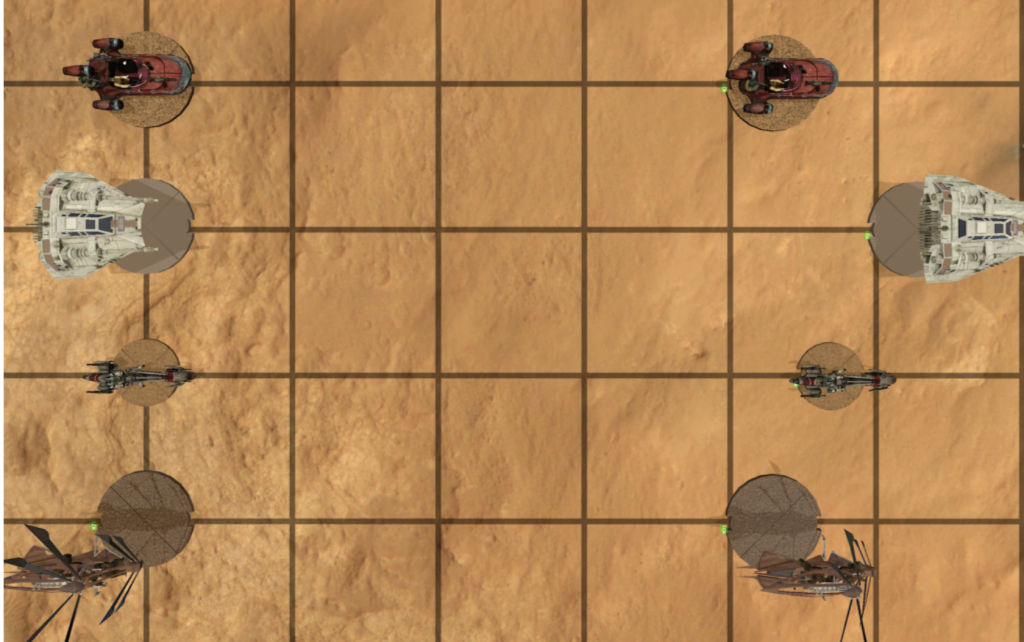
Here’s where I wish this game had an option for 180⁰ firing arcs. I realize it would have meant printing a different base but I think it would have made a substantial difference for guns that can rotate a bit but not all the way such as this, the ISP, the LAAT…hey wait a minute what’s up with this Grand Army of Glaucoma?! Don’t worry though folks, I saved the Canon Accuracy of the Republic for my last faction, which gives me plenty of time to find a comic that references Jango Fett’s performance on a Snellen chart.
Anyway, while you may occasionally dive for a stray strike team on Disarray or some such, the usual name of the game here is KITING. For reasons we’ve already covered, a Fluttercraft Gunner CAN shoot whatever it wants but until the end game, it SHOULD focus on targets that are both strategically relevant and at the edge of the enemy army. DO NOT dive in to shoot something juicy if doing so will allow multiple aim shoots with decent dice pools. Most heavy corps are going to easily average one inflicted wound, some like Clone Z6, shores, and T21 will do two. I’m sure I don’t have to do the math for you, if you’re more likely than not to be rolling a vehicle damage dice after two shots then you’re probably in the wrong place. Diving late game or when you’re about to die anyway is certainly a valid strategy, but that should seldom be your starting point.
Gunner: Maneuvers
Generally, you will find yourself doing 1 turn circles (usually more like freaky circles) or figure 8’s that take place over two turns. This takes some getting used to as there are a lot of variables at play. You want open shots, at the maximum feasible range, on units that matter, which have a face-up corps within range 3, and at a firing position that won’t leave you hanging. For this reason I will say that your default choice should usually be to Move, Shoot, Move. An aim will leave you cold if it means you die or sacrifice a nice open shot next turn; a dodge will leave you chilled to the bone compared to diminishing or negating enemy shots by getting some distance from them.
A quick note on how the Gunner should time its compulsory: use it in the way that will allow you to escape threats most efficiently. If you’re starting close-ish to the enemy it may be worth it to take a small move, then turn, then book it out of there with a compulsory. Remember, you want to shoot at the edge of range if you can then book it away from potential threats. Let’s get into a couple of specific ways to fly this thing.
“The 360 Bow-Scope” and the “Lazy 8”
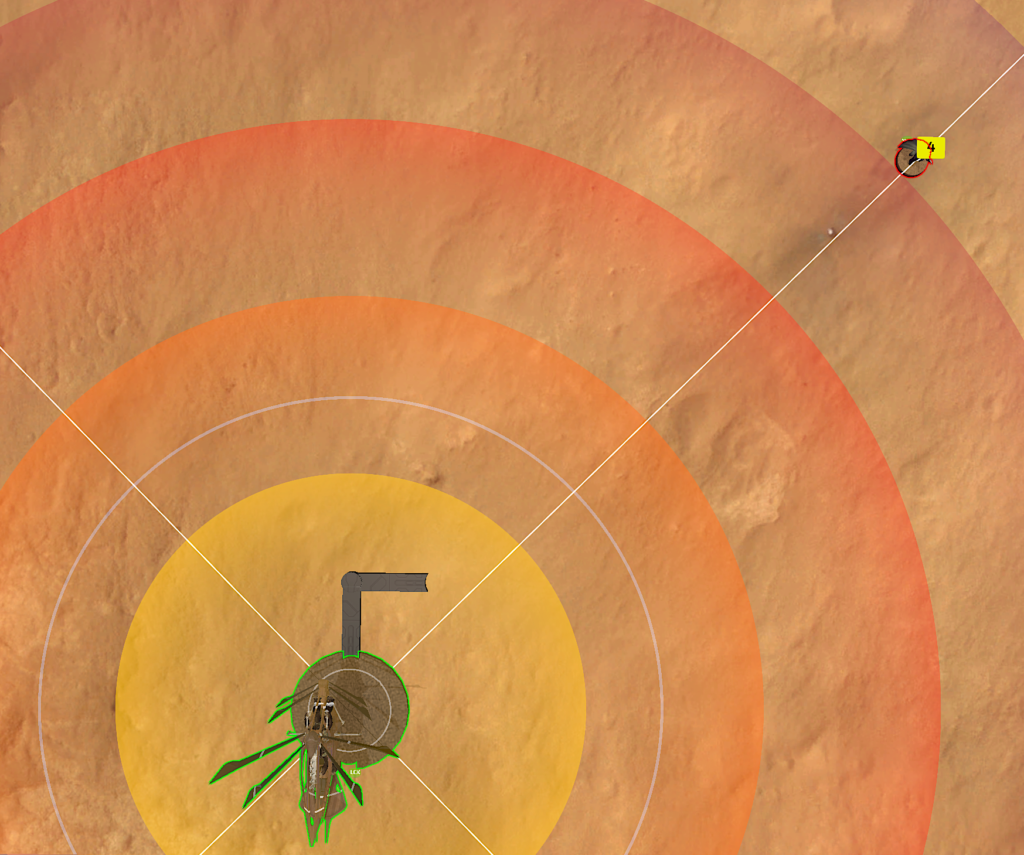
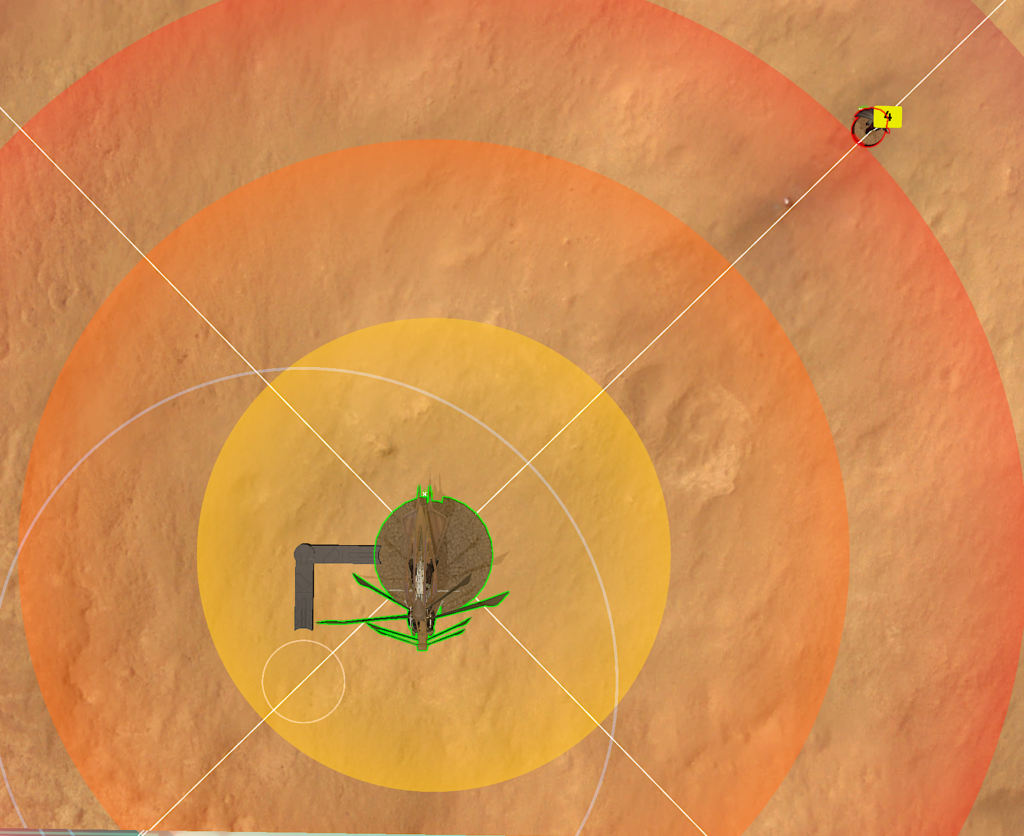
This is the simplest maneuver to grasp and the one that requires the most setup (could often be a turn 1 triple move to do so) if you want to do it totally perfectly. The idea is to start and finish outside shooting range of the opponent (Bow-Scope) or to sacrifice distance for angles or a different target next turn (Lazy 8, thanks to my little brother Greg “Pilot” Paul for the tip on what this is called in real life). If you don’t get perfect angles they may be able to jump out and get you, but this is why we mentioned the strong flank earlier: if your opponent is too aggressive then your own guns can make them pay for every inch.
Gunner: Comms Slot

Honestly? I think the right choice is usually nothing. The one exception to this is if you’re running Cody, in which case the above or a comms relay is a decent choice. None of the others are worth it in my book, including HQ Uplink because while order control is lovely it’s usually not an amazing choice to recover when you need to keep moving.
The Bomber
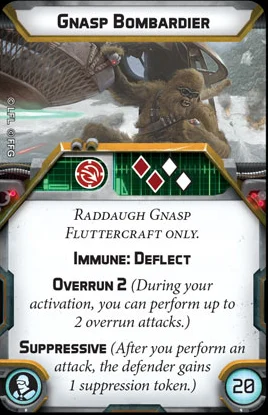
If nothing else I consider the Bomber to be the most unique unit in the game. Overrun attacks are not ranged or melee, they are a completely separate form of throwing dice at a specific enemy unit. You can sort of think of it as a melee vehicle with relentless if they could stop and attack in the middle of a larger movement. Please refer to our Quick Guide for the full details but the important stuff is that Overrun attack attacks…
- MUST target ONE enemy unit that the vehicle overlapped at some point during a movement
- CAN target engaged units
- CAN be done multiple times per turn even against the same target, up to the Overrun “X” number of times to be exact…however, only one Overrun attack can happen per movement so the Bomber must overlap enemies (or overlap with the movement tool) on two different moves to do two attacks
- Since they aren’t ranged attacks there is no cover, no fire support, and no suppression unless the weapon is suppressive
Long story short, the Bomber can either rain a surging and suppressive but non-pierce/impact Darth Maul saber on a single unit or cause chaos to an enemy blob. Like the Gunner it can be useful to dive on enemy units that are hiding separately from the rest of their army, but otherwise you’ll ideally keep it towards the back of your strong flank until you see the best chance to close in while taking minimum return-fire. Then, you usually will want to go early with them to do two more attacks OR rely on the fact that the enemy will have bigger fish to fry from the rest of your army than wasting activations killing this thing.
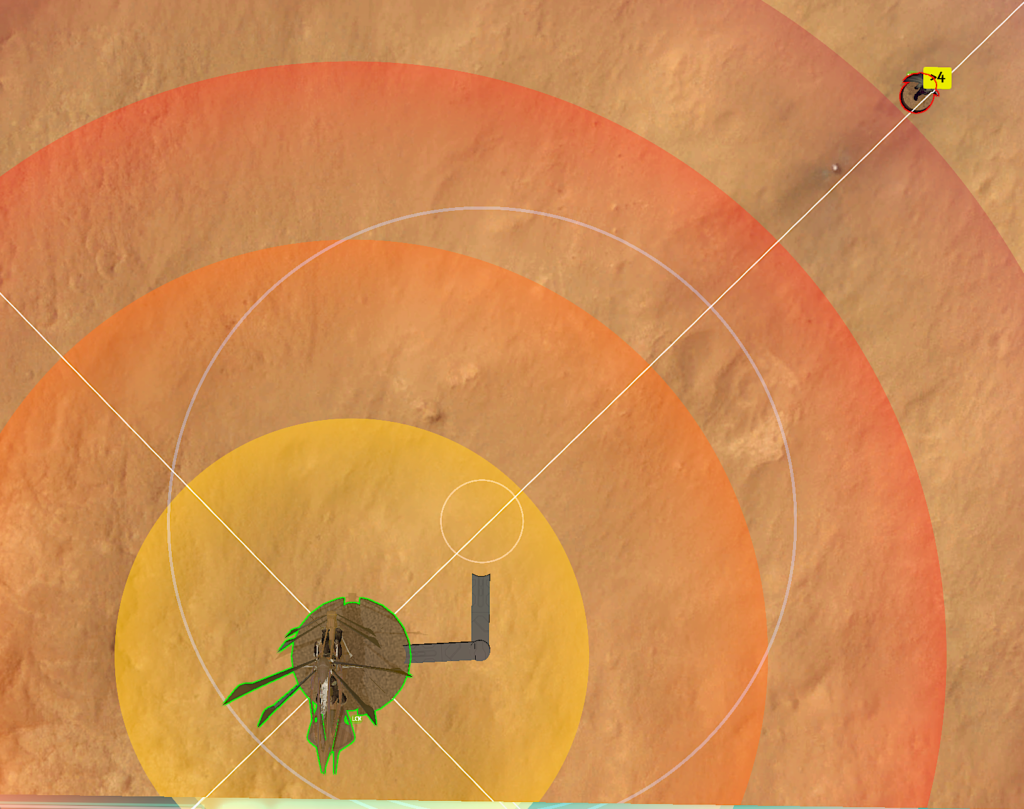
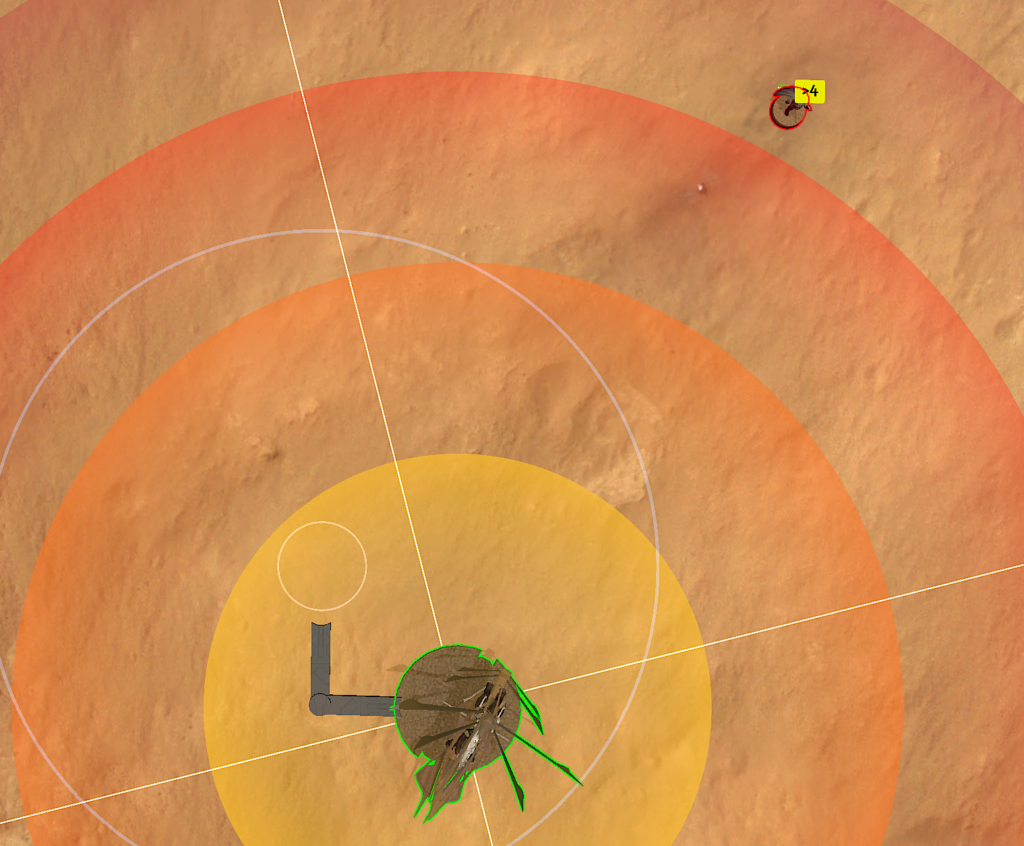
Bomber: Maneuvers
Before Legion 2.6 got rid of displacement this section was pretty rad. It was full of cool ways you could take advantage of displacement mechanics to make these things sing. There was even a link to a Jennifer Paige song, it was a great. Now, however, there is no such thing, and that the only consolation is that with the new(er) version of the Overrun rules, you can get an attack even if your vehicle is stopped short of being able to physically pass over the enemy unit as long as your movement template touches said unit. This functionally allows you to have an easier time getting both attacks in on the same unit, by starting with a standard move that intentionally “crashes” into the target you usually won’t functionally move much but can still attack. Then you can either shoot with your gun Black-White pistol from the unit card (since Overrun attacks don’t count against your attack limit) or take an aim before using your compulsory move to actually fly over the target to get your second Overrun attack in.
Note that in many situations you can speed up gameplay by showing your opponent that by doing a move->pivot then a pivot->move you can end up in the exact place where you started, just rotated 180 degrees, while still getting two overrun attacks (and a pistol shot as well) on the target. Not a bad way to toss 10 dice at an opponent and give them three suppression tokens if you ask me!
Bomber: Comms Slot
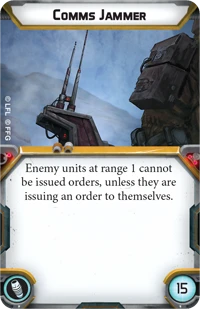
If you’re going to be diving face first into the enemy as a prerequisite for doing any damage then the jammer is a decent choice. Usually though, this slot will remain empty.
List Ideas (updated for Legion 2.6)
Combined Arms (Wookiee Defenders)
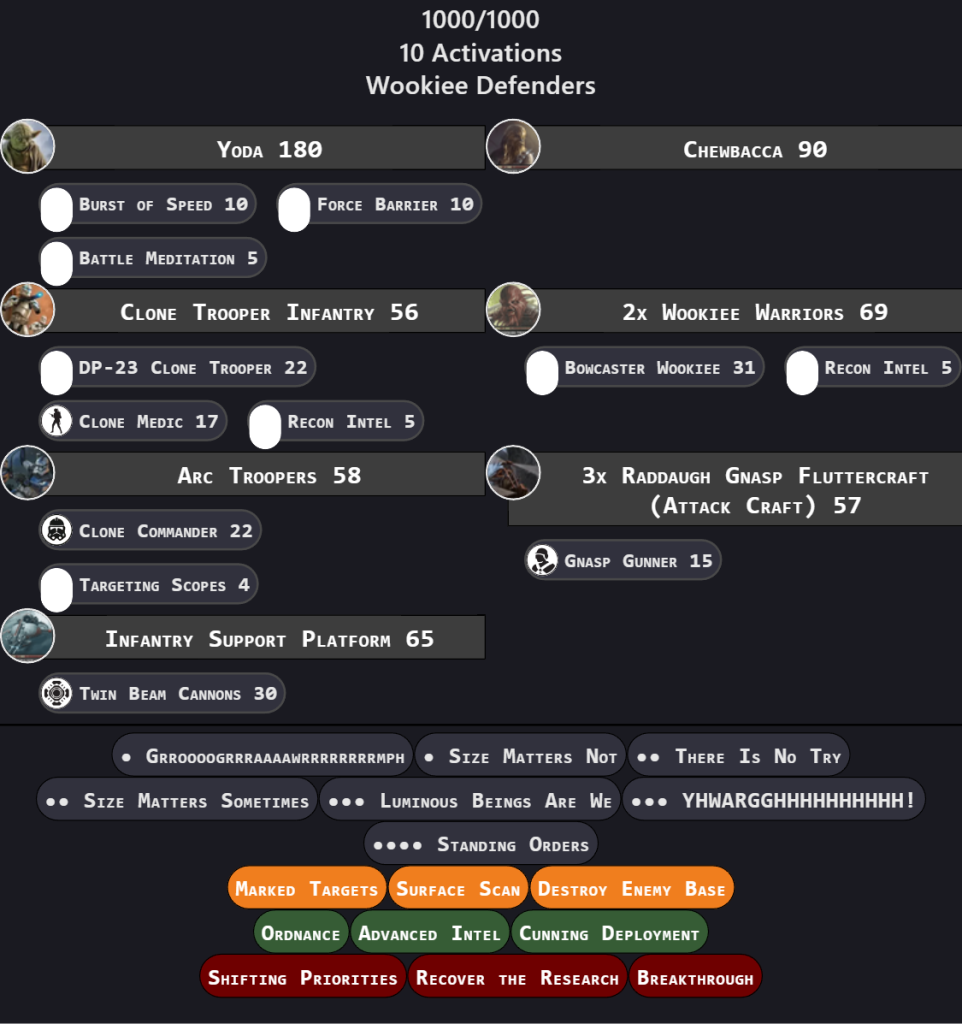
I’ve been running this locally and have been having a lot of success, the Yoda 3-Pip really helps with ensuring you have order control Turn 1 without sacrificing the rest.
The Bomb
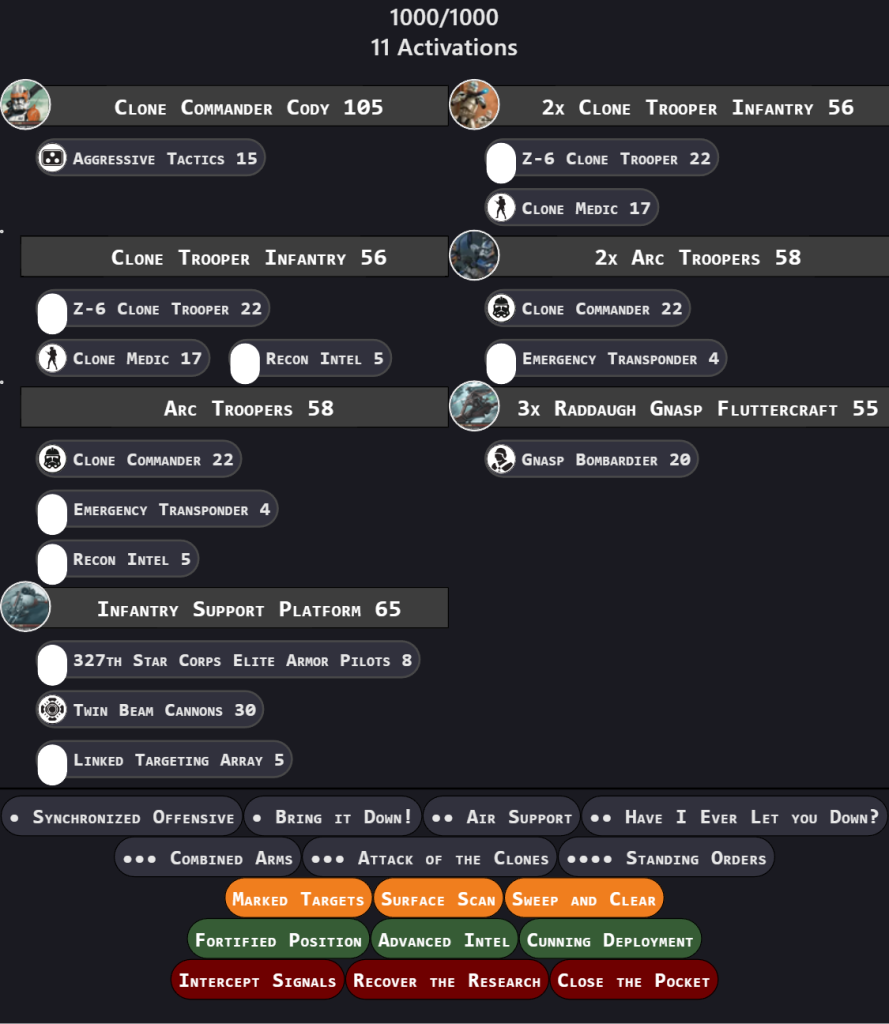
I was schooled by isaiahzsa in a recent local tournament by a similar list and I’ve added a bit of my flavor. This has a formidable ranged presence on one side and can dive with the bombers onto the weak side, just do your best to have order control for those flutters as much as possible on turn 1, you can use Cody’s 3 pip in combination with Direct to achieve that.
Conclusion
I loved this thing since it first came out and with each small shift in the rules (including a points drop or two) it has just gotten better since then, it really is worth a try! More than anything I hope that those of you who own some GAR minis will consider grabbing one to put it on the table and give it a shot. Playing with one of these is the closest Legion has gotten to arc-dodging in X-Wing or flanking a big ship with a Corvette in Armada, a rare treat in a game that is mostly about hiding and scooching. I cannot stress enough how rewarding it is to pull off cool plays with this unique vehicle, just don’t be too sad if it ends up as kindling by the end of turn 3.


4 Responses
Great article. I have two of these models and I’m more excited to get them on the board now. Also, worth noting that you can shoot the pilot’s pistol and still do 2 overrun attacks.
That’s a great point and didn’t think of that, would allow you to get 4 supps on one unit which could matter especially against rebel troopers and what-not
Seriously the best article I’ve read on the fifth trooper because your sarcasm was really funny and still explained everything step by step.
Thank you! I’ll try to keep doing better, once TFT realizes I’ve peaked I’m a goner.