
This week we’ll take a look at the Separatists’ mindless automatons of destruction, the B2 Battle Droids.
Unlike their smaller B1 brethren, B2s are competent, intimidating, and completely devoid of personality. In Legion, they are beefy and flexible, if you kit them out properly. We’re going to look at the two most viable builds to run B2s with (in my humble opinion).
Strengths
- Tough
- Hard hitting
- Good courage
- Independent (when fielded with T-Series)
Weaknesses
- Short ranged
- No coordinate
- Expensive
Overview
B2 Super Battle Droids
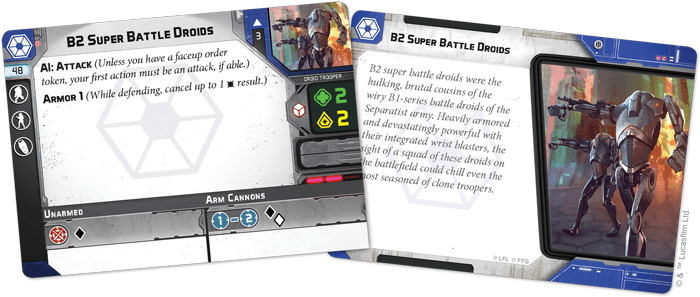
45 points. This is pretty good for a unit with six wounds and armor one, though it’s only three models, range 2, and very vulnerable to AI, especially without coordinate. I would not recommend taking B2s naked; if you want a cheap activation that doesn’t really do much else, take naked B1s instead.
Defense. White (no surge) save, 2 wounds/model, Armor 1. Now this is solid; the white save isn’t great, but Armor 1 strips a lot of hits right off the top. You want to keep them in cover whenever possible. They do still melt pretty quickly due to their save when caught in the open, like all droids.
Offense. White + Black, no surge, Range 2. The range is certainly short, but this is a very strong dice pool. The only other corps unit with two dice printed on its unit card are Fleet Troopers, who still top the charts for the most points efficient attack in the game. Their attack is still pretty underwhelming with just three models, but when you combine a full pool of Arm Cannons with one of the heavy weapon upgrades, you basically have an AT-ST attack pool at Range 2.
Their melee is a single black dice, which is not great. You want your B2s unleashing salvos of rockets and arm cannon lasers, not slap fighting things.
Courage 2. Very strong for a corps unit. B2s are rarely losing actions, which they desperately need both of, since they are a close range assault unit.
AI: Attack. This is actually fairly debilitating, even on a Range 2 unit. I know you are probably thinking “why does it matter, they usually aren’t going to have anything at Range 2 to shoot.” A good opponent will do things like throw one model out there for you to see at range 2 or put tough/less desirable targets in your range band to prevent you from moving and shooting what you really want to shoot. It get’s *really* bad if you run the B2-HA without a T-Series personnel upgrade, because you are often having to exhaust just the three dice HA pool at Range 3 with AI. Make sure you have a plan to either A) get all of your B2s faceup orders or B) run the T-Series personnel upgrade to strip this keyword.
A Tale of Two Builds
B2s technically have a lot of options, between the various specialist pack personnel upgrades and the two heavy upgrades. However, for various reasons, there are really just two builds I use, both of which are effective: what has become known as the B2-HAT (the HA upgrade plus a T-Series Personnel Upgrade) and the B2-ACM with extra B2.
B2-HAT
This build combines the B2-HA with the new T-Series Specialist Pack personnel upgrade, for a total of 93 points. It’s considerably more expensive than a B1 with a heavy weapon, but also harder hitting, more durable, and importantly, independent. B1s are heavily restricted, positionally, by their coordinate keyword, since they need to be all in one unbroken chain. A B2 with a T-Series is a much more flexible unit that you can use more like a “traditional” corps unit from another faction, since their on table positioning isn’t nearly as restricted as your B1s.
B2-HA Heavy Weapon Upgrade
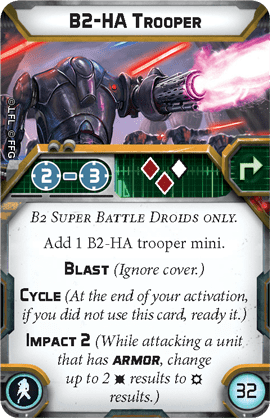
Now this is a weapon, if ever I saw one. It’s basically the space laser equivalent of a rocket launcher, except it’s also built into the B2’s arm, because robots.
The keywords on this are excellent; Blast makes your entire pool ignore cover, and Impact 2 is a nice little bonus that lets you hedge against armor. Cycle is what exhaust weapons should have had all along, refreshing the weapon for free on a turn that you don’t use it.
If there is a weakness to this weapon, it’s that it still exhausts; cycle helps a lot, but you either need to spend a turn making a sub-optimal attack to cycle it, or use an action to recover. Usually I take a shot with the Range 3 pool combined with the T-Series (more on that below), move into Range 2 and take a normal shot with the full Range 2 pool to let the weapon cycle, and then take the full blast pool at Range 2 on the following turn. If your Target is already at Range 2, you should generally just be recovering and shooting the full Range 2 pool with Blast. Don’t be afraid to take those Range 3 shots though; with the T-Series they are very solid. Combined with the T-Series, you are looking at a very consistent ~3 hits at Range 3 with Blast, or ~6 at Range 2, if you have at least one surge token.
T-Series Personnel Upgrade
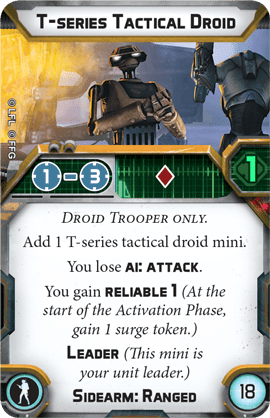
This upgrade is what really “unlocks” B2s and makes them viable in quantities of two or more. Losing AI: Attack is excellent for B2s, as they are an assault unit that needs to be able to operate independently, and they lack coordinate to duplicate their faceups to mitigate AI. Reliable 1 is also great; free surge tokens are worth about three quarters of a hit on their full Range 2 pool (with 10 dice) and about half a hit on their Range 3 pool (with 4 dice). I find that I rarely spend these on defense in practice; not because I’m saving them, but their saves are just so unreliable in the first place. Generally, I use the “bird in the hand is worth two in the bush” approach with surge tokens. As soon as I can spend them, I spend them.
The T-Series also gives you a red dice at Range 3, which combos perfectly with the B2-HA in that range band for a three red, one white shot with Blast. On average this reliably nets you three hits, which is basically the same thing as five hits when you are shooting something in heavy cover (since a “normal” pool without blast would have two of those stripped). Don’t underestimate that Range 3 shot.
One important note on this guy; he is only one wound. This makes it possible to “scope” him to get 2-for-1 on your wounds, since if you don’t have a B2 model that is wounded already you have to replace a fully healthy two wound model with this one wound model. Make sure you are familiar with the cohesion fundamentals and protect your T-Series from scoping just like you would a heavy weapon.
B2-ACM Beef
The ACM build is far less flexible than the HAT build, but it is also 11 points cheaper at 82 points, which isn’t nothing. It consists of the ACM heavy upgrade and an extra B2 generic personnel upgrade. This is slightly beefier than the HAT B2s, both defensively (10 wounds and not vulnerable to giving away extra wounds via scoping) and offensively, once you are at range 2. The ACM doesn’t have to cycle and has better raw dice than the HA, so if you are repeatedly taking range 2 shots you are going to be getting more bang for your buck with the ACM.
However, it doesn’t offer any anti-vehicle utility, it can’t shoot at Range 3, and most importantly, it needs faceups to avoid AI, which means it needs to be at the end of your B1 chain, and you should really only take one. That doesn’t mean you shouldn’t take them; I’ve run quite a few B2 lists with one ACM on the tail end of a partial B1 chain to save points. They are also great with Maul or Dooku, who can pull units into their shorter range.
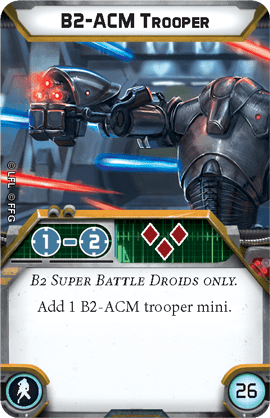
B2 Personnel Upgrade
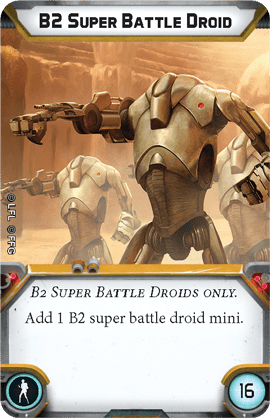
The generic personnel upgrades can be a little hit or miss, but this one is a must take for the ACM build. You get two wounds and two dice for just 13 points, and I find the two extra dice are necessary to power the hard-hitting Range 2 pool that comes with the ACM. B2s tend to bleed models with their poor save, even with Armor 1. The extra dude gives you a little more staying power to close the distance and clap your opponent with a little more dice once you get there.
What about the other personnel upgrades?
Technically, B2s can also take the repair droid, the medical droid, or the Viper recon droid. However, none of these are good fits for a B2 unit. All of those personnel upgrades have support functions, and B2s job is to murder things, as efficiently and frequently as possible. All three of those personnel upgrades can do their job just fine on a B1 unit, whose actions are less precious than their beefier brethren. Each of them are also only one wound, which means you water down the durability of your B2 unit by taking them.
What about comms upgrades?
I rarely fill a B2’s comms slot with anything; uplinks are too expensive and better on B1s anyway, they aren’t consistently close enough to make use of jammers, and you generally aren’t in a position to make use of something like a comms relay. The latter has some edge case uses in certain builds, but I find B2s to be fairly expensive anyway and anything that doesn’t help them do their one job (of murdering things) doesn’t usually make the cut.
List Ideas
And now let’s hit a couple of list ideas for B2s. Some of these are recycled from the Specialist Pack article.
Maul/B2s
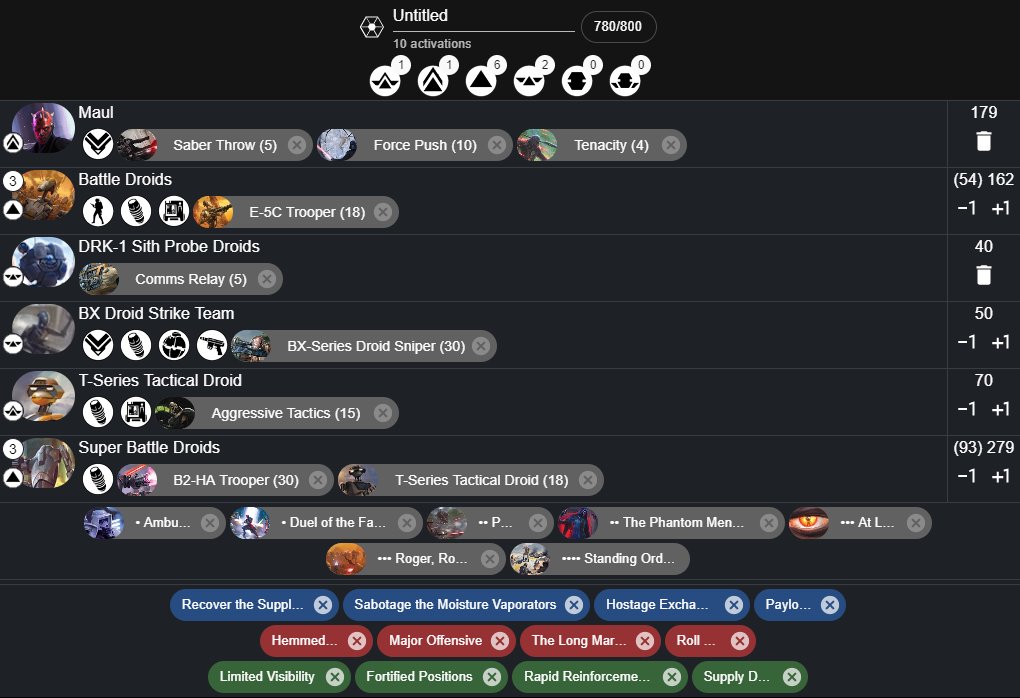
This is my favorite B2 list at the moment and what I am currently running in the ongoing Invader League eliminations. It isn’t as sexy or as rage-inducing as 13 activation droids, but it has Maul and a healthy bid. This list is designed to play area control objectives as blue player. It does pretty poorly on objectives like Bombing Run and Breakthrough, as well as long edge to long edge deployments, but hopefully your bid is enough to avoid those.
There are ways to trim some fat in this list to fit in a fourth B2, but I find that I am generally giving up too much on upgrades and cutting too much into the essential bid when I do that.
Dooku/B2s

A slight variation on the Maul list. This one leans even harder into the “area control” identity, replacing Dooku with Maul. Barrier gives you some extra durability in your corps and the three snipers (instead of one) provides a little more long range poke. It also has a tad less short range firepower, since you have to downgrade a B2-HAT to a naked B1 uplink. I run the same battle cards in this list I do with the Maul list.
Full B2 Spam
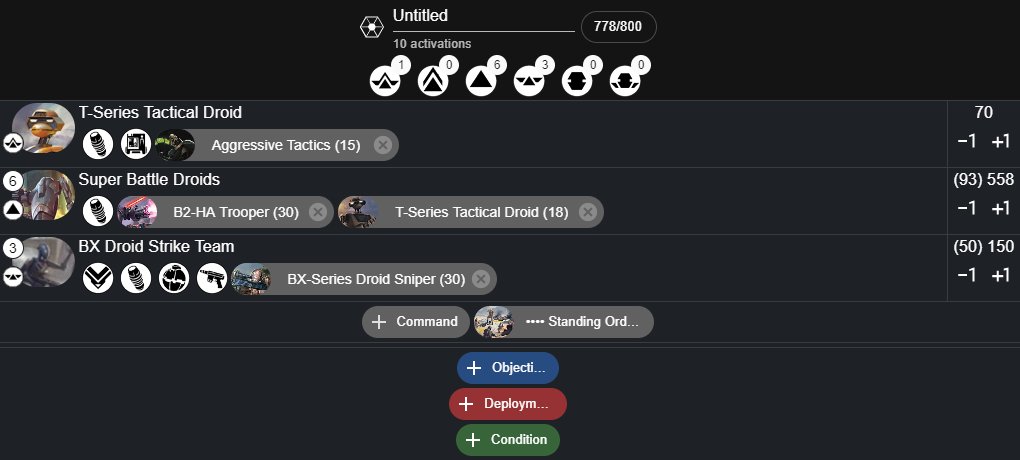
The “wallet warrior” list. You would need six B2 packs and seven specialist packs to field this one, so I don’t know how realistic it is. Also, you might not make many friends with this one. 54 of the wounds in this list are behind Armor 1.
This list does have a fairly significant weakness: it only has one mode. That mode is murder. It really isn’t very good at objectives, and it isn’t very good at like, poking at long range. Your goal is to overwhelm your opponent with armored bodies and dice, and once things start to fall apart they do so pretty quickly since it lacks a playmaker like a force user.
B2s and Droidekas
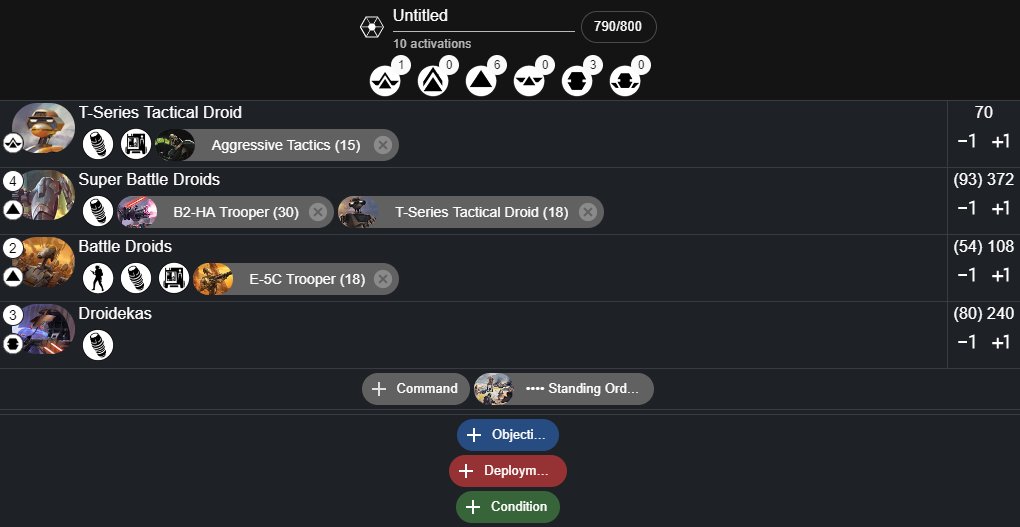
If you want to be slightly less degenerate and a little easier on your wallet, there’s also this. The droidekas double down on the “you can’t kill me” nature of this list, and double as blockers late in the game to prevent your opponent from scoring. If you can keep them alive until turn 5/6 your opponent is going to have a really hard time burning through those shields.
As with other lists you can hard swap the dekas for STAPs and it is nearly the same points, though it plays completely differently.
If you want to get really crazy, you can swap the Droidekas for Dioxis sab strike teams with shields and add some repair droids. I’ve played it, it is exactly as hilarious as it sounds.
Conclusion
B2s are tough, hard hitting, and when built accordingly, very flexible. You may find giving up perfect order control to gain a little on-table positioning flexibility as liberating as I do, if you are used to running full B1 chains. You don’t need to go crazy and run the silly six B2 list; anywhere from 1-4 B2s can fit nicely into most CIS builds if you don’t mind cutting an activation to get there.


2 Responses
“Courage 2. Very strong for a corps unit. B2s are rarely losing actions” – Droid troopers don’t lose actions to suppression.
True. I suppose Kyle could have said, “B2s are hard to panic, requiring 4 suppression to do so” instead of making it sound like can be suppressed.