
November 3, 2023 was a momentous day for Star Wars: Shatterpoint. It marked the release of Sabotage Showdown, the second objective for the game, and for the first time players will have a decision to make when list building: Shifting Priorities, or Sabotage Showdown? Players may also be faced with that same decision in each game they play, depending on the situation. Throughout November I’ve been getting a lot of reps in with the new objective and I’m excited to share my thoughts and findings here today.
I’ve written about Shifting (as the cool kids now call it, I assume) on multiple occasions, examining objective location frequency and deployment strategy, as well as the math for early turn contesting. In the spirit of Cyber Monday, I’ll be giving you, the reader, a sweet 2-for-1 deal as I dive into all of that, and more, in a single article! On the agenda today, we’ve got:
- The basic mechanics of a multi-objective world
- Measurements with the new objective layout
- Objective location frequency (and resulting thoughts)
- Early game strategy
- Objective choice considerations during list building
1. The Basic Mechanics of a Multi-Objective World
Given that we’ve only had one objective until now, it would be understandable if you’ve forgotten that part of the rules. Just in case, let’s do a quick refresher! When building your strike team you will choose one objective in addition to your squads. After choosing the table side, the first player will decide which objective to play, choosing from either player’s objective. If both players brought the same objective, there won’t be any decision to make. The important thing is that you are not forced to play your own objective as first player. Will you almost always pick your own? Probably, but you don’t have to. It’s also worth noting that, while you technically choose table side before choosing the objective (as I read it), it’s open information so as first player you can pick your side knowing what objective you will play.
In the premier tournament format, players take extra squads but they still only take one objective. Squads are also chosen prior to first player being determined. This means you won’t know what objective you’re playing until after you build your strike team (unless both players brought the same objective). I find this a bit disappointing as it denies what could be an interesting layer of strategy, but so be it.
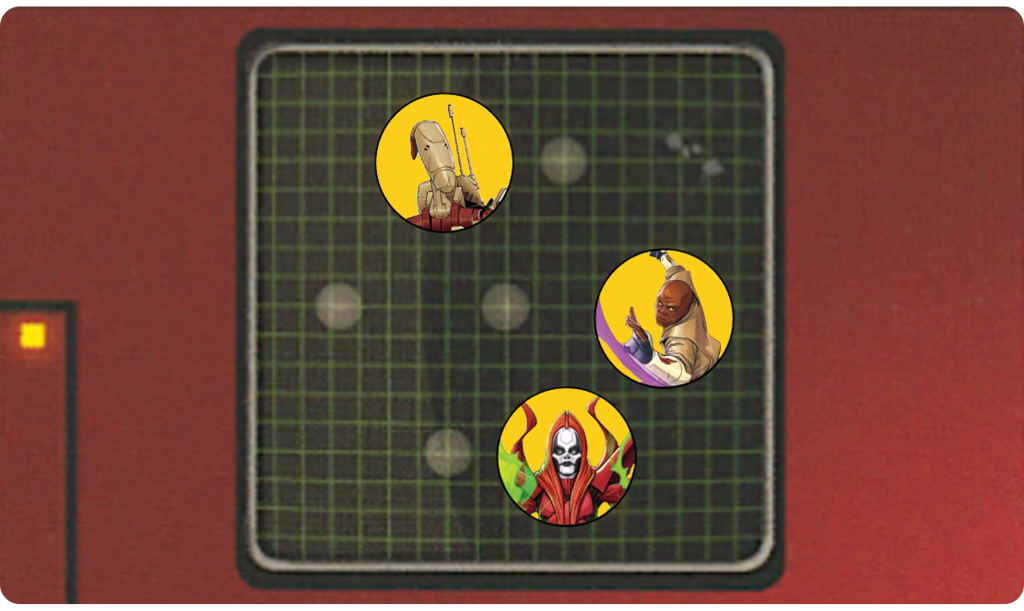
2. Measurements with the New Objective Layout
First things first: the middle three objectives are in the exact same spots as they were with Shifting. This is a joyous thing to TOs everywhere as it makes it a bit easier to set up tables for events. It also means that all the math stays the same regarding how much movement it takes to get to the midline, right?

We’ll talk more about deployment later, but often you’ll deploy a bit more central than before. Pair that with no middle objective and units will generally start a bit further away from the midline.
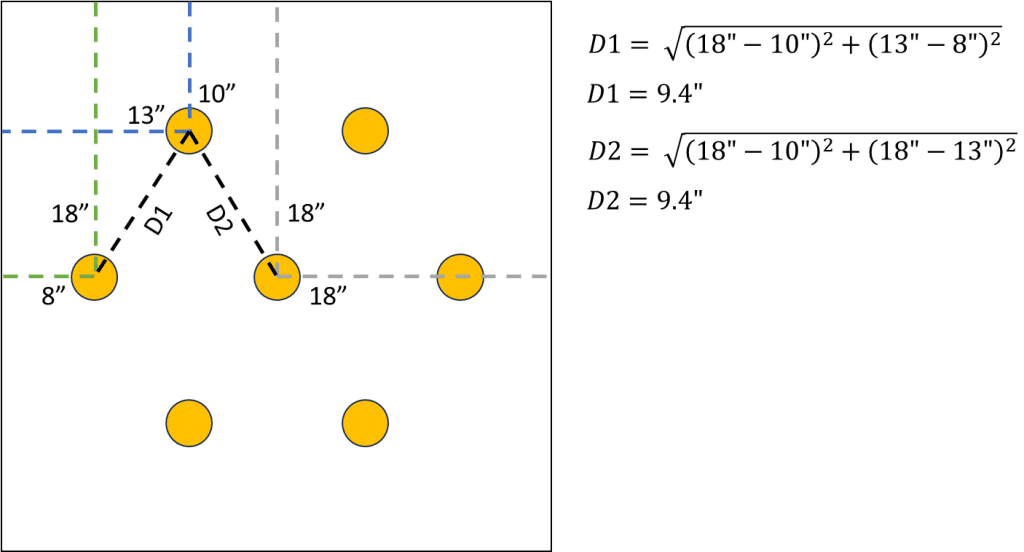
The two backline objectives for each player are now range 5 from the deployment edge, instead of range 4. This puts the objectives two inches further from your units and two inches closer to the enemy. Using all small-base units, the furthest to the side you could go is about range 5 (measuring from the board edge to the nearest edge of the primary’s base) while still being able to contest from deployment. Going closer to the edge closes the distance the primary has to travel to get to the nearest side objective. It may also be a better position for accessing ingress points on a specific map. The downside would be having the primary in a less central position, losing flexibility. In my quick testing, it seems impossible to cover both back points with a single squad, even if it’s General Grievous and B2s (two large-base units), for example. Maybe I’m just bad at eyeballing though, I didn’t run the math to check. What am I, a huge nerd?
Speaking of huge nerds, I calculated the exact diagonal distance from the backline objectives to the midline using the Pythagorean Theorem. And people would joke we’d never need it in the real world! If you remember that A2 + B2 = C2, you’ll ask why I chose the letter “D” in my diagram. You’ll also find that the diagonal distance is a mere 9.4″ inches (center to center), 0.6″ shorter than the range 5 tool. The distance from a backline objective to the two closest midline objectives is slightly less than the distance between the midline objectives themselves!
I demonstrated previously in my measurement article that a unit could not dash diagonally from one objective to another and still contest. That all changes with Sabotage. Out-of-activation dashes are much more common than out-of-activation advances, so when the latter gains effectiveness that’s pretty important in the objective game. Not to fear, though, advances are still great too! A small-base unit sitting directly on the center objective can get into contesting range on any objective with just a single advance.
3. Objective Location Frequency (and Resulting Thoughts)
In Shifting, we saw some very drastic trends with objective location. The bottom right and top left objectives came up much more frequently than the bottom left and top right. Going into the third struggle you could be absolutely sure that those last two locations would not be active. Frequency in Sabotage is much more evenly distributed. Furthermore, the distribution of possibilities is even about the “vertical” line running down the middle of the battlefield. That’s not to say the left side will always light up if the corresponding spot on the right side does, but rather that the left or right spots are equally likely when considering the three cards for each struggle.
Struggle 1 – A Tale of Sameness
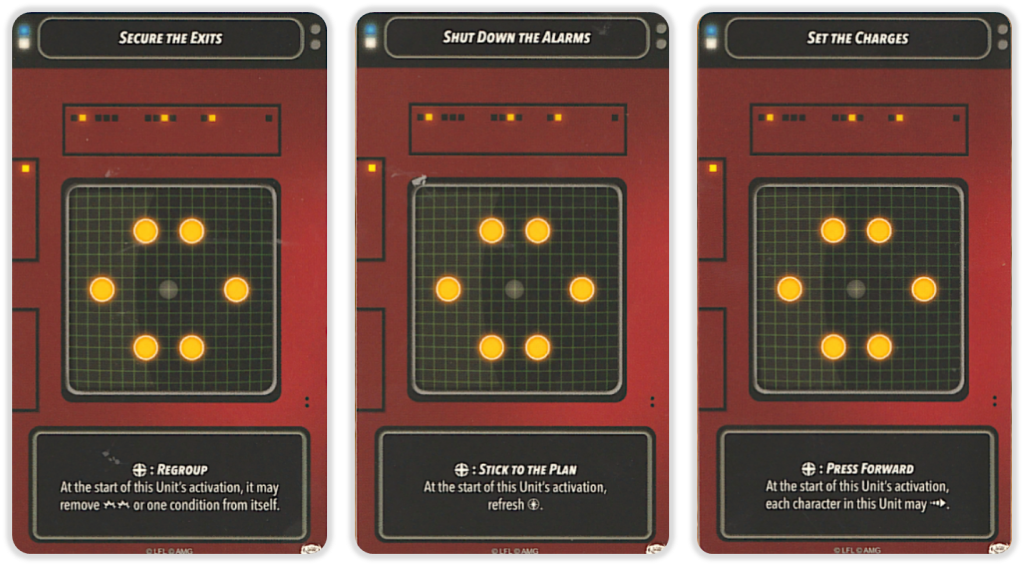
OK, I don’t want to harp on the sameness of these cards too much. Most of the time Shifting was effectively the same layout every first struggle because the back objectives often didn’t flip.
Since both back objectives are always active, you’ll want to ensure these are covered during deployment. As such, you’ll want to have one squad on the left and one on the right. It’s not impossible for the left squad units to go and contest the mid-right objective on their first activation, or vice-versa, but it can be difficult. Since the center is never active, there will often be a void in the center of the board going in to struggle 2.
Struggle 2 – Driving Down the Middle Lane
I like to refer to these ones, from left to right, as “The Wiggle”, “The Line” and “That One That Looks Like the Shifting Priorities Struggle 3 Layout That Always Messed Me Up”. Across the three cards the middle-edge objectives show up only once. Two of the three you’ll have the middle point active and every struggle you’ll have one near point and one far point. With such an even distribution it’s hard to draw strong conclusions. The clearest thing is that the fight will shift from the outside edges towards the middle lane.
What I would do to set up for struggle 2 depends on whether I’m winning struggle 1 or not. If I am losing the first struggle, I’d try to ensure I have one back point secure and the far point on the other side (for example, bottom-left and top-right). This strategy gives me a 2/3 chance of being on at least two objectives to start the next round. If I think I’ll win struggle 1, I’d be more apt to take two objectives on the same side, or both objectives on the same row (such as bottom-left and top-left objectives or both bottom objectives). Doing so will give me the best chance to start on 1/3 locations regardless of which layout my opponent picks.
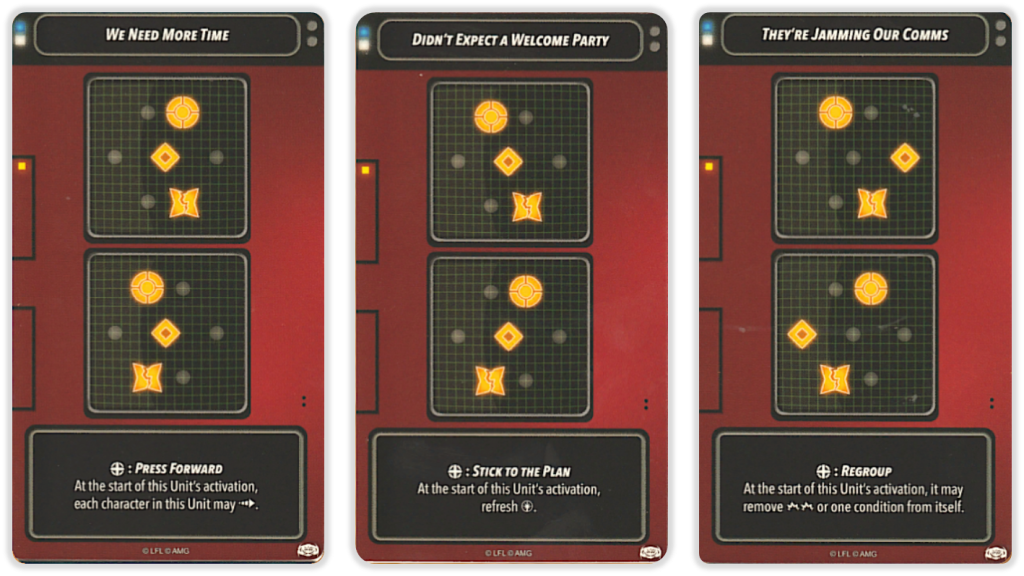
Struggle 3 – Spread Out Again
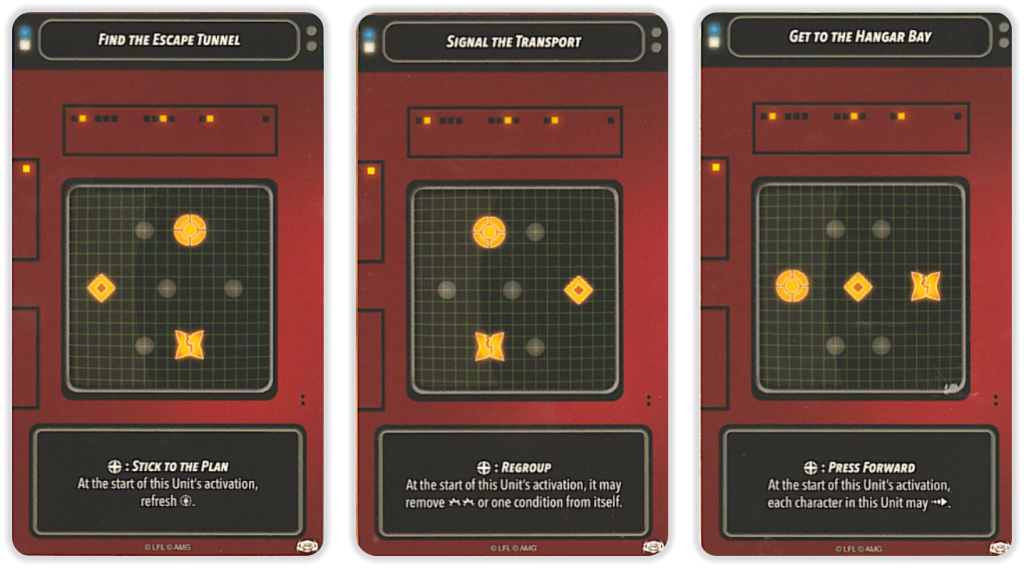
In contrast to struggle 2, the side objectives are the most likely to come up in struggle 3. The middle-left and middle-right objectives appear twice each and at least one of them will always be active. As such, if I’m setting up for struggle 3 I’ll try to situate my units one the edge objectives but towards the middle of the board. If I have a unit on the middle-left objective but draw “Signal the Transport”, for example, then I may be able to dash that unit to either the “block” or “failure” objective as needed.
A big change compared to Shifting is that the loser of struggle 2 gets no choice in the layout of struggle 3. In an evenly-matched game of Shifting, assuming each struggle is a 50/50 coin flip tells you that the winner of struggle 1 should win the game 75% of the time. If you assume getting to choose between two layouts increases the odds to 60/40 in your favour then first player would win 76% of the time. Maintaining those assumptions for Sabotage, a 60/40 struggle 2 and a 50/50 struggle 3 would have the winner of the first struggle winning the game only 70% of the time, a not insignificant change.
It’s much more likely in Sabotage that the struggle 2 loser will get hurt by a bad draw in struggle 3. You can try to set up with good positioning going into struggle 3, but with how evenly distributed the objective frequency is you’re still needing to get lucky if you want to start the struggle controlling multiple objectives. I believe part of the solution to this comes in list-building: lists with poor out-of-activation movement will struggle (pun intended) in Sabotage. Out-of-activation movement is important to relocate units once you know the objective layout. Compared to Shifting it’s harder to get in position just by memorizing the chances of each location activating.
Overall, my high level contrast of the two objective sets is as follows: Shifting is often a fight near the center in struggle 1, spreads out in struggle 2, then comes back to the center in struggle 3. Conversely, Sabotage often starts away from the center, moves inwards in struggle 2, then back out in struggle 3. As such, units that prefer to be in a central location, such as Mace Windu, will likely prefer Shifting.
4. Early Game Strategy
Luckily for us, we don’t have too many scenarios to cover since there’s only two midline objectives active in struggle 1. Before I begin, just a reminder that a “single” activation refers to an activation that can only move one body onto an objective, while a “duo” activation refers to a unit that can put two bodies on objectives. This is nominally the difference between primaries/secondaries and supports, but some single-model units can act more like duo-activations in the early game because they can move extra bodies through abilities.
For our first scenario, let’s assume the first player (red) draws a single-character unit and takes a midline objective. If the second player (blue) draws a single-character unit, they can try to flip the objective or secure the empty objective. Let’s start by assuming blue draws a character on the far side who is unable to cross the board and displace the red unit, so blue player opts to flip the unclaimed objective.
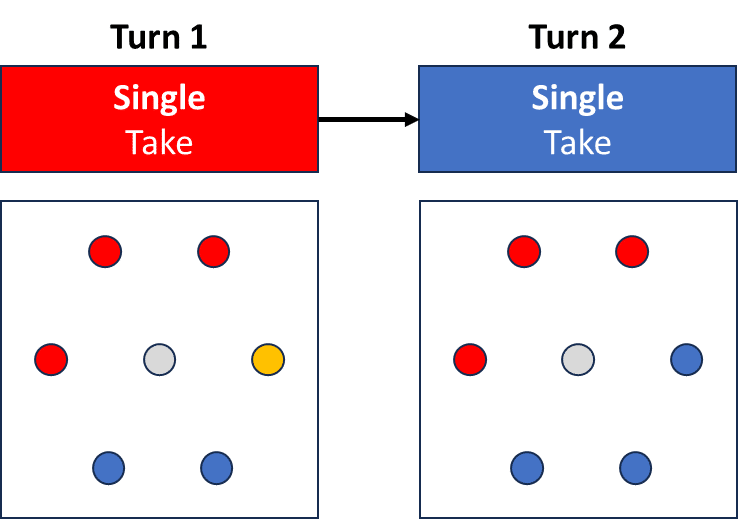
Generally speaking, there’s kind of two ways this game can continue to go: defensive or aggressive. The defensive version of this would be that red draws a unit on their right side (our left) which can’t flip blue’s objective. As such, red reinforces their own objective. Then blue goes and can’t remove two bodies from red’s spot, so they reinforce their own objective, and so on. This line of play would generally favour blue as each player continually scores 3, meaning it goes to blue’s side, back to the middle, back to blue’s side, back to the middle, etc. The onus is on red to score 4 in one turn or they’ll lose the struggle.
In the “aggressive” game, perhaps red is able to flip blue’s objective on turn 3, scoring 4 points. Blue will likely be unable to flip both the midline objectives the following turn as that’s very hard to do. Best case is blue flipping one objective and scoring 3. If red can flip again and score 4 then the pattern repeats and eventually red will win because they are gaining one spot on the track each cycle.
Of course, the “aggressive” and “defensive” games described above are oversimplifications. There will be a mix of flipping and reinforcing. The important point to emphasize is that it’s generally hard for a unit that deployed on one side to go and flip the far side objective on their first activation. Some units, like Maul or Jango, can go cross-country to flip objectives fairly often. If you have one or both of those guys in your list then perhaps Sabotage is a good choice.
Similarly, if blue can flip red’s objective on turn 2, they’ll score 3 points.
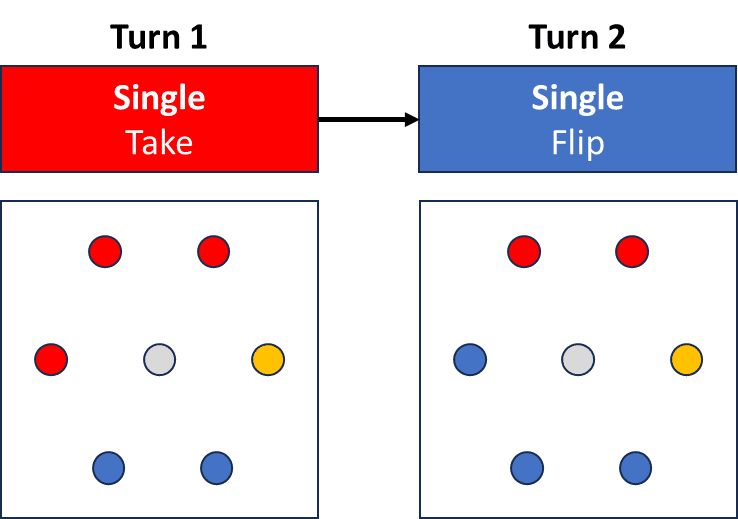
Whether red flips back or takes the unclaimed objective, red will score 3 points on turn 3. If both players keep scoring 3 blue is happy. Additionally, the the first player to score 4 is probably blue, giving them even more of an advantage. If blue is able to flip the midline objective turn 2 they should develop a strong advantage in the early game.
Now let’s assume the first player gets to start the game with a duo-activation. Between an advance, an ability that allows a jump/dash/advance, and a shove from the Take Cover action, it’s quite possible for such a unit to contest and flip both midline objectives turn 1. Even if the second player also gets a dual activation, flipping both objectives is harder than simply taking them when they were unclaimed, since now there’s an enemy to deal with. As such, blue will probably only secure one objective at best, scoring 3.

Once again, if this develops into an “aggressive” game, then red is in a great spot. In a “defensive” game, blue is still in a fine position since they went first, but likely a bit worse than in the prior scenarios since red has more bodies downfield. In my experience thus far, when the first player has been able to secure both midline objectives turn 1 it’s been a very strong advantage. Doing so is much easier with mobile units like the Mandalorian supports, but it’s almost impossible with something like B1s and Magnas.
Beyond listbuilding, the center point being inactive does feel like it removes a decent bit of player agency and decision making in round 1. The “do I go for the middle or the side” question is out for many units as they can only reach one of the two midline objectives. That being said, once you move beyond the early game the back objectives come into play as they are quite a bit more vulnerable compared to Shifting. Before, we were sort of trained to ignore the backline objectives for most of the first struggle (not that they never flipped, but you know what I mean). In Sabotage, however, chances to snag an opponent’s starting objective are much more frequent, so keep an eye out for that. To counter that, I try to deploy my starting squads such that one character each from both my secondary and supporting units is within range 2 of the objective. That way if my support activates and moves up, for example, the secondary is still contesting and making it harder for my opponent to sneakily steal.
5. Objective Choice Considerations During List Building
When we first got a few Sabotage spoilers, I was imagining that slower lists with lots of out-of-activation movement and big aura effects would like the new objective the most. As we’ve seen the rest of the cards and as I’ve gotten to play a number of reps, I think prior-me was partly right and partly wrong. Out-of-activation movement is indeed very important as dashes are more effective and pre-positioning is harder to do heading into a struggle. However, speedy lists have a bigger advantage than I first thought. Despite the 7 objective markers being closer together, the active objectives are generally spread out, so fast units are ideal as they can relocate quickly and hit wherever is vulnerable.
To talk about some specific units, I was initially thinking Mace would be the biggest fan of Sabotage. However, since we now know the center is never active in struggle 1 Mace is a sad boy. Being off to the side isn’t where he want’s to be. I don’t think he’s terrible on Sabotage, but I also think his best ability is his aura and that’s less effective when the center matters less. Conversely, and maybe paradoxically, I’ve had more success with Bo-Katan’s defensive aura playing Sabotage. I think the difference is that, since it’s only range 3, she was never trying to cover the entire board. She’s only ever trying to cover a part of the board and she can do that better with the objectives being more condensed.
Finally, I think lists with strong diceless displacement effects like Force Push or Capture Wire get even stronger with Sabotage. For example, I’ve been playing a Maul/Plo list. It has it’s faults, but it also has a unit on each side that can shove one enemy off a point and dicelessly move another, potentially breaking a deadlock in a “defensive” style game. In my swing theory articles I refer to this as “self-contained” swing since they don’t need friends around to make stuff happen. I think units with strong self-contained swing are well positioned for Sabotage, especially if you have them on both sides of the board.
Units with defensive swing have also been performing very well for me on the condensed board. Mother Talzin’s dash and range 4 attack have been wonderful and I’ve gotten much more use out of Plo’s identity dash as well. Next on my list to try is primary Ahsoka. As mentioned before, an advance on Sabotage is money. Keeping her out of melee so that she actually gets to advance and not dash, though, will be a bit tricky.
At the end of the day, lots of lists will be good at both objectives. In fact, I think a lot of lists that were already having success on Shifting will be even better on Sabotage. The question to consider then isn’t necessarily “is this list better on Sabotage than it was on Shifting” but rather “compared to other lists I will likely face, is my list more advantaged on Shifting or Sabotage“. You want to maximize your advantage and/or minimize your disadvantage.
Wrap-Up
You may have noticed that I haven’t even touched on the extra tactical abilities on the bottom of each card. While they’re cool and I like the design space, they’re a bit too random for my liking. I’ve found the extra abilities are usually meh to fine, but once in a while they are exactly what you need and are gamechangers. It can be hard to plan around since it can change right before you draw the Shatterpoint card. I’ve had games where I drew the Shatterpoint card turn 1, shuffled it back in, and didn’t see it again until the start of struggle 3, so the special ability had changed twice! I think I would have much preferred if it was more like struggle 1: extra dash, struggle 2: heal, struggle 3: refresh force. Then you can actually plan for it in-game and list build for it. Does X character have mobility issues turn 1? I’ll take Sabotage Showdown so they can dash on the Shatterpoint! A 1/3 chance just doesn’t make that sort of approach worthwhile. I get that you don’t want to have lists that are super skewed to one objective or the other, but the timing on list building in the premier format already stops that from happening a bit.
The special abilities sort of encapsulate the main issue I have with Sabotage Showdown: it’s a bit too random. Sometimes the extra tactics will be important, sometimes it won’t. It feels like decision making is a bit less important in struggle 1 and good card draw is a bit more important, compared to Shifting. The objective in struggle 3 may be awful for you even if you lost struggle 2, or it may be perfect. All of this together doesn’t mean it isn’t a fun objective, because it still is that. I just would prefer to be in control of things as a competitive player. Many events are setup up such that you have to go X-0 to win, so one game where your opponent gets way more mileage out of the special tactics than you do could be one game too many.
After the new-toy shine wears off, do you think you’ll be gravitating more towards Shifting Priorities or Sabotage Showdown? Let me know! For more articles on Shatterpoint, check out the index as well!
