

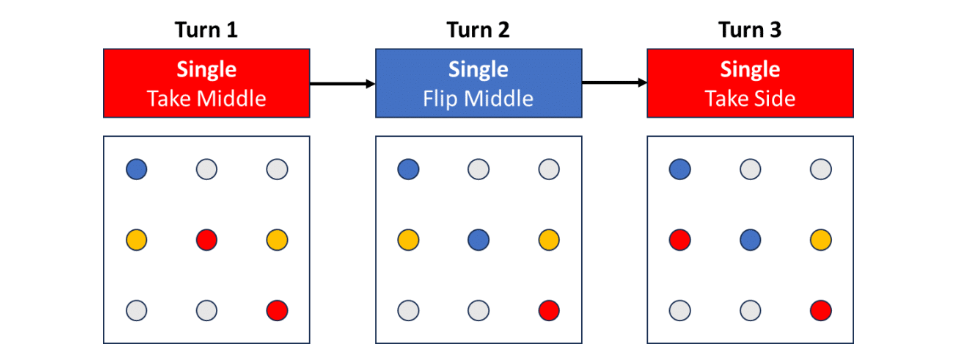
Funnily enough, I’ve already written an article called Shifting Priorities Early Tips, which could be the name of this article. Whereas the old article was “early” in the sense that it was written soon after the game released, this one focuses on what to do in the early game. Specifically, I’ll examine the first few activations of the game and think through some different scoring scenarios.
In the past I’ve humbly compared myself to little-known figures such as Stephen Hawking and Socrates. Trying to come up with a comparison for this month, the only thing I could think of was a scene from 2007 Oscar-snub, Mr. Bean’s Holiday. Trying to figure out the missing two digits in a phone number, he states “I’ll write down all the possibles” and starts calling every possible number from 00 to 99. Today we will take a similar approach to that of Mr. Bean, brute-forcing our way through possible permutations of the first turns. I guess what I’m saying is…I’m also the Mr. Bean of Shatterpoint?
A couple quick notes before we get started. To keep things simple, I’ll be using the terms “single” and “dual” to discuss turns where single or double character units are drawn, respectfully. The general assumption is that a single character can only move themself onto an objective whereas a “dual” activation can put two bodies onto objectives. This distinction sort of represents drawing primaries and secondaries versus supports, but many single character units can of course move extra bodies during their activation. Usually not into contesting range from deployment, but…sometimes. In these cases, think of it more like a dual activation even though a single character is activating.
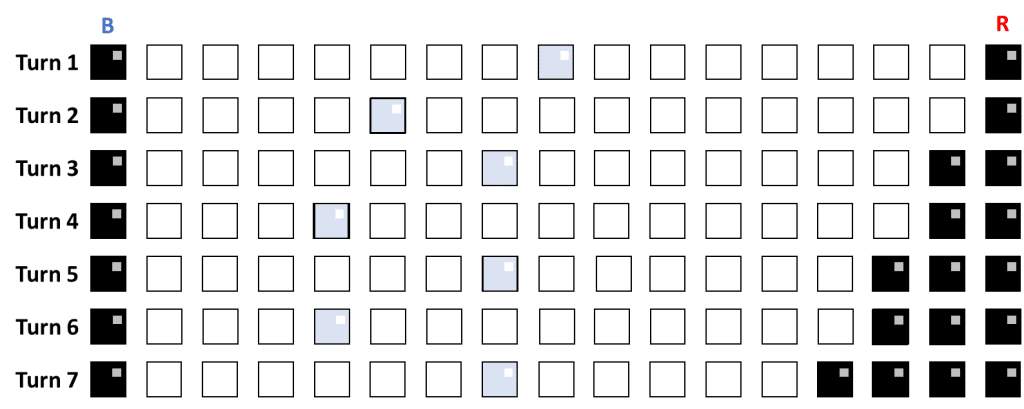
We’ll also assume that both players deploy such that they claim their close objective turn 1 without having to move, meaning there is one squad off-center to the left and the other off-center to the right. Finally, when I show examples of how the struggle track could evolve over the first 7 activations I am only showing momentum gained from the struggle cube position and not considering possible momentum from wounds.
Without further ado, let’s get going! We’ll start by examining permutations where the very first draw of the game is a single character.
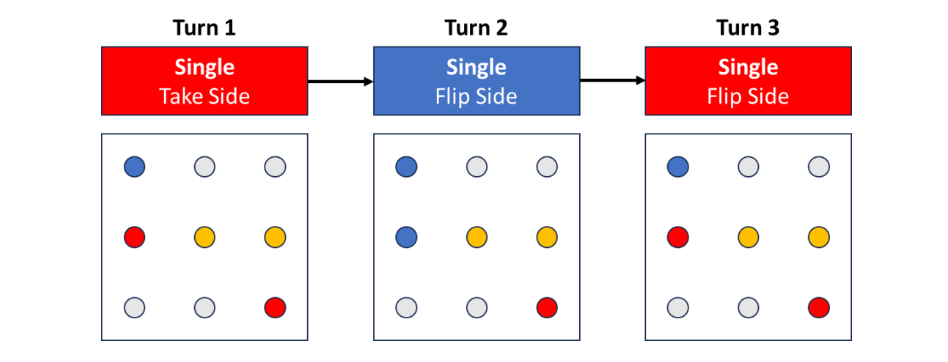
First Activation – Single
This is a nice place to start because the single character only has three options:
- Contest the middle
- Contest a side
- Do not contest
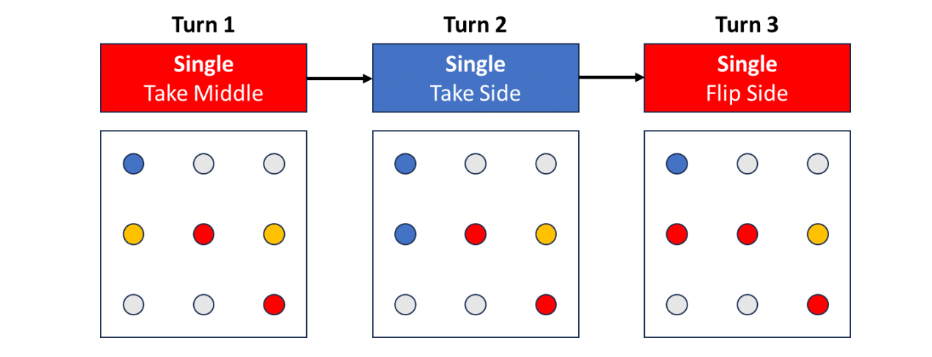
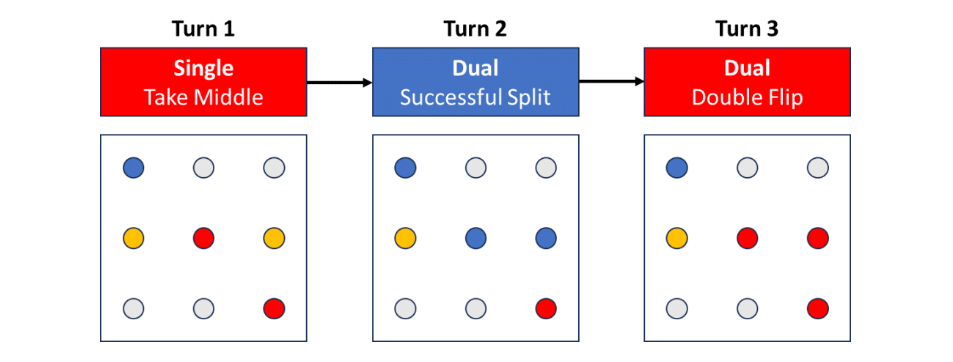
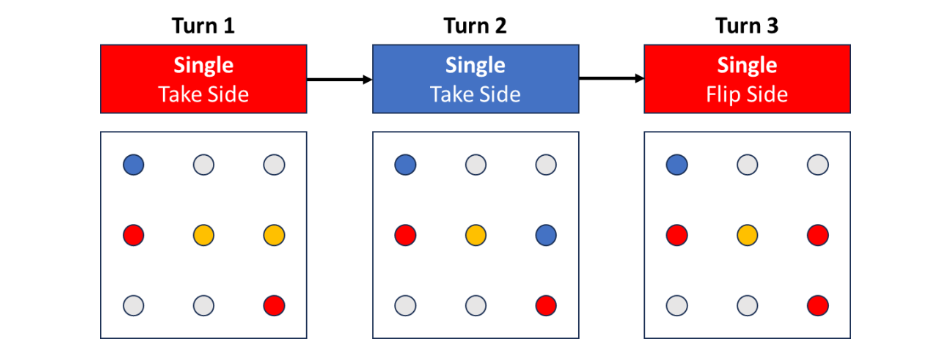
Option 1 – Contesting the Middle
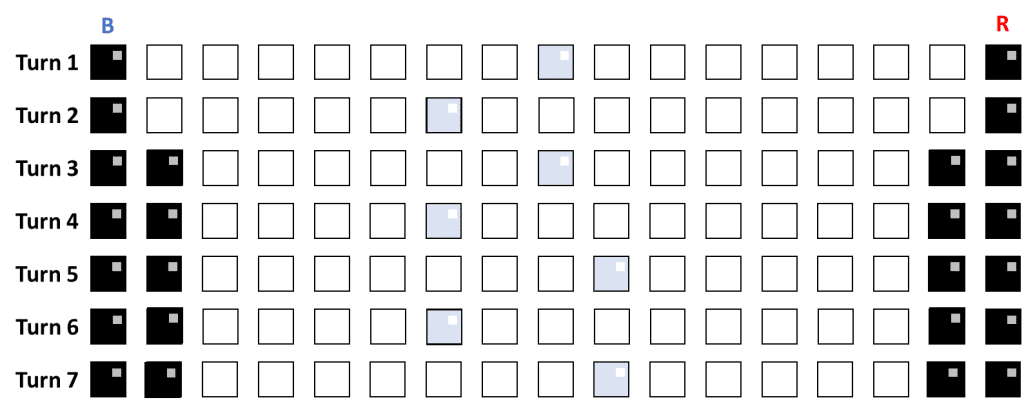
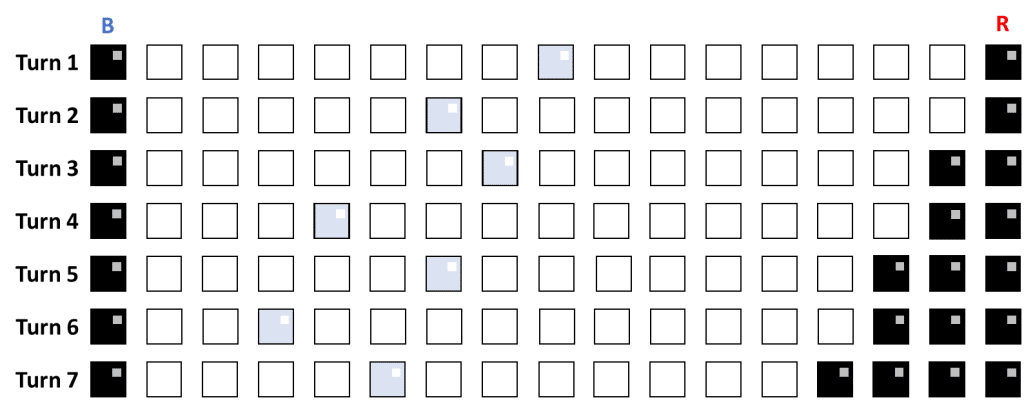
Let’s continue down the tree and assume option 1 is chosen. After round 1 the battlefield will look something like the image below (red player is first player). The struggle tracker does not move turn 1.

Whether the blue player draws a single character on the left or right, either should have decent access to contest the middle. However, to take control of the middle objective blue will have to displace or wound the single red character. That’s not too difficult, but let’s start by assuming blue doesn’t like their chances and elects to take a side objective, scoring two points.
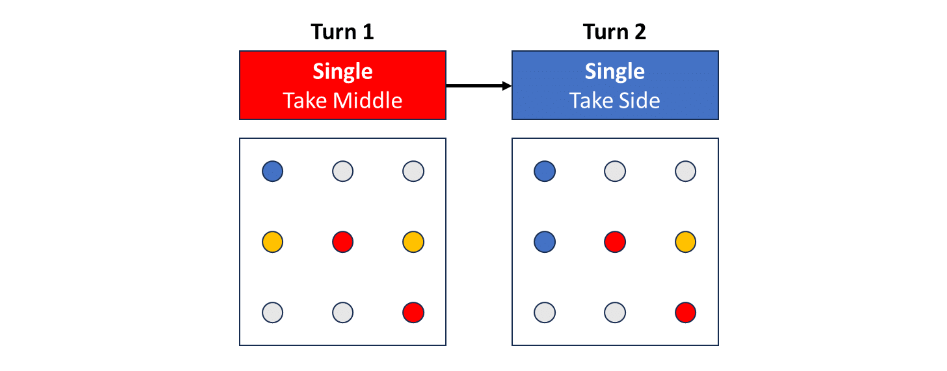
Now red goes again and draws another single character. If this character is located on red’s right side, they may not be able to get to the left and contest. We’ll assume that journey is too far so red uses the right-side unit to take the right-side objective. Red scores three and brings the struggle tracker on to their side of the board such that neither player gains momentum.
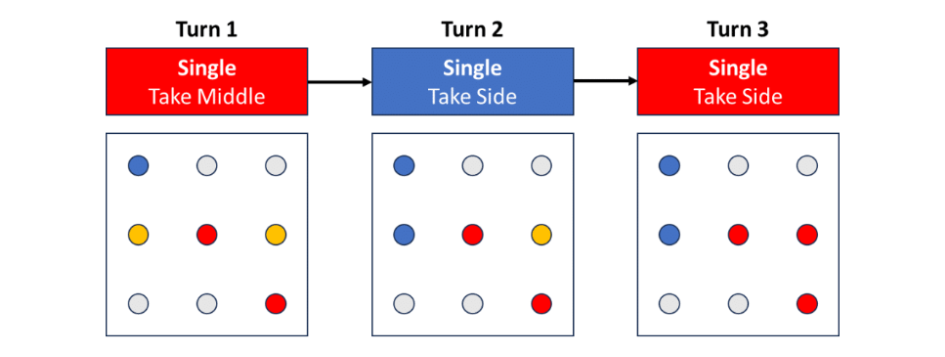
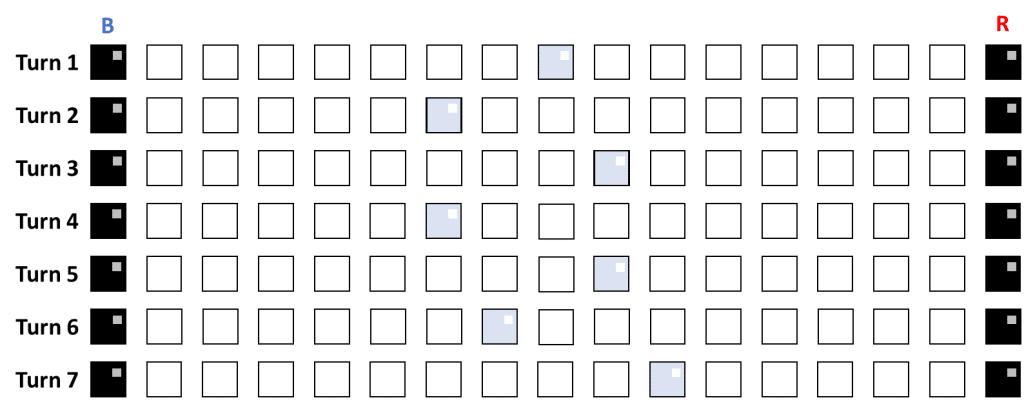
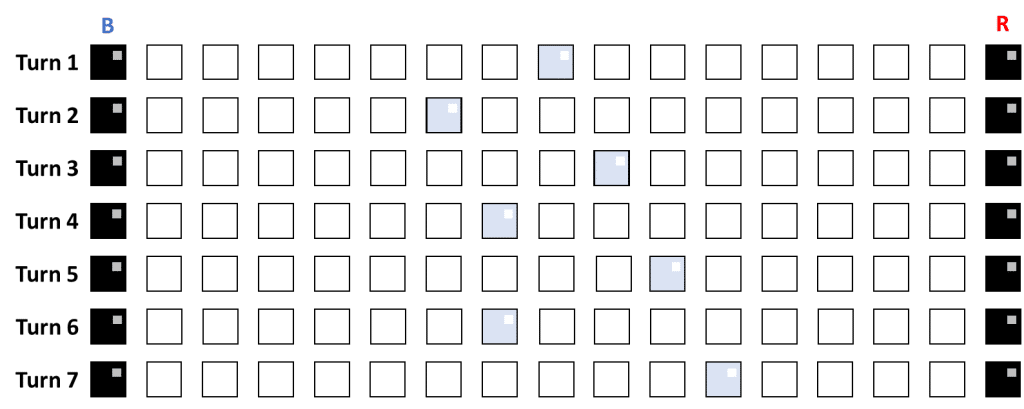
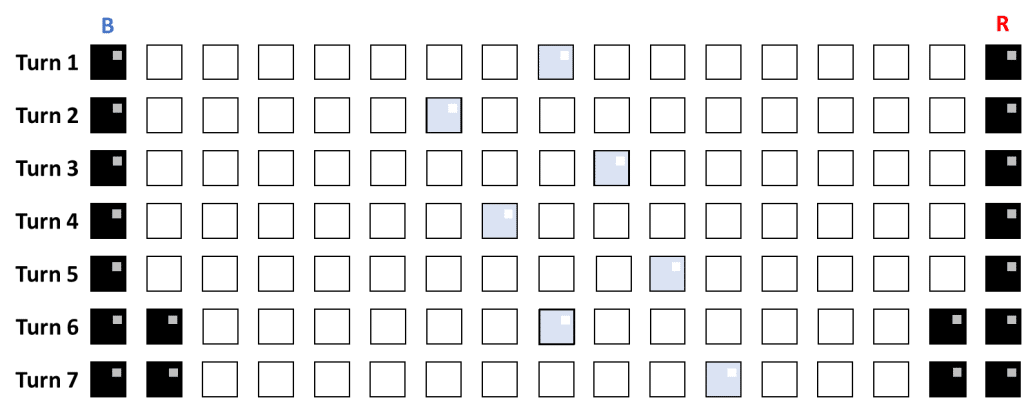
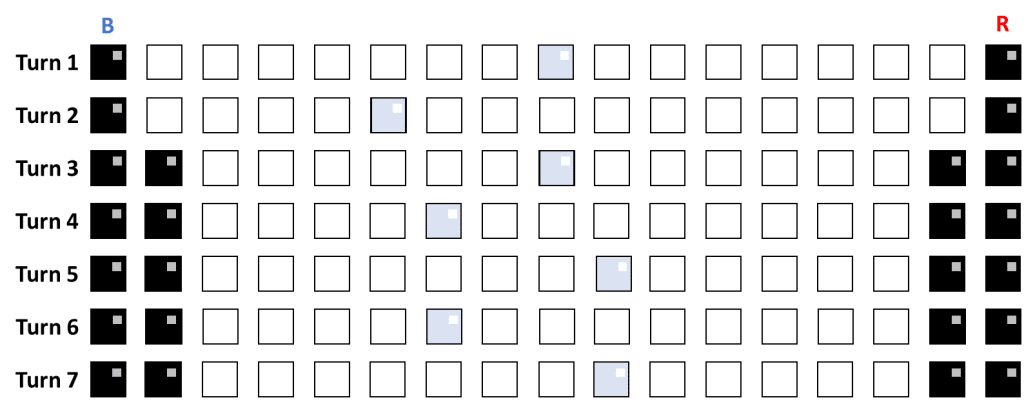
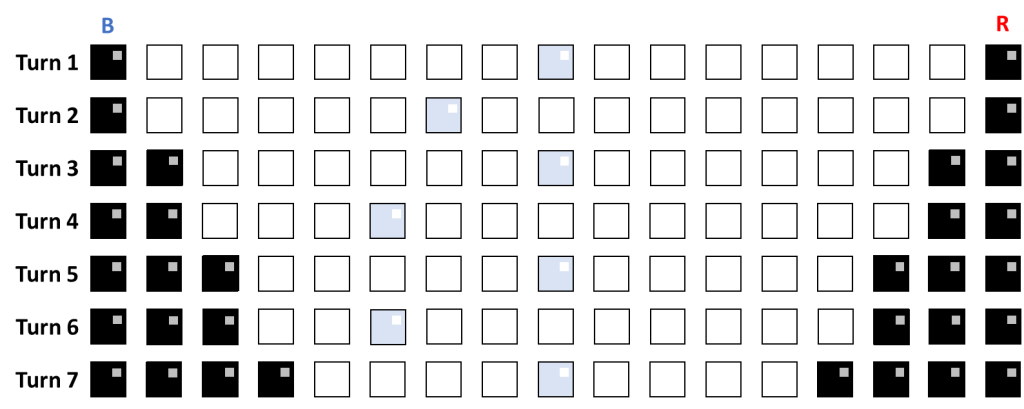
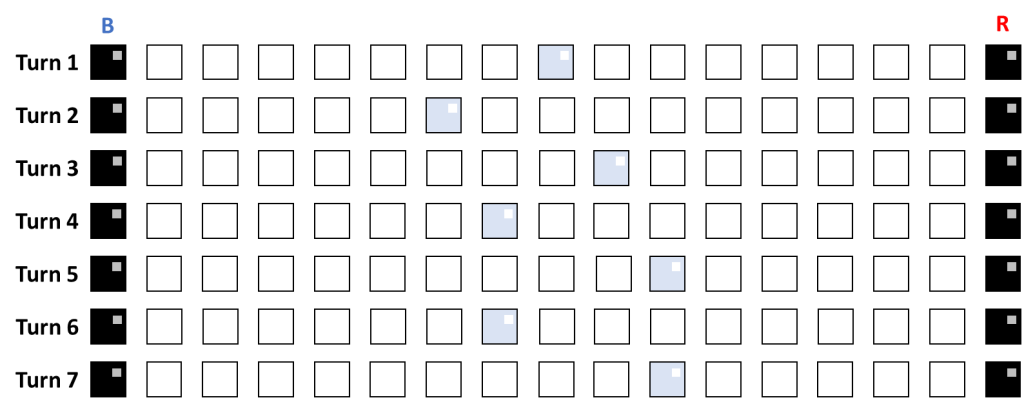
I won’t keep going with the detailed approach as that will quickly explode into way too many permutations. Given the board state at the end of turn 3 it would be fairly common for each player to flip one objective each turn for a little while, scoring 3 while the struggle tracker jumps across the middle each turn. This is a fairly neutral game state for each player and won’t shift much until one player cannot flip an objective on their turn or someone scores 4 in one turn. Below is an example of what the struggle tracker could look like for the first little while. There’s a good chance it will be a long first struggle.
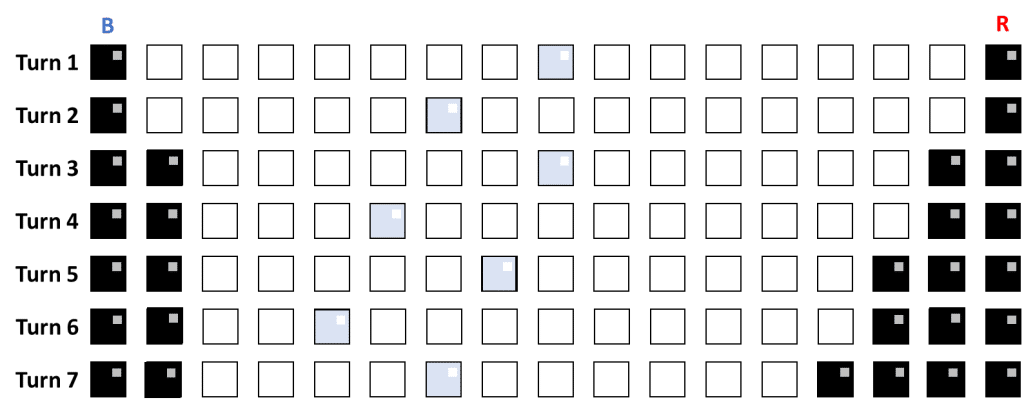
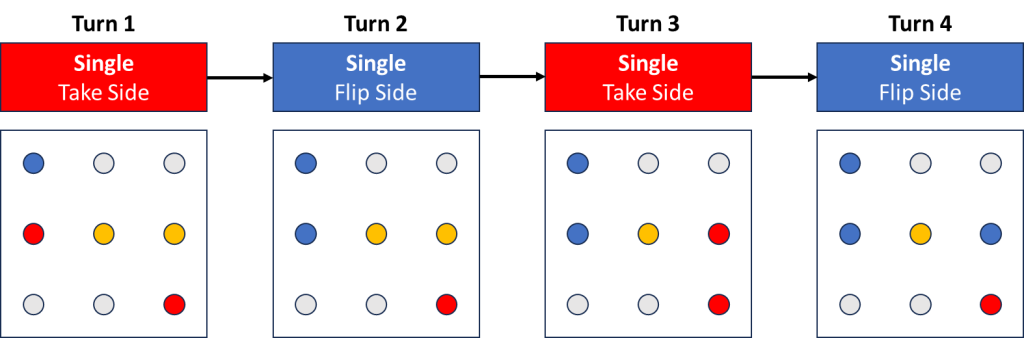
Let’s rewind one step back up the tree and assume red flips the side objective turn 3. They’ll still score three, but it will be much more difficult for blue to score three on the following turn since they’ll have to flip two objectives to do so. If blue can only flip one in response then they could quickly fall behind.
Now when we look at the example struggle tracker, we see that red is about one spot ahead compared to the first scenario. It can still devolve into each player mainly scoring three but now it’s slightly skewed towards red instead of blue. Overall, the game is still in a stalemate until someone scores two or four.
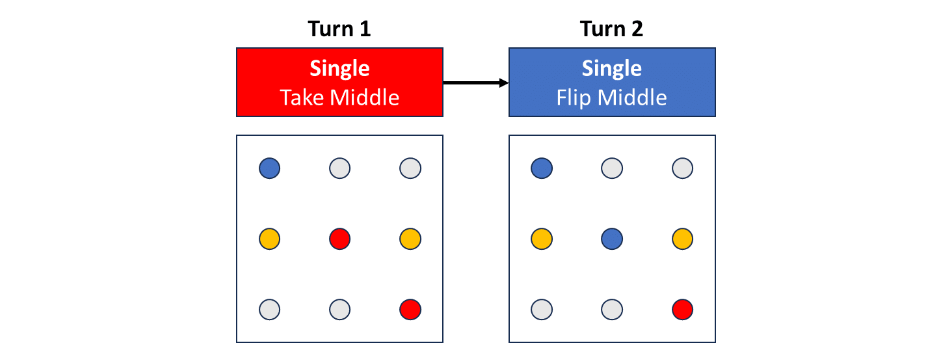
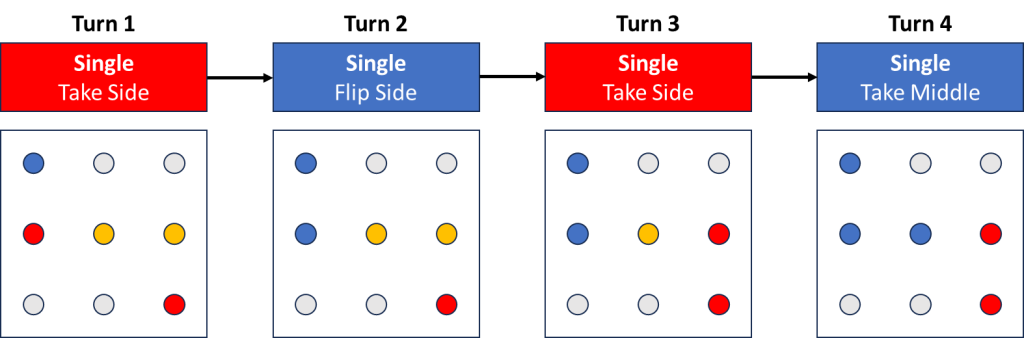
Flipping an objective seems good, so let’s travel back to turn 2 and say the blue player flips the center. They still score two points like before but they’re now in a better position going forward.
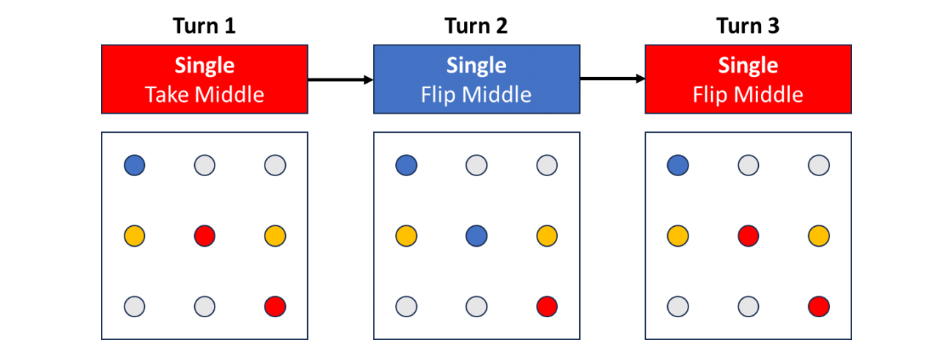
Drawing a single in turn 3, red can either retake the middle or take a side. Whoever they draw should be able to attack the middle. If red takes the middle they score two, bringing the struggle token back to the center and giving each player a momentum. If each player continues to score two then blue will eventually win. Obviously at some point one player will draw a dual-character unit and potentially score two, shaking things up. Either way, the slight edge goes to blue now.
On turn 3 red could elect to take a side objective instead, but that just gives blue more of an advantage. The next struggle tracker example assumes blue is able to flip the side objective next, which leads to a very strong position for blue.
Now, as much as I idolize Mr. Bean, I don’t really have the time to go through “all the possibles” and I imagine you, dear reader, don’t either. There are a ton of scenarios to go through still and things will get even more complicated when we move from singles to duals. So far we’ve seen that flipping a position is stronger than flipping a neutral position. This makes sense since you come out +1 either way but flipping also means your opponent ends up -1. To save some time going forward, we’ll mainly look at options where a player flips objectives and ignore the options where they don’t.
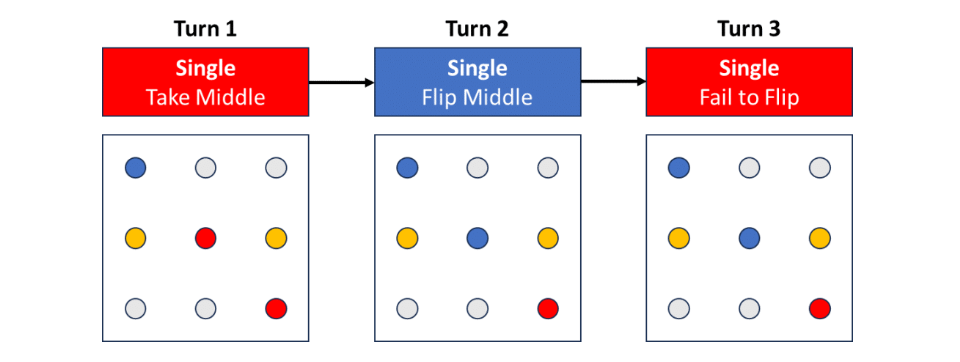
It does need to be said that taking a neutral position is still better than trying for an opponent’s position and failing to flip it. Consider the below scenario and an example of how scoring could look as a result. Is the situation unwinnable for red? No, they are getting a lot of momentum as a consolation prize and a few big plays could put them back in it. I’d waaaaay rather be blue in this case, though.
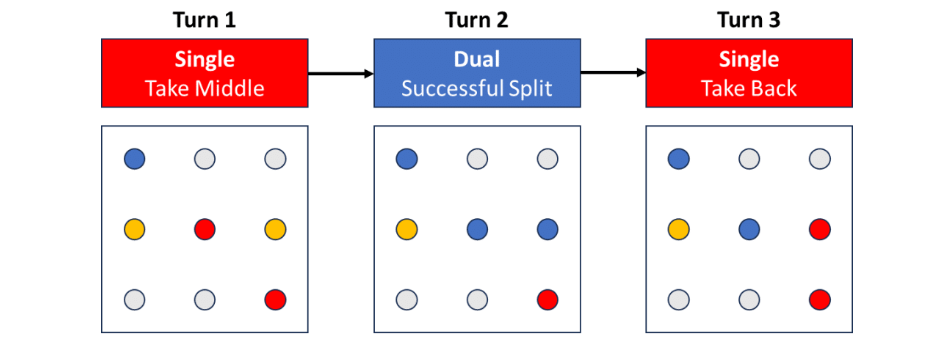
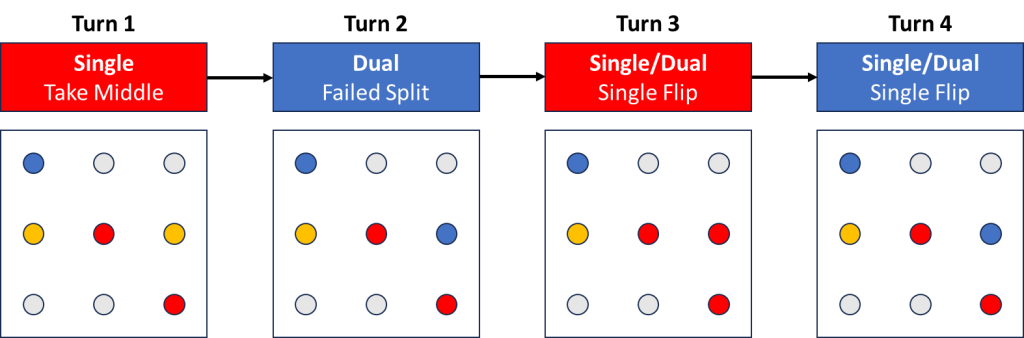
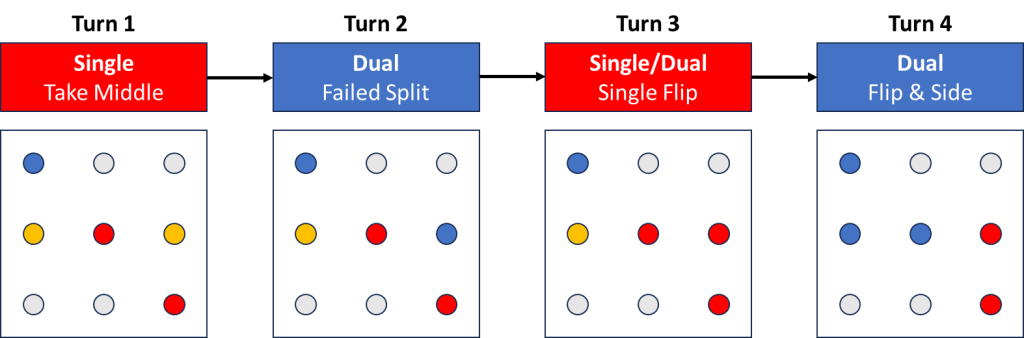
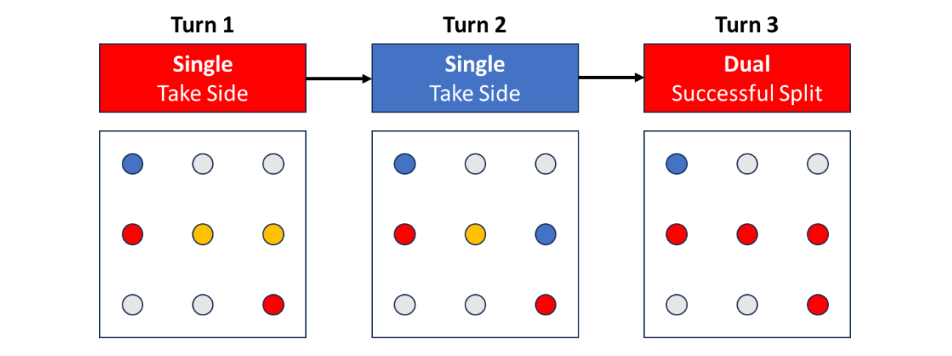
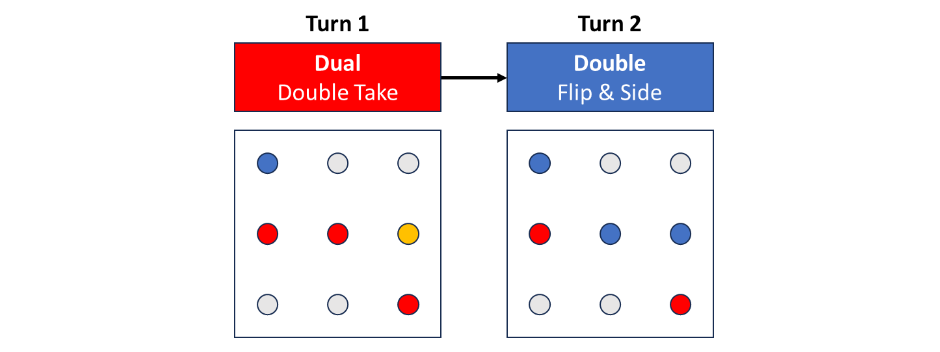
OK, time to make things a bit more complicated. Let’s introduce dual-character units into the equation! Turn 3 let’s say red draws a dual-unit, and assuming they want to flip the middle they can guarantee it by putting both bodies there. If they can also wound or remove the blue unit contesting there from turn 2 then red will be up 2-0 on the middle objective, making it harder for blue to flip it back. The example struggle trackers assume blue is not able to recapture the middle on their next activation. The result in the example is a fairly neutral game with red having perhaps a slight disadvantage.
If red splits their unit up and goes for glory, here is what it may look like if they successfully flip the middle and take a side. Red gains a big advantage if blue can’t flip back two points in a single turn.
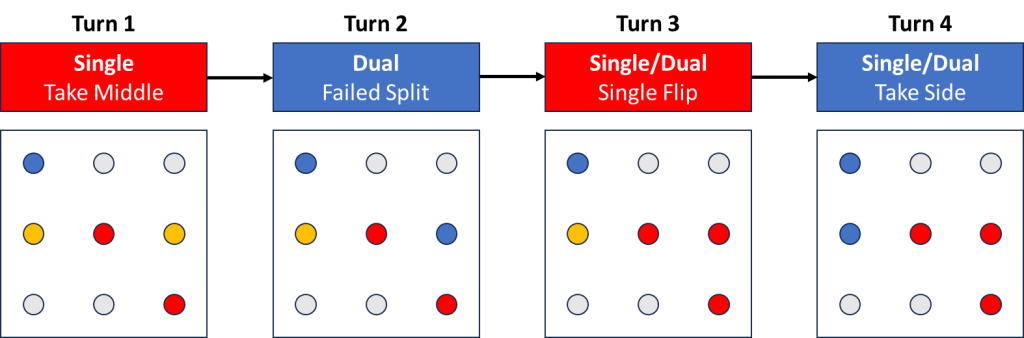
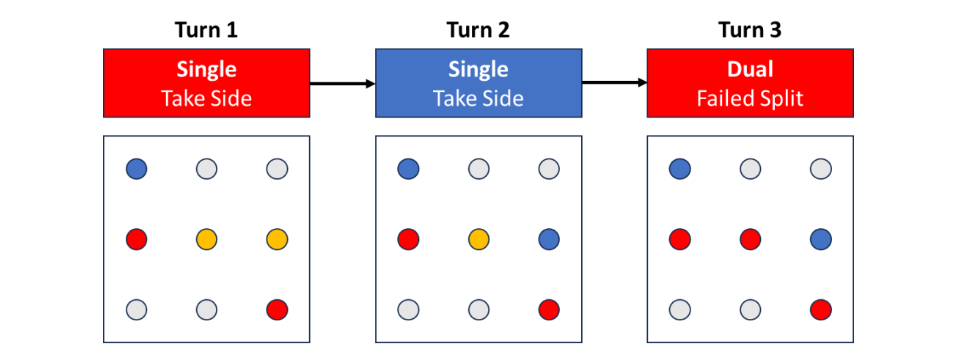
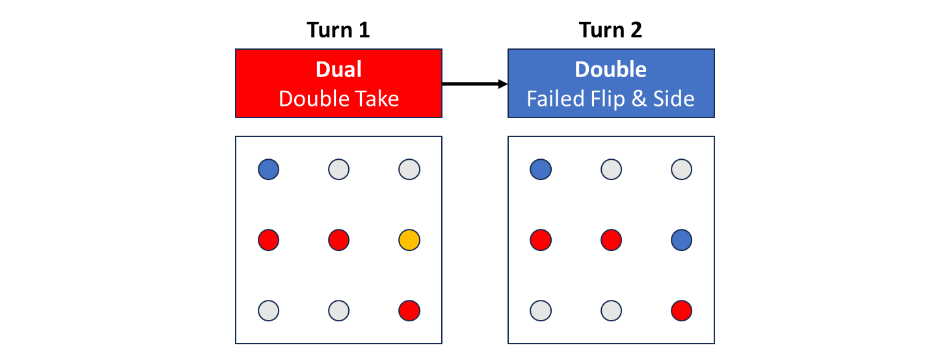
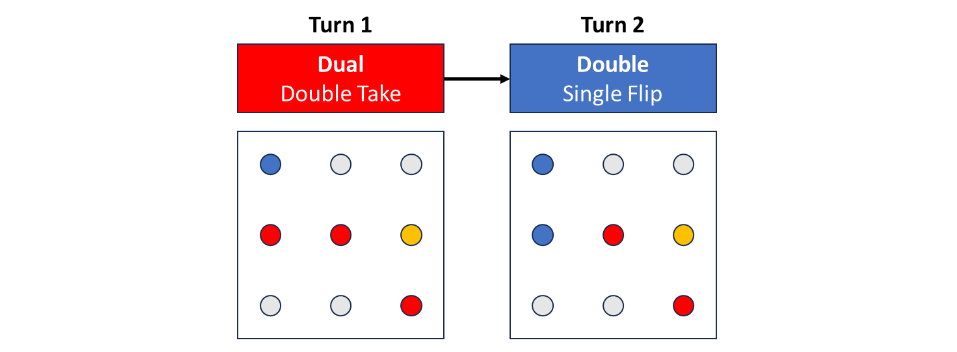
However, if red splits forces and fails to overtake the center, things could go poorly. How poorly depends on what blue can do next. Since red took a side objective, blue may draw a unit on the far side and have to settle for taking a neutral spot. I won’t go through the full 7 turn examples, but I will “unlock” the fourth panel in the colourful diagrams.
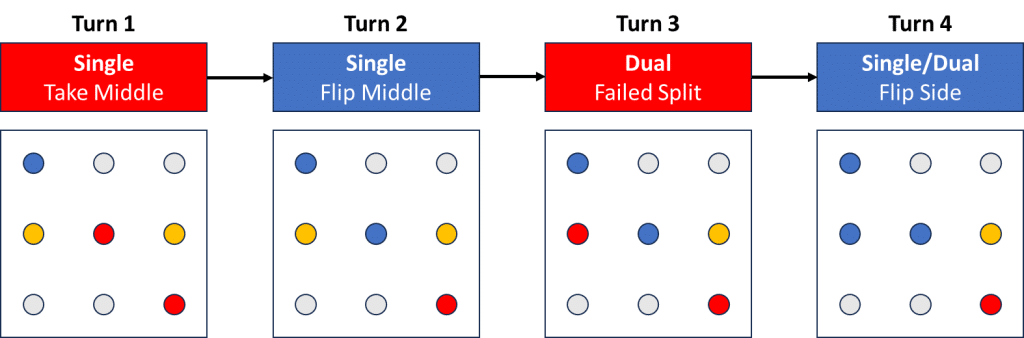

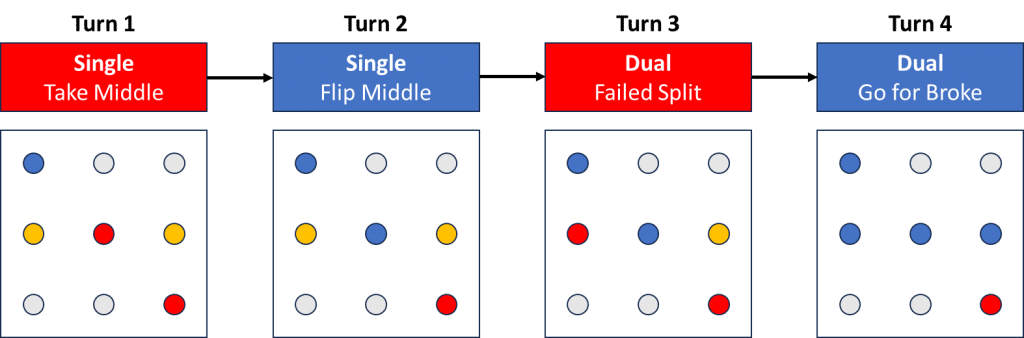
Scenarios A and B are most likely since Scenario C requires drawing a dual-character unit and making a cross-country journey to tap the far side objective. Not impossible, but unlikely. Scenarios A and C put red on the back foot whereas Scenario B is a fairly even start with a slight advantage for blue. Splitting forces and failing to take the middle can be bad for red, but succeeding can be really good. If you’re looking to become a better player, a good place to start is improving decision making around when to take such a chance and when to to play it safe.
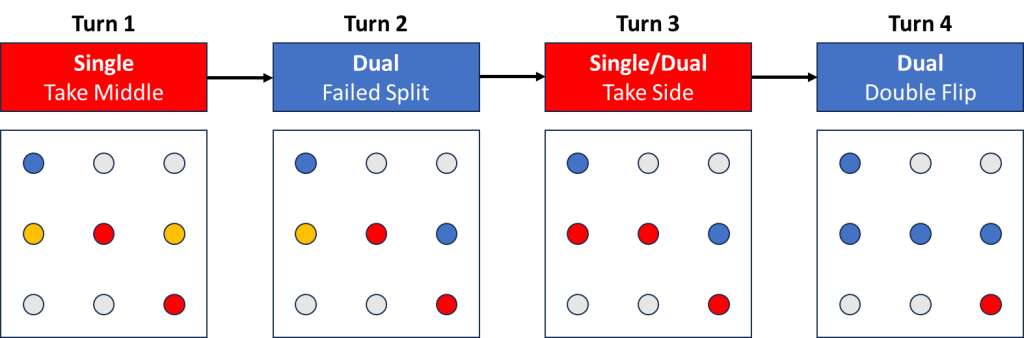
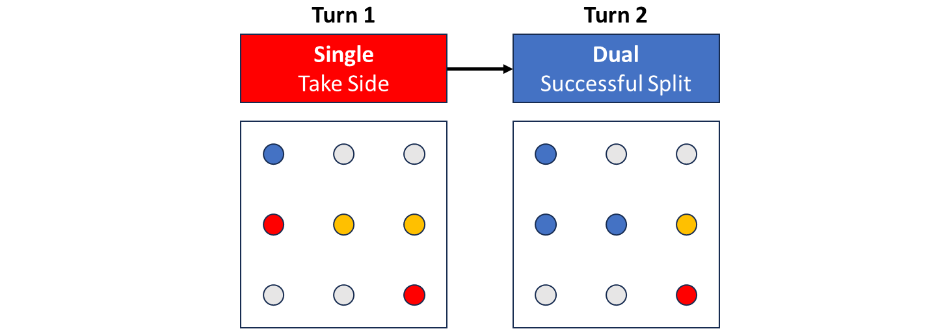
Alrighty, to finish up this section we need to look at blue player drawing a dual-character unit on turn 2. Technically they could put both bodies on the middle, but that will play out similar to a scenario we’ve already examined. The perks of diving the middle with both bodies is to guarantee a flip and to make it a bit harder to take back. To save a bit more time, as we continue examining dual-activations we’ll assume they go after multiple positions. This simplification doesn’t mean splitting up dual-characters is always the better play; splitting will often be higher risk, higher reward. It will generally make things a bit more fragile in the long run as well, which could cause a big lead to flip quicker than you’d like.
With all of that being said, blue player successfully splitting forces turn 2 would net them three points.

If red player then draws a single-character unit on turn 3, best-case scenario only flips one objective and scores two. That’s not a great spot for red as they’ll be playing catch-up for a while. Depending on draw, blue may have a choice on attacking the middle or the side. We’ll see later what the better call may be.
If red instead draws a dual-character unit, they could take both points back, which would likely result in a fairly even game.
Finally, let’s say blue goes for two objectives on turn 2 but fails to flip the middle. How bad are the consequences? Let’s go back to the four-box charts!


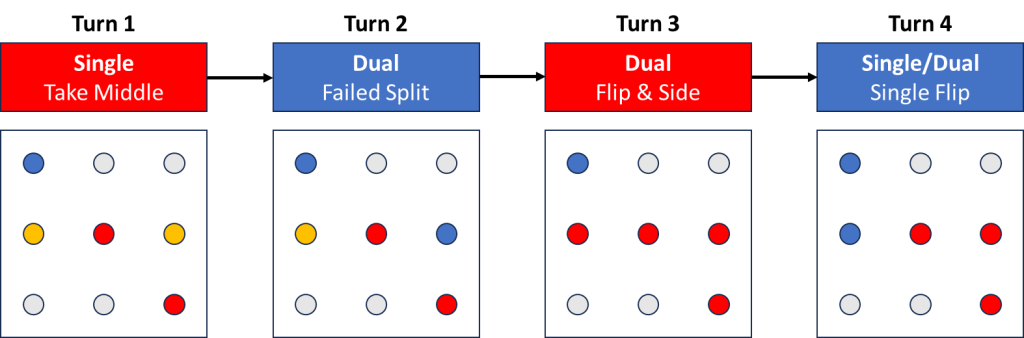
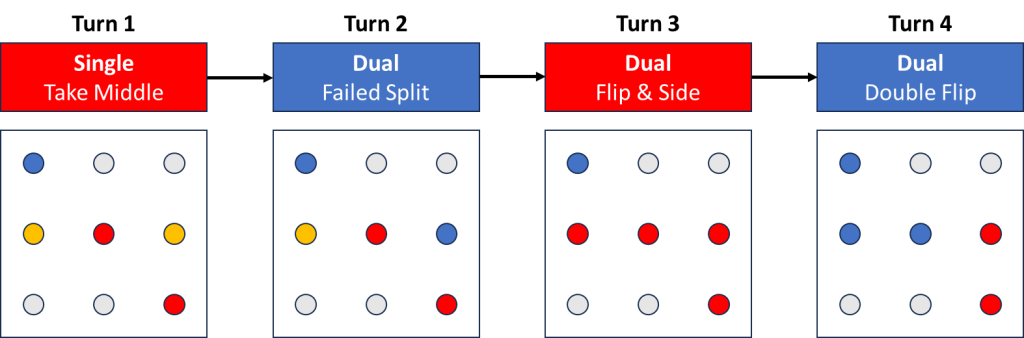
As a certain Neimoidian would say, “this is getting out of hand!” And yes, that’s a lot of scenarios. Almost like I’ve bitten off more than I can chew with this article. Fear not! Let’s get some quick summaries going.
Of the eight scenarios, I’d say five are fine for blue (F, G, H, I, K). Scenario D is semi-bad, while E and J are very bad. I’d say J is the worst-case scenario because it is less avoidable than E. Once again we see it is better to flip objectives than to take neutral ones. Overall, I’d say the downsides of a failed split for blue on turn 2 are less than the potential downsides for red doing the same on turn 3. Since they score first, blue can afford a little bit of a misstep early.
That about does it for option 1 – taking the middle with a solo unit on turn 1. A lot of the time this results in a fairly even game, but if one player ends up being favoured I’d say it’s blue more often than red. That is to say, the second player benefits more than the first player when the latter goes for the middle right away.
Option 2 – Contesting a Side
As we’ve seen already, flipping objectives is better than taking neutral objectives. Taking that into consideration, it would make sense that you would want to make it as hard as possible for your opponent to flip your objectives. If I am first player and I claim the middle objective right away, it’s quite possible that every single one of my opponent’s units will be in position to try and flip it. If I take one of the side objectives instead, now only about half of my opponent’s units can potentially flip it back right away.
The most basic scenario here involves each player starting with single-character draws and retaking the same point from one another. Score-wise this won’t play out much different than the very first scenario this article looked at, when the middle kept trading hands. As such, I won’t bother going through what the first 7 turns may look like. It will likely result in a fairly neutral start, the main thing here is that red has already committed two units to taking their left side. Going forward they’ll start to draw more of their right-side units, making it harder to protect and flip the left side should the need arise.
The next scenario is still all singles. On turn 3 perhaps red draws a right-side unit and can’t attack the left side. If red takes the middle it will be easier for blue to take back compared to the right side. Let’s break out the four-box layout once again to examine some possible responses from blue. The first assumes blue can flip the side immediately, putting them in a very strong position.
The second appears to be a bit more even, but if it devolves into a “I score three, you score three” sort of a game then blue is actually in a good spot. If the struggle tracker keeps bouncing between the middle spot and blue’s side then eventually blue will win the struggle if red can’t break the pattern.
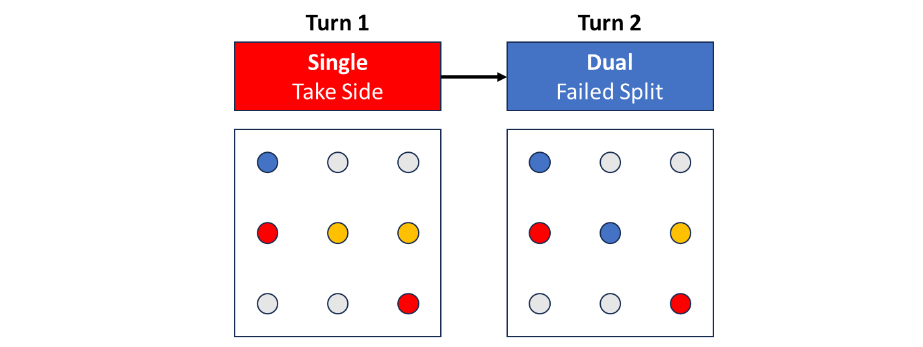
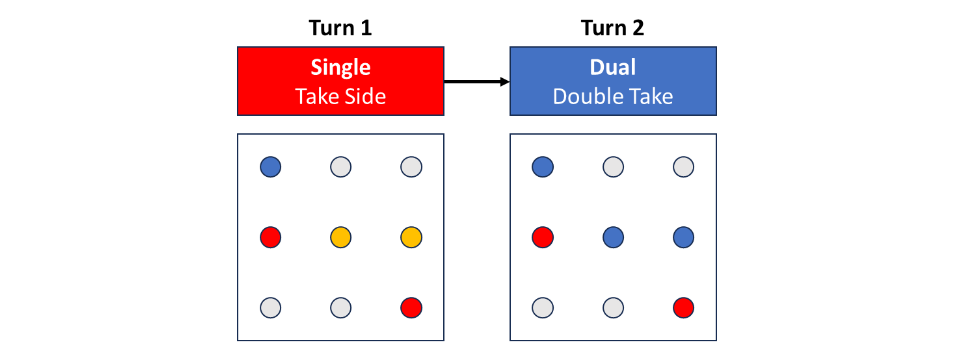
OK, so far we’ve seen a lot of scenarios where blue gains the advantage. Wasn’t taking the side supposed to be good for red? Well yes, good point. As noted earlier, the good thing about taking a side objective is that it’s harder to flip back right away, but so far we’ve only examined the times when blue is able to flip it anyway. Let’s now assume that on turn 2 blue draws a unit on red’s right side. Blue will probably attack the right side since it is safer than the middle. This early game will be fairly balanced with a small advantage to red.
If red can get dual-character unit turn 3 then it can get even better with a successful split.
And if red has an unsuccessful split, they still control three objectives at the end of turn 3, which should make for a balanced opening to the game. The “Failed Split” scenario is named as if red draws a right-side unit on turn 3 and fails to flip the right side objective, but drawing a left side unit and taking the middle would give the same result, just with some extra reinforcing bodies.
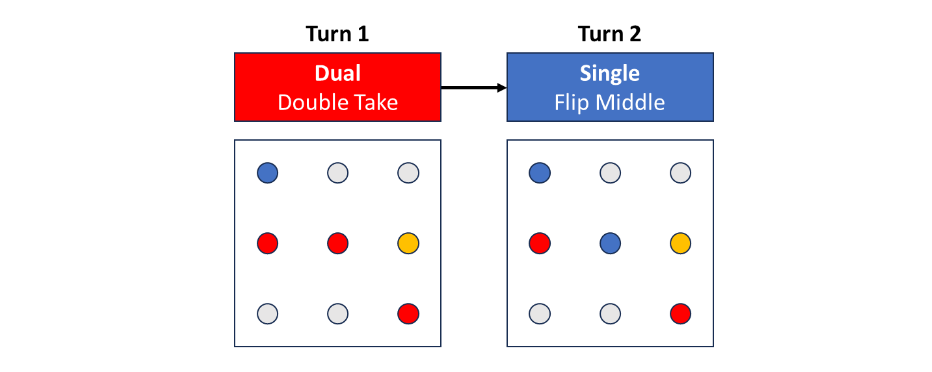
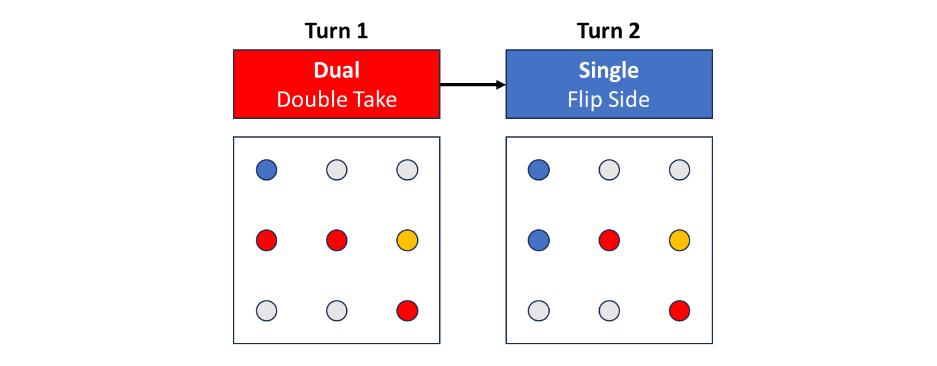
Finally, let’s take a quick look at what happens when blue gets a dual-activation on turn 2. I’m only going to go two turns deep just to keep things manageable.
We now have three very different scenarios in front of us. A successful split in Scenario L is obviously very good for blue, they should be set up to have an advantage in the early game. Scenario M could be very rough for blue because now the only midline objective they control is the middle, which is fairly vulnerable. I went in depth above with the consequences of a failed turn 2 split when red took the middle on turn 1. My verdict was that there was little downside for blue failing to flip the middle. However, now if blue attempts to split forces but fails to flip the red objective, I think the consequences will be worse. Finally, if blue draws a double-character unit on red’s right side then blue can go for the double take of neutral objectives. That should be an even start or advantage blue since it may result in the struggle token yo-yoing between blue’s side and the middle spot.
I wasn’t as thorough with option 2, but hopefully the main takeaway is clear – capturing side objectives is generally better than capturing the middle objective.
Option 3 – Do Not Contest
We’ll save discussion on this option for near the end of the article. What you have may noticed with options 1 and 2 above is that there seems to be a small second player advantage, on average. For now, let’s quickly check in on what happens when first player starts with a dual-activation.
First Activation – Dual
Let’s check in on first player’s options when drawing a dual-character unit to start the game:
- Contest one objective
- Contest two objectives
- Contest zero objectives
Does it bother me that I don’t have that list in order of increasing objectives contested? Yes, yes it does. However, I want to address the “don’t contest” approach with more context, so we’ll leave it for last.
Option 1 – Contest One Objective
For our purposes in this article, this choice isn’t too different from drawing a single-character unit and taking one objective. The main difference is that a dual-character unit is ostensibly more resilient. A single enemy with a shove in their attack tree cannot shove both characters off the objective and flip control. That single character would have to one-shot the defender to flip control (or have Force Push or similar). One-shots are not terribly unlikely in the right circumstances, as I’ve demonstrated before, but they are usually much less reliable than a simple shove.
To keep things relatively concise, for this option I’ll simply say “see above”.
Option 2 – Contest Two Objectives
OK, so technically you could try to capture both side objectives on the first activation, but that would be a long journey that may be impossible depending on terrain and the unit drawn. As such, we’ll consider only the option where first player takes the middle and one side.

If blue draws a single-character unit, the best course of action would be to try and take the closest red objective. This course of action would lead to one of two results (assuming the objective is successfully flipped). If blue draws a right-side unit and flips the middle, they are in a vulnerable position that could go south quickly if red can flip the middle back and score three on turn 3.
If blue draws a left-side unit and takes the side objective it could still go badly, but it’s less vulnerable so red may not be able to easily flip it back turn 3.
Now let’s say blue draws a dual-character unit on turn 2. Obviously a flipping both midline objectives would be a great turn, I’ll trust you know that by now and I won’t even bother putting the visual up. Similarly, splitting forces and failing to flip either objective would be disastrous. I won’t show that either, but it is a good reminder: splitting forces instead of guaranteeing an objective flip can be high risk, high reward.
What if blue splits forces, successfully flips the middle takes the neutral objective? They’ll score 3 and set up a scenario where the aforementioned yo-yo effect is possible. It’s neutral to good for blue.
If blue splits forces but fails to take the middle, they’ll only score two points. Red will then score three or four. Red should gain a solid advantage in this scenario.
Alright, finally we ask “what if blue doubles up and flips a single objective?” Great question, Matt! Blue will only score two points on turn 2, and red has a good chance to score three on turn 3. A lot hinges on turn 4 in this case; if blue can score three then it’ll be a fairly even. If blue only scores two again then red will be developing a solid advantage. For old time’s sake I’ll include a potential scoring pattern for the first 7 turns.
So what are the main takeaways here? For me, there are two.
The first player is generally much happier when they draw a dual-character to start. Not scoring turn 1 feels better when you at least come away with three claimed objectives. My second takeaway is a follow-up on that and a comment on an overall trend you’ve probably noticed: dual activations are strong. It turns out that the ability to take two objectives is better than taking one. Astounding breakthrough, I know.
I point back to my early comment that “dual-character unit” is just a label I use here and that it doesn’t just have to mean supports. Super Tactical Droids, Dooku, and sometimes General Grievous are all examples of single character units that can get extra bodies to the midline from deployment. Dash effects on multiple turns, such as a Rex activation followed by a Ponds activation, can have a similar effect. Part of the battle starts in list building, where you should try to get decent amounts of out-of-activation movement.
Option 3 – Contest Zero Objectives
The potential game states stemming from a “single” starting activation for first player were generally not too favourable. Game states stemming from “dual” activations were more favourable. As such, contesting zero objectives is more viable in the former scenario since you aren’t giving up as much. However, this whole analysis doesn’t really account for the downsides associated with aggressive play. Objectives you secure on turn 1 may not be yours by turn 3 anyway, but placing the unit in the midline exposes them to attacks. You could be back to square 1 with nothing but a hurt or wounded unit to show for it.
There are also long term effects to consider. For example, I’ve been enjoying a Padme/Mace list recently (PadMace, if you like). Thanks to Ponds’ Forward Scout ability and Padme’s Royal Command, I can secure all three midline objectives turn 1 with Padme on one side, ARFs on the middle and other side (terrain allowing). But putting ARF forward that quickly, especially with no defensive tech, is a recipe to get them wounded early and often. When the late game rolls around the ARF’s Coordinated Fire: Expose may be wildly expensive, making everything harder.
Given the risks, it’s definitely defensible to not contest any midline objectives turn 1, even if you draw a dual-character unit, and instead set up for future success. However, setting up for future success often means putting a unit within dashing range of a midline objective, which is still far enough up the field that they could suffer some rough attacks. In that case you still end up damaged but you don’t even have a claimed objective to show for it.
Choosing not to contest turn 1 is not always the right call, but I do think it is plenty viable. Early cagey play in general will probably become more popular as the game goes on, but that’s just my guess. Try it out, learn from the experiences, and come to your own conclusion!
Wrap-Up
Before we get to all the final conclusions, I’d like to give a reminder that, despite being very long and including a lot of pictures, the above analysis is very simplified. Terrain layout will change how accessible each midline objective is, downstream effects of positioning choices have been largely ignored, and the probability of successfully flipping objectives has not been examined. Usually I am assuming each player is flipping at least one objective a turn if they choose to, but even one failure to do so could be a big setback. For this reason I put a high value on units that have good access to one or more shoves early in their combat tree. In my article detailing strike team building I suggest a lot of units that can shove and a lot of ways to move units out of activation. I hope I have demonstrated here some good reasons why those are very valuable things to have.
There is a temptation to look at all of the scenarios above, throw your hands in the air, and just say “it all depends on what units you draw from the order deck!” You may think that the player who gets a better draw order will win. While card draws are important, you have more control than you think! Claiming a middle objective turn 1 can mean all of your opponent’s draws are good, whereas claiming a side objective can significantly reduce that number. Deciding when is a good time to split forces and when is a bad time is a great avenue of skill expression. The same goes for deciding when to play aggressive and when to be cagey. One big takeaway is that two, three, or four rounds into the game, there are almost no positions that are unsalvageable. While I acknowledged one player gaining advantages, it was never “this player should now win easily”. Poor early draws may just mean that all your big pieces are coming late in the deck, so do what you can in the meantime and be ready to make big plays later. The momentum mechanic helps keep you in the game and things can always change in the blink of an eye.
Without further ado, I will leave you with these general summary points that I will be trying to remember following this analysis:
- It is better to flip enemy objectives than to claim neutral objectives
- Side objectives are generally safer than middle objectives
- Splitting up bodies can be high risk, high reward
- Shoves and out of activation movement important and need to be considered when list building
- Not contesting turn 1 can be a viable choice
Even diving just 2-4 turns deep we saw an incredible number of possible ways the game can play out. When you think about the first 14 turns (one full deck shuffle, about how long the first struggle lasts on average) it’s a mind boggling number of permutations. Even the great Mr. Bean can only think through so many on paper so get out there and get reps, reps, and more reps, learning from each one!

